Android synchronization allows you to continue working with the same files on different devices, always having access to contacts, email, photos, etc. However, it is useful to know how to disable synchronization on Android, because sometimes it is necessary, for example, to reduce traffic consumption or reduce battery consumption battery (programs, when synchronized, do not allow the processor to go into deep sleep, which speeds up discharge) by the operating system.
You can deactivate it in less than a minute, and we will tell you how to do it correctly. We will also describe ways to remove synchronization not only with the main Google profile, but also with other services and applications that lead to rapid drainage and loss of Internet traffic.
What problems are associated with this feature?
Uploading information to the cloud comes with a sea of problems. Often, they occur from Chinese manufacturers or on re-flashed smartphones. Among the common cases:
- Duplication of contacts in the phone book due to algorithm errors when checking identical numbers;
- Periodic freezes and slowdowns of the device due to problems connecting to Google servers. This causes cycling and overheating, in some cases critical errors;
- Battery drains quickly.
For information: Are duplicate numbers in your phone book annoying? Read how to remove them in the material: “How to delete copies of contacts on Android”
Disable automatic backup on iPhone
Apple mobile phones create their backups on iCloud, allowing you to practice all the settings and preferences, and they can be quickly exported from one smartphone to another using just our e-mail account. In this case, we can load backups with a complete solution, choosing not only whether we want to turn them off or on, but also choosing what we want to copy and what not.
iCloud backup is only created when we're connected via Wi-Fi, so we don't have to worry about Apple's Automatic Backup draining our mobile data speed. To carry out the process, you simply need to do the following:
- Go to Settings.
- Click Device Name.
- Now we find and log into iCloud.
- And finally, select iCloud Copy.
In this case, the backup is performed daily while we are not near the device. This will not change even if we check or uncheck some applications or OS services that do not create a backup, and this will only be done for those that remain active.
Can I schedule a backup?
One of the wishes of many Android and iPhone users is the ability to create scheduled backups, but unfortunately, neither operating system supports this feature. The decision is made by the smartphone, we choose a moment when we are not using the mobile phone and for which we are not concerned that the backup affects productivity.
The only way we should simulate a backup schedule is to create backups manually. You just need to go into the backup settings for Android to click on “Back up now”, which we have to do every time we are going to change the mobile. The same thing happens on iPhone, you just need to click on "Back up now" which is the closest thing to deciding when the copy will be created.
Prohibiting synchronization with other services
Xiaomi, Meizu, Samsung offer their cloud storage services, and I force you to register with them. This is useful because it stores settings for your calendar, music, photos, and contacts. But, as in the previous situation, this can get in the way if, for example, you reject the Xiaomi ecosystem in favor of the one proposed by Google.
To prevent your phone from exchanging data with developer services, just take a couple of steps. Let's demonstrate this using the example of Xiaomi.
- Launch Settings.
- Scroll to the “Accounts” section and select “Synchronization” there.
- At the top of the list, find the line “Enable synchronization”, turn the switch to “OFF” mode.
- Now the gadget does not synchronize the contents of the phone.
Using this scheme, you can disable synchronization with any services of the smartphone manufacturer.
How to turn it on?
You won’t have to spend a long time figuring out how to enable synchronization: it is performed in almost the same sequence. The only difference between the two procedures is checking the boxes and activating the synchronization switches, which allow the smartphone to save data to the Google account again.
Synchronization is tightly integrated into all new smartphones running on Google's operating system. This causes a large number of problems, including rapid battery drain. In this article we will look at how to disable synchronization on Android .
Content
How to choose what information to sync with your account
Select "Accounts and Backup" or "Cloud and Accounts." If there is no such item, proceed to the next step.
Select "Accounts".
Select an account, in our example we select a Google account. If there are several accounts, select the one you need.
If the account you need is not on your device, register it (if the account has not yet been created) or log in to it (if the account has already been created).
Select Account Sync if you have one. If there is no such item, go to the next step.
A list of data that is synchronized with your account will appear. Enable synchronization of the data you need. If you don’t use anything from this list, feel free to disable it.
The vast majority of modern Android smartphones have a standard option for searching for identical contacts. It is usually located in the contacts section of the settings item, where it is possible to find and combine entries with identical phone numbers or email addresses. Therefore, if duplicates are bothering you, it’s worth spending a couple of minutes studying the phone book menu to solve the problem once and for all.
There can be a lot of reasons for their appearance - you wrote down one number under different names, changed the SIM card, incorrectly configured the function for saving contacts, or you were “helped” by applications that have synchronization active. Be that as it may, you need to deal with duplicates and you don’t have to do it manually.
1. Using Google. Contacts"
If synchronization of contacts with your Google account is enabled on your smartphone, then you can simply go to the Google website. Contacts" and select the "Similar contacts" section. In it you will already see duplicates that can be combined with one click. And then the smartphone, if automatic synchronization is enabled, will independently update the phone book and delete duplicates. If synchronization is not enabled, then it will be possible to bring the entries on the website and in the smartphone to a common denominator using manual synchronization.
2. Using the function built into the smartphone
The vast majority of modern Android smartphones have a standard option for searching for identical contacts. It is usually located in the contacts section of the settings item, where it is possible to find and combine entries with identical phone numbers or email addresses. Therefore, if duplicates are bothering you, it’s worth spending a couple of minutes studying the phone book menu to solve the problem once and for all.
3. Using third party apps
4. Manually
When there are not many identical contacts or you are not ready to entrust such an important task to programs, you can get rid of duplicates in the phone book manually. To do this, you just need to independently select those records that you want to turn into one, and then select the function of combining several items together.
5. Disable the ability to display/create duplicates
A less radical way to deal with duplicate contacts is to simply disable the display of entries in the phone book, for example, from a SIM card or instant messengers, which often cause duplicates to appear. If this doesn’t seem enough to you, then the same messengers can generally be prohibited from synchronizing contacts in the settings.
As you can see, there are a lot of reasons for the appearance of duplicates in the phone book, but there are no less opportunities to combat this scourge. But there’s nothing complicated about it - just choose a method you like and spend a few minutes to get rid of identical contacts on your smartphone.
Don't forget to read the comments, there is also a lot of useful information there. If your question is not answered, but later comments are answered, then your question is answered in the article, respect other people's time.
Disable synchronization
Typically, all processes for updating information on the device are handled by Google services. That is, by disabling them, the user automatically disables all types of synchronization. However, it is not necessary to disable the entire package of services; just log out of your Google account, or disable synchronization in the device settings (that’s what the section is called). However, when it comes to other applications, the shutdown algorithm is slightly different.
For applications
Here we will look at how to disable the function for individual applications. Let us remind you that when automatically updating information about applications, the first thing that is recorded is all user settings, passwords and current progress (if any). Algorithm of actions:
- Open the application you want to unlink from your account.
- Click on settings inside the program.
- Find the "cloud" section.
- Find your Google account and click the “Disconnect”, “Unlink”, or “Cancel” button.
- Do the same operation with other accounts to completely turn off downloading.
Please note that this is only a sample algorithm, as the interface of each program is unique and may vary.
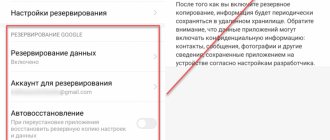
Disabling data backup to Google Drive
Google Drive is a single storage for user files for photos, contacts and other resources. Without a subscription, the account owner is given only 15 GB of free disk space, so on some devices the reservation should be disabled. To do this, follow the steps below:
- Open the Google Drive app. If necessary, sign in to your account.
- Click on the three lines in the upper right corner (menu).
- Select the gears (settings) icon from the menu that opens.
- Open the “Backup and reset” subsection.
Then the installation wizard will tell you what you can disable and what you shouldn’t. By default, backups are disabled. Please note that such changes will affect photos and even Gmail.
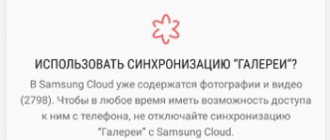
How to disable photo synchronization?
There are three event scenarios:
- Photos are copied to Google Photos but remain on your device.
- The photo is copied to Google and deleted from the gadget automatically.
- The photo is not copied, but remains in the internal memory.
So, to remove auto-sync, you need to do the following:
- Open the Gallery.
- Click on the gear icon or three dots (one of them will be settings).
- Uncheck all the boxes that mention copying.
- Open the Google Photos app.
- Click on the avatar icon, and then on the “Settings” item.
- Go to the “Startup” subsection.
- Try unchecking the corresponding item.
Ready. In fact, photos from Google Photos also end up in Google Drive, so this way you will first free up space there.
How to remove contact synchronization from Facebook Messenger mobile phone
Step 1 Login to the Messenger app and tap on your avatar.
Step 2 Once inside, among the various options that you will be able to see, click on the “People” button.
Step 3 Now you will get a new screen where you will see 4 options, click on “Upload Contacts”.
Step 4 Finally, you will see the following. You have to click on the "Deactivate" button and you will be deleting Facebook contacts synchronization with your mobile phone in these simple steps.
It's so easy to activate and deactivate synchronization of contacts from your phone book with Facebook Messenger.
Solving some problems
There may be cases when you need to turn synchronization back on, or it does not work initially. In this case, you need to do it manually once, look at the problems that have arisen or their absence. For this:
- Open settings.
- Go to the "Accounts" section.
- Select your Google account.
- Click Sync.
- If it goes smoothly, then rejoice. Otherwise, look at which service is not syncing and clear the cache for it.
Thanks for reading.
How to disable photo synchronization?
The Google Photos app (pre-installed on most Android devices) offers a great feature - automatically saving photos and videos to a cloud service that helps you access photos from any device. But some users, despite the usefulness of this functionality, prefer to abandon it.
You won’t be able to do this through the “Accounts” menu, so you’ll have to work directly with the program.
- Launch Google Photos.
- Tap on the three stripes icon located in the upper left corner.
- A window will pop up with a list, select “Settings” there.
- After that, click on “Backup and Synchronization”.
- At the top there is an option responsible for auto-uploading photos to the cloud and forcing it to turn off.
- Turn it off by moving the slider.
Below there are also options for changing the image upload quality. You can reduce (not recommended, as the detail of the images will drop sharply) or increase the resolution to the original one. This will make it possible to view photos without compression from any device.