Good time! All you need to know about DFU (Device Firmware Update) mode is that it allows you to put your iPhone or iPad into a state where it is possible to completely restore the iOS system - after this operation your gadget will be “like new”.
No, scratches and abrasions will not go away; simply restoring the firmware via DFU will not get rid of it :( But the inside of the device will be “clean”!
Why is this even necessary? Various software failures, proper removal of jailbreaks, beta versions of software, demo iOS firmware - all this can be cured and corrected only by completely reinstalling the system. Which, in turn, cannot be completed without entering this mode.
As you can see, DFU is a useful thing. And now is the time to learn how to use it all. One two Three. Go!
Putting any iPhone or iPad into DFU mode (if it has a mechanical Home button)
Follow these steps in sequence:
- Launch iTunes and connect your phone or tablet to your computer.
- Turn off the device (it should still be connected to the PC).
- Press and hold two buttons at the same time - Home (under the screen) and Power (located on the top edge of the device, except for iPhone 6 and older versions - here it has been moved to the right side).
- We wait 10 seconds and release the Power button while holding the Home key.
- Continue holding the button for about 10 seconds.
- After a while, iTunes will notify you that the program has detected the device in recovery mode.
- Finally releasing the button
That's all, you can safely start restoring the firmware! The only thing is to avoid mistakes, use only original wires. Of course, non-certified ones can also charge (if used correctly), but they don’t handle software updates very well.
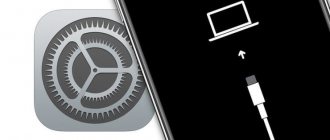
By the way, when transferred to DFU, iOS devices do not show any signs. That is, the screen is completely black, nothing is written on it, there are no identification marks and no characteristic sounds are played.
Only iTunes will inform you about the successful result of all manipulations performed. Here's a sign like this
Recovery using iTunes
Warning : When you restore DFU to your device, your computer erases and resets every bit of code that controls the software and hardware on your iPhone device. There is a possibility that something will go wrong.
If your iphone device is damaged in any way, especially water, restoring it may break it. I've worked with clients who tried to put dfu into their iPhones to fix a small problem. But the water damaged another component, which prevented it from being restored. A stable iPhone mobile device with minor problems may become completely unusable if DFU restoration fails due to water damage.
How to put iPhone 7, iPhone 8 and iPhone X into DFU mode?
A small update to the article related to the release of the iPhone 7 (Plus), iPhone 8 (Plus) and iPhone X. As you know, the Home button in these models has ceased to be mechanical (in the “top ten” it was removed altogether) and is no longer pressable as before. How now to enter the DFU?
Everything is very simple, here are short instructions:
- Launch iTunes and connect the iPhone to the computer.
- Turn off the gadget.
- On the phone we simultaneously press two buttons - power and volume down (!!!).
- We wait 10 seconds and release the power button, but continue to hold the “volume down” button.
- After 5-10 seconds, iTunes will see the device in recovery mode.
- Release the volume down key.
Congratulations, your iPhone has entered DFU mode, you can start restoring the firmware.
Recovery
If everything is done correctly, the tablet screen will remain black. Restoring an iPad in DFU mode begins with a message appearing on the computer screen indicating that the gadget has been transferred to a certain state. Be sure to make sure that iTunes is running on your PC, since all processes will take place through it.
The window that appears on the monitor will contain a message stating that iTunes has detected a device that has been transferred to recovery bypassing the OS. You will also see text stating that for normal operation you need to restore the tablet software. That's it, there is no turning back. You just need to agree to the request and the process will begin.
iTunes must be running for DFU to work.
Be sure to make sure that the tablet has a black screen with nothing on it. As you can see, putting the iPad into DFU mode is not that difficult—it only requires a little skill. Now let's look at how to properly remove the gadget from this state.
How to enable DFU mode on iPhone XS, iPhone XS Max and iPhone XR?
The devices are new, but entering the Device Firmware Update mode is carried out in the old way (exactly the same as in the “eight” and iPhone X).
However, as Malakhov says, do not rush to switch.
For those who have problems activating DFU mode using the method from the previous subheading, there are slightly modified instructions.
Hopefully this will be a little easier.
So, enter iPhone XS, iPhone XS Max and iPhone XR into DFU:
- Turn on iTunes and connect the phone to the computer.
- Press the power key and wait.
- The “Turn Off” slider appears. We wait and do nothing. Don't let go of the power button!
- After some time, the phone screen will turn black.
- Press and hold “Volume Down” (while continuing to hold the power button!).
- After 5 seconds, release the power button (“Volume down” still held!).
- After 5-10 seconds, iTunes will see the iPhone in DFU mode.
- Victory!
Let me remind you that these instructions are suitable for any iPhone starting with iPhone 8. Let’s use it!
Recommendation: Use iOS System Recovery as an alternative to DFU mode
In fact, you can use Apeaksoft iOS System Recovery to fix iOS system errors without losing data. Thus, it can serve as an alternative to iPad DFU mode software to solve various system problems of iPhone, iPad and iPod Touch.
- Return iPhone from DFU Mode, Recovery Mode, Apple Logo, etc. to Normal on Mac or PC.
- Support iOS 12/11 and latest iPhone X/8 Plus/8/7 Plus/7/SE/6s Plus/6s/6 Plus/6/5s/5c/5/4S/4 etc.
- Secure, clean, easy to use interface.
- Does not cause data loss when restoring iOS system.
Step 1. Launch iOS System Restore
Download the iPad DFU mode alternative to your computer for free. Later, select "iOS System Recovery" from the main interface.
Free Download Free Download
Step 2. Connect iPhone to PC
Connect iPhone to your Mac or PC. Keep in mind that your iPhone/iPad/iPod will be updated to the latest version of iOS.
Step 3. Enter DFU mode
Click the Start button and put your Apple device into DFU mode by following the onscreen instructions.
Step 4. Check the detected information
You need to take a look at the detected information of your iPhone/iPad/iPod. Otherwise, your iOS device may be locked during repair.
Step 5. Fix iPhone/iPad/iPod System Errors
Click the "Restore" button to start booting and restoring your iOS device to its normal state.
DFU mode for iPhone 11, iPhone 11 Pro, iPhone 11 Pro Max and iPhone SE (2020). Instructions!
Were you hoping for something new? In vain. Nothing changed.
Activating DFU mode for iPhone 11 (Pro, Pro Max) and iPhone SE (2020) occurs exactly the same as in all other iPhones (starting from the “eight”).
Therefore, if you are the happy owner of an iPhone 11 (Pro, Pro Max) or iPhone SE (2020), then I can only envy you. To transfer your smartphone to DFU mode, use the instructions found in the previous subheading.
What is iPad Recovery Mode for?
As we already said, there are many glitches and situations that may require you to switch DFU mode on your iPad. Here are some of the most common:
- iPad won't turn off.
- iPad won't turn on.
- The application does not close.
- The device is completely locked.
- You need to restore the operating system.
- Can't connect iPad to iTunes.
- You want to install an older version of the software (iOS/iPadOS).
How to enable DFU mode on iPhone 12 mini, iPhone 12, iPhone 12 Pro and iPhone 12 Pro Max?
In 2022, Apple introduced simply a huge number of smartphones.
Tim Cook, why so much? Come on stop it! Otherwise, I’m already tired of understanding all these “twelfth apples” models. There are too many differences between them!
Fortunately, at least in some ways they are the same - any iPhone 12 (mini, regular, Pro, Pro Max - it doesn’t matter) is entered into DFU mode with a single combination:
- Launch iTunes and connect the iPhone 12 to the computer.
- Consistently press “Volume Up” (immediately release), “Volume Down” (immediately release) and the “Power” button (hold).
- As soon as the screen goes completely dark, press and hold “Volume Down” (while continuing to hold the “Power” button!).
- We count down 5 seconds.
- Release the “Power” button (continuing to hold “Volume Down”!).
- We wait (holding Volume Down) until iTunes detects the iPhone in recovery mode.
Hooray! Our iPhone 12 has successfully entered DFU mode - we can start restoring the firmware!
Software Update
When the smartphone is in this state, you need to connect it to the computer, go to iTunes and just wait until the PC recognizes the phone. There is nothing complicated about this. Soon after connecting, you will see an icon of your iPhone. DFU mode does not affect this in any way, so you don’t have to worry about how the device will behave.
Your further actions should be aimed at updating the firmware. This is quite simple to do: go to the panel displaying the status of your device and select the “Update” button. This will reinstall the operating system on your iPhone. The DFU mode will be removed only after this process is completed.
An alternative action is the recovery procedure. You can activate it with the corresponding button here on the status bar. With its help, the firmware will not only be updated to a newer version, but all personal information of the user will also be erased from the phone. The iPhone will thus be launched with factory settings.
If iTunes finds a more recent version of the operating system, the program will offer to install it. Upon completion of the procedure, we proceed to the last stage of work - exiting the update mode and restoring normal operation of the device.
How to enter DFU mode on iPhone 13 mini, iPhone 13, iPhone 13 Pro and iPhone 13 Pro Max?
Stability is a sign of mastery. Most likely, this is precisely the slogan that Apple is guided by, which once again did not change anything.
Entering DFU mode on the iPhone 13 (regular, mini, Pro, and Pro Max) is the same as on all recent iPhone models.
Therefore, if you are the owner of any “modification” of the iPhone 13, then you are a very happy and rich person; to switch your smartphone to DFU mode, just use the step-by-step instructions described in the previous subtitle - everything will go without a hitch!
Why is this?
For what purposes did Apple implement this mode? Let's imagine that you suddenly experienced a software crash due to the installation of a third-party application. You can't control your device using the screen because it doesn't respond (or doesn't respond correctly) to touch, isn't customizable enough, and simply doesn't work the way you want it to. What to do in this case?
You need to connect to your computer and update the shell completely to get rid of the error on your iPhone. DFU mode allows you to do just that. It disables graphics and actually runs at a basic, software level. The user does not see any signs of life on his phone, but the device does not load an “external” operating system (along with which an error may appear). In this way, a connection is made between the phone and the computer while the DFU mode is enabled on the first one. iPhone 4 (and not only this model) can be restored at the software level.
We enter DFU mode without buttons, i.e. programmatically
Unfortunately, the previous methods may not always be suitable, because they are based on the use of buttons - Home, Power and “volume down”, but what if they don’t work? Left without DFU mode and, accordingly, without the ability to restore the software? Nothing of the kind - there is still a way out. We will need:
- Computer and wire for synchronization.
- A file downloaded to your PC with the latest firmware for your device.
- Redsn0w program. Download links - redsn0w_win_0.9.15b3 and redsn0w_mac_0.9.15b3. The first is a version for Windows, the second for Mac OS.
Download and install redsn0w. In the window that opens, select Extras.
Next is Even More.
Follow DFU IPSW and indicate the previously downloaded official firmware.
We wait for some time and a modified software file appears on the desktop.
Now, if you specify this particular file when restoring iOS, you do not need to press any Home or Power buttons; you will enter DFU mode automatically.
What is firmware
Firmware is the program that controls your device's hardware . Software changes all the time (you install apps and download a new email), hardware never changes (hopefully you don't open up your iPhone and rebuild its components), and firmware almost never changes.
All! Think about it: your washer, dryer, air conditioner, TV remote, microwave oven use firmware to control buttons, timers, and other basic functions. You can't change the Popcorn setting on your microwave because it's not software - it's firmware.
Apple employees restore many iPhones. Given this option, I always choose to restore dfu in normal mode or recovery mode . This is Apple's unofficial policy, and some experts say there are too many problems, but if the iPhone has an issue that can be fixed, dfu restore has the best chance of fixing it.
I hope this article clears up the misinformation on the internet about how to enter dfu mode. I encourage you to celebrate your inner fierceness. You should be proud! Now you can tell your friends (and kids), “Yes, I know how dfu restores my iPhone.”
How to get your iPhone or iPad out of DFU mode
There is also a small nuance here. In most cases, you can get away with simply rebooting the gadget. Well... you just have to hold the power button a little longer than usual.
Does not help? Then we perform a forced restart - here are detailed instructions for any iPhone model. Naturally, you must first disconnect the device from the computer.
Here is such a short instruction. However, there is nothing more to describe here - we pressed and held two buttons, released one and connected it to the computer. All! After a few years and many updates, the situation has changed a little :)
PS If I missed something or have any questions, write in the comments. I’ll add to the article! I will answer - with pleasure!
PSS I almost forgot the most important thing! Attention! For successful and correct operation of the DFU mode, you must click on the social network buttons and “like” this article. Try it, it really works! :)
Attention!
- All this time, the iPhone or iPad display will remain dark! But don’t panic, I only advise you to turn on the sound on your computer so that you can hear the device turning on and disconnecting from the computer (this will be a signal for you that everything is fine), and the process will also be shown in the iTunes program window. The time may take about 5-10 minutes, and during this time you can drink coffee or leave me a good comment or like for a detailed article