Technologies are advancing uncontrollably. And if previously taking a photo of yourself was something unthinkable, now anyone can do it. The selfie stick is designed to make this task easier and take better pictures. But how to properly connect the device to your mobile phone? In this article I will tell you how to connect a selfie stick to a phone on Android or iOS - Samsung, Nokia, Lenovo and others
What is a selfie stick?
A selfie stick is also called a monopod. Essentially, this is a modification of a tripod for a camera or smartphone. The difference is that you can rotate this tripod in different directions and adjust the appropriate shooting angle. If you want to take a photo against the backdrop of the area or various attractions, now there is no need to ask passersby for this. The smartphone is securely secured in the monopod. All you need to do is adjust the required length for the telescopic stick, select the angle and take a photo.
Verdict
Of course, the Mi Selfie Stick Tripod also has competitors; the Huawei AF15 immediately comes to mind - it is a very similar device with its own advantages and disadvantages. For example, the length of the competitive model is significantly longer than that of the hero of my review.
In general, the Mi Selfie Stick Tripod is a quite suitable device; it is well suited for taking pictures of yourself or landscapes in calm weather. If you plan to film various unboxings of gadgets or even reviews, then it is better to turn your attention to more specialized solutions.
Which monopod should you choose?
You have realized all the advantages of a monopod and now run to the store to purchase this device for yourself as quickly as possible. But take your time. Although the selfie stick models look approximately the same in appearance, there are still differences. And you should know about them.
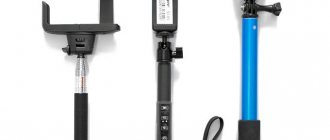
- Cheaper and more bulky options are a regular tripod. Choose an angle, set a timer and you're done. Not the most convenient option, but it may also be of interest to someone.
- Monopods with a special button on the handle are considered more convenient. Pressing this button activates the shooting procedure on your smartphone.
Each monopod has its own advantages and disadvantages, which are important to consider when purchasing. When choosing a more expensive model, you can be sure that the tripod will not break during a fall, and the smartphone will not jump out of the mount during shooting. This unit weighs about two kilograms.
Also pay attention to the length of the stick. It can also be different. The maximum possible length at the moment is about two meters.
Appearance and functionality
The device comes in a transparent plastic case, inside which is the tripod itself, a Bluetooth remote control and instructions. I admit honestly that I didn’t find the remote control right away - the box with it was well hidden in the upper part of the package.
The device is available in black or gray - the first option seemed more practical to me.
Together with the power button, the product weighs only 152 g. The length of the tripod when folded does not exceed 19 cm; when unfolded, the total length increases to 51 cm. The distance from the edge of the tripod to the smartphone screen is only 42 cm.
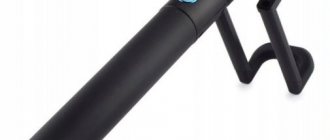
The device is made primarily of metal and plastic, but there are also rubber inserts - they are present on the smartphone bracket, the middle part of the handle and at the base of the legs. The telescopic rod is naturally made of metal.
The assembly of the device is good - after two years of use, nothing has broken off or fallen off, the rubber has not cracked, and the bracket has not become loose. The legs of the subject “in the activated state” are slightly playful - I believe that the manufacturer did this on purpose, for greater stability.
The Bluetooth remote control is equipped with a 60 mAh battery and, take my word for it, it will last for a long time. The remote control is also equipped with a micro USB connector and a button; you can charge this thing in any way - from a computer, a portable battery, or from a regular charger.
Attaching the remote control to the tripod is very simple - just insert it into the rubber base specially designated for this. There is absolutely no need to worry about losing the remote control, because there are grooves on its ends that securely fix it in the socket - in two years of operation it has never fallen out of there.
The bracket is capable of accommodating a smartphone up to 88 millimeters wide—a large device like the Poco X3 NFC fit in there without any problems. Even in a complete case.
The bracket can rotate in all sorts of planes - around its axis, in the frontal plane, and you can also tilt the bracket forward and backward. Unfortunately, the tilt angle back is small, which imposes some limitations when shooting, but more on that later.
How to connect a selfie stick to your phone: instructions
Well, you've chosen the right monopod and are ready to put it to work. To do this, read the instructions that come with the monopod. The general instructions look something like this:
- First, take care of the mounts for your mobile gadget. After making sure that the fasteners are working and perform their assigned tasks without any problems, proceed to the next step.
- Mount your smartphone on a monopod tripod. Secure it tightly with fasteners. And check if it stays there securely. It’s better to check this in advance than while shooting against the backdrop of a body of water.
- Depending on your phone model, there are differences in how you can connect your monopod to your phone device. If you have a regular smartphone running Android or iOS , then simply connect one end of the wire to the connector on the monopod, and the other to the telephone connector.
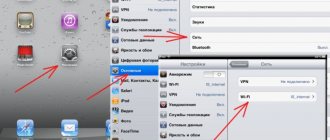
- If you have Lenovo or Nokia Lumia , then first you need to turn on the monopod. Using your smartphone, find the monopod via Bluetooth and establish a connection with it. Ready.
If you have an iPhone, then you will not need such manipulations. Everything will be configured there automatically.
Congratulations! You have connected the monopod to your gadget and are ready to shoot. But there are still a couple of important issues left to resolve.
Applications for selfie sticks
The FV-5 Camera has many settings that standard phone camera applications do not have. To redefine the functions of the keys, you need to find the Function of the volume keys in the settings and select “Shutter/Focus” in the window that opens. However, the free version of this software has limited functionality, for example, it cannot take large photographs.
You can also use the SelfiShop Camera app, which also allows you to override buttons. It takes up little memory space and is suitable for photography with a monopod. However, SelfiShop Camera has very few functions, so it is not always convenient to use. When shooting without a monopod, it is better to use the software built into your smartphone.
The Cellfie allows you to make all the basic settings and redefine key assignments needed when shooting, and allows you to completely replace the standard Camera application and is ideal for selfie lovers.
Camera360 Ultimate allows, in addition to overriding settings, many interesting functions, for example, it allows you to work with geotags and other metadata. Camera360 Ultimate also comes with a built-in photo editor and various filters.
Now you know how to set up a selfie stick and use the device. Happy selfie photography everyone!
Charging the monopod
Yes, your new device also needs charging. Therefore, immediately before taking photos or videos, you need to check the presence of charge. A monopod connected to the USB connector will indicate that it is fully charged by flashing a red light. If the device is discharged, then put it on charge. Within an hour, the red light will go out, indicating the end of the charging process.
Review of Xiaomi Mi Selfie Stick Tripod
There are no complaints about connecting the Xiaomi selfie stick to the phone and controlling the camera from the remote control. Works equally well with both Android and iPhone - the delay between pressing the button and releasing the shutter is minimal.
To charge the wireless remote control, a micro USB cable and a power supply from any smartphone are suitable. The battery capacity is enough for several days of active use. But since we don’t take a selfie stick with us very often (unless we’re talking about some kind of travel), one charge will last for a very long time.
As a result, we have a cool small and well-made selfie stick. The small size and simplicity of the tripod can be critical at some moments, but these nuances are compensated by a very tasty price.
Varieties
As already mentioned, there are several types of monopods. They are divided by price categories and according to their capabilities.
- A regular tripod for selfies . Let's set a timer. We get a photo. The main inconvenience: before each photo you need to set a timer;
- fastenings are not strong enough. They cannot be used for too long.
- Two hands are used simultaneously;
- Folds up. In this state its length is 23 cm.
Top 10 compatible Samsung smartphones with monopods
Compatible Samsung smartphones with monopods. These models will work with monopods:
- Samsung Galaxy S3 (GT-I9300)
- Samsung Galaxy Grand Prime (SM-G530H)
- Samsung Galaxy S4 (GT-I9505)
- Samsung Galaxy S3 Mini (GT-I8190)
- Samsung Galaxy Grand Duos (GT-I9082)
- Samsung Galaxy S3 Neo (GT-I9301I)
- Samsung Galaxy S5 (SM-G900F)
- Samsung Galaxy Note3 (SM-N9005)
- Samsung Galaxy S6 (SM-G920F)
- Samsung Galaxy J7 (SM-J700M)
Terms of use
If you just purchased a device and don’t yet know how to use it, then here are a few basic points you need to know:
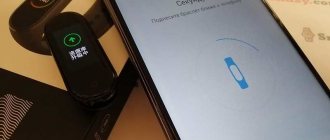
- If your monopod uses a Bluetooth connection, then first of all, charge your device.
- Attach the phone tightly so that it does not fall out in unforeseen circumstances.
- Adjust the length of the stick for ease of shooting.
Every time you use a new device, read the instructions for it. It’s better to spend an extra half hour reading the manual than to later wonder why your device doesn’t work. The instructions described in the article are partly universal and you can adapt them to any purchased monopod. But only the selfie stick manufacturer can tell you better about the capabilities of your selfie stick than we can.
So don't be lazy to study the manuals. This way, the process of connecting the monopod to the phone will be easy and pleasant, and the pictures themselves will be high-quality and memorable. Well, the monopod itself will last you much longer.
Frequently asked questions (FAQ)
How to connect a selfie stick to a Samsung smartphone?
No matter what mobile device you are using, the connection process is the same for almost all Android devices. So, by following the above steps, you can easily connect the selfie stick to your Samsung smartphone.
How to use a selfie stick without Bluetooth?
If your selfie stick is not wireless, then you need to use a special wire to connect. However, if your Bluetooth no longer works, you can use the timer to take photos.
Connecting a monopod to an iPhone
Above we listed all types of selfie sticks, and now we’ll figure out how to connect them to an Apple device.
Via Bluetooth channel
Follow these steps:
- Turn on the selfie stick's power, either by clicking the button that takes the photo or via the switch;
- Activate the Bluetooth feature on your iPhone;
- Insert the smartphone into the monopod, securing it securely with the clip;
- Synchronization must occur: on some accessories this will be indicated by a blinking light. In another case: a new name should appear in the list of paired devices on the iPhone screen;
- Start pairing with the monopod. Usually it’s easy to find it on the list - its name will match the name of the brand. Wait until the connection ends;
- As mentioned above, there is no need to install third-party software - the standard Apple Camera application is used to take pictures. Pressing the key will begin the shooting process, and the video or photo can be found in the Camera Roll.
One connection is enough for the phone to automatically connect to the selfie stick in the future when Bluetooth is activated (the iPhone will remember the accessory).
Selfie stick with timer
Starting from version 8 of iOS, all models that support this axis are equipped with a delayed shooting function. The standard time in the Camera app is 3 or 10 seconds. However, you can find programs in the App Store that allow you to change this setting. In such utilities it is possible to set an interval - at certain intervals, for example, every 5 seconds a new photo will be created. To take pictures using a timer, you must:
- Secure the iPhone in the holder;
- Set the timer or interval using third-party applications;
- Take a pose and wait for the timer to expire.
How to take pictures with a selfie stick with a wire and a button
The algorithm of actions is as follows:
- First of all, install the iPhone in the clip;
- There is also a 3.5 mm cord, similar to headphone cords. Insert the cord into the appropriate connector. If your model is iPhone 7 or higher, then use an adapter;
- If the accessory matches the device, synchronization will occur immediately;
- Take a test photo by pressing the button - if the test photo is saved, then the device is installed correctly and paired with the iPhone.
Taking pictures using Siri voice assistant
Taking a photo using your voice assistant is very easy.
- Just make sure Siri is enabled on your iPhone. This can be checked in “Settings” - “Siri and search”. If necessary, activate the function;
- After that, download a special application from the App Store to control the camera using your voice. The best and popular apps for this are VoiceCam or Voice Command Camera. By the way, they work without a monopod (for this you need to look in the utility settings);
- Unfortunately, not all accessories are adapted for the Russian language, so in most cases, instead of “take a photo,” you will have to clearly and loudly say “take photo.” However, this may also depend on the installed application itself. For example, for VoiceCam you need to say “Action!”