Sony PlayStation is rightfully one of the most beloved and famous gaming consoles. Starting from the earliest models, the appearance of Sonya in the house is a real holiday for both children and adults. Modern realities impose their own adjustments on games - technologies are changing and it is no longer so easy to connect an old console to a new TV with digital connectors. We'll tell you how to connect your PlayStation to your TV and enjoy the delights of video games.
Enable developer mode
In order to make the screen of an Android device black and white (or monochrome), you must first obtain developer rights. After this, you will have access to an additional section with settings, where you can enable this function.
To get developer rights, you need to open Android settings, go to the “About phone” section and click on “Build number” several times.
After this, a message will appear on the screen stating that you have become a developer.
Your TV inputs
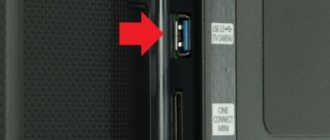
Take a look at the sides or back of your TV and note what type and how many inputs it has. Most new TVs have multiple HDMI inputs and may also have multiple AV inputs.
If your TV has enough inputs for all the consoles you want to connect, the easiest way is to simply connect each console to its own HDMI input. From here you can select the input source on your TV, usually using either the remote control or your TV's buttons.
If you have too many consoles for the number of inputs available on your TV, there is actually a way to increase the number of inputs that each source input on your TV can use.
But before you do that, it's a good idea to know what inputs you already have on your TV and how to switch between them, as you'll need this knowledge to set up a functional multi-console system.
Go to the “For Developers” section
Next you need to open the “For Developers” section. To do this, return to the main Android settings screen and follow the path “System - Advanced - For Developers”.
In older versions of Android, the "For Developers" section may not appear in the "System" section, but on the main settings screen. Next to the “About phone” item. If you can’t find it, try using the search in Android settings.
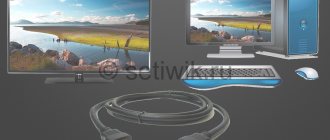
Getting a splitter
The first thing you need to do is get a power strip. These are devices that you can connect to multiple inputs at once and simply switch to the input you want to activate when you want to use it.
You can buy splitters with AV connections (if you have older consoles) or HDMI ports. If you have both old and new consoles that you want to connect, you can connect them to your TV at the same time.
There are splitters available with any number of inputs, so you shouldn't have any problems finding one that fits all your devices. Once you've found a splitter that works for you, you can get to work connecting your consoles.
Turn on black and white mode
After this, you need to scroll through the developer settings page and find the “Simulate anomaly” option. After opening it, a menu will appear in which you can select one of the screen modes: Monochrome (black and white), Deuteranomaly (red/green), Protanomaly (red/green), Tritanomaly (blue/yellow).
When you select monochrome mode, the screen will immediately switch to displaying the picture in black and white colors only. This function is disabled in the same way, through the developer mode.
Possible connection problems
The most common possible problems that arise are:
- Green/black/blue screen. Monochrome is adjusted to a normal picture using the “anti-aliasing processing” parameter. You need to set "TAA".
- Inability to recognize the console automatically. Solved by manual adjustment using the remote control. You can also reboot both devices.
Playing through the console is fun and interesting. To enjoy the game and not worry about errors, you need to properly configure the entire system. Properly connecting your Sony PlayStation to your TV will ensure an enjoyable experience without interruptions or anomalies.
Accessories you will need
Flamingo Images / Shutterstock
If you're going to use the camera as a webcam, you'll need something to mount it on a tripod. You'll also need some way to power the camera, assuming power-over-USB isn't an option. For many mirrorless and DSLR cameras, this means purchasing a "dummy battery." The dummy batteries are located in the battery compartment but are connected to the wall.
All of these methods require a micro-USB-to-USB cable (like the one that came with your camera) or a mini-HDMI-HDMI-HDMI-HDMI cable. For our last (and most effective) solution, you'll also need a capture device.
Universal connection instructions
Each manufacturer offers a special, rather than universal, connection program, so it is better to use recommended applications. This instruction is universal; it will help you figure out how to connect an action camera to a phone , namely Aceline, Digma, Eken, SjCam Sj 4000, SooCoo S60, Recam and other devices with Wi-Fi support.
Step-by-step instructions that are suitable for almost all cameras:
- Search for an application. How to do this is indicated on the packaging or in the instructions, but in order to avoid searching for the name for a long time, it is better to just read the Qr code.
- After scanning the code, the user will be taken to the application page in the Play Market. It needs to be downloaded and installed.
- Turn on the camera and start Wi-Fi. To launch a wireless network, some models of Chinese action cameras have a special button on the body; you can also activate the function through the menu.
- You need to open the Wi-Fi menu on your phone or tablet. To do this, go to “Settings”, and then select the “Wi-Fi” line. The smartphone will show a list of available networks, from which you need to select the one that repeats the name of the camera or its serial number.
- Entering the password. It is indicated on the box or in the instructions for it.
Once the application is installed, you can launch it and receive files from the action camera.
Additionally: Application for Xiaomi action camera for setup and control
Enable monochrome screen on Samsung Galaxy
On Samsung Galaxy smartphones, turning on the black and white screen can be much easier:
- Go to Settings - Accessibility.
- Open the Visibility Enhancers settings section.
- Click on "Color Settings".
- Set the switch to On and select Grayscale.
This will complete the necessary settings, and the image on the screen will turn black and white.
Keep in mind that despite the monochrome image you see on the screen, the videos, photos and even screenshots you take will actually be saved in color.
Using a GoPro as a Webcam
You probably already know that GoPro cameras can be used to broadcast live on various platforms and social networks - and we hope that you have already fully mastered this skill. But if you want to further unlock the potential of this action camera, we recommend checking out our tips for using a GoPro as a webcam.
First, let's talk about an important difference between GoPro and the many cameras that have flooded the market: it is a universal tool that can be used for action filming, for full-fledged creativity (for example, for filming), vlogging and broadcasting on social networks, as a DVR in a car and, finally, webcams. But users who purchase GoPro primarily for conducting webinars most often choose these devices for one simple but compelling reason: the picture quality of these cameras is noticeably higher, and color rendition is incomparably better than standard web cameras.
If you are a long-time fan of the brand, you probably remember that before the HERO5 Black model, setting up and using GoPro as a webcam was quite simple: you had to connect your computer to the camera’s access point, enter a special IP in the browser, and the image from the device was already on your PC - all that was required was some simple manipulation with the software, and voila - you're on the air!
For models starting from HERO5 Black, the scheme of actions has changed somewhat, but in general, it remains the same simple. Below we've listed a list of additional accessories you'll need to create your broadcast, as well as detailed settings for connecting your GoPro to popular video conferencing services such as Zoom, WebEx and Skype.
Note: HERO8 Black, HERO9 Black and HERO10 Black can only be used as a webcam in this manner when paired with a media module. The MAX, Fusion and Session series models, which do not have a built-in MicroHDMI port, cannot be used as a webcam.
Step 1: Prepare the necessary equipment
- GoPro with MicroHDMI output for signal output;
- MicroHDMI-HDMI cable;
- Video signal converter with HDMI-USB interface.
Pro tip: You can choose any video capture device you're used to working with, but we recommend Magewell and Elgato Cam Link 4K. Using them, you can broadcast video in quality 1080p60 and higher, and with minimal video signal delay.
This adapter is the key device that converts the camera image into a webcam signal.
- USB Type-C cable for GoPro charging + power supply;
- Mount for convenient camera mounting. We will look at the options below.
GoPro mount
The choice of mount for mounting an action camera will largely be determined by your shooting angle. As a standard solution, we recommend choosing a Shorty monopod tripod or a more convenient Trippler monopod with a rotating head from PolarPro. If you prefer more creative options (after all, this is a GoPro, not a regular webcam!), we recommend choosing one of the following options:
- Jaws Flex Clamp - This universal mount is useful if you need unusual angles, or if you are conducting training or education, and it is important for you to see what is happening on the camera screen. Due to the fact that the mount can be bent at different angles and attached to many surfaces (table, monitor, table lamp), “jaws” are very often found in the arsenal of accessories for web broadcasters. In a word, a must-have.
- Magnetic Swivel Clip or SP Magnet Mount - thanks to its ability to hold GoPro on metal surfaces, it has gained fame among motorists and service specialists. Do you want to broadcast the engine repair process by attaching a camera to the inside of the hood? Then magnetic mounts are definitely your choice!
- The Suction Cup is another universal mount that can be attached to any flat surface, including vertical ones, such as window glass. In this case, the angle of the camera can be adjusted, and the mount itself can be rotated.
- Gooseneck Flexible Swivel Mount - Combine as many as you like with all of the above fasteners and you've got the longest, most flexible, and feature-rich mount without any hard-to-reach spots.
Step 3: Select a streaming service
You can use a GoPro as a webcam on those video conferencing services that allow you to choose a broadcast tool—in your case, an action camera. To list just a few of these services: Webex, Zoom, Microsoft Teams, Skype, Google Meetings, OBS and Wirecast.
Step 4: Set Up Your GoPro
Camera setup
- Turn on your GoPro;
- Swipe down from the top of the screen and select Settings;
- Scroll to “Input/Output” and select it;
- Select HDMI Output and then Broadcast.
Equipment setup
- Choose a shooting angle and attach your GoPro;
- Open the side cover on the camera and connect the microHDMI cable;
- Connect the other end of the cable to the video capture device;
- Insert the video capture device into the USB port of your computer. If your computer has a USB 3.0 port or higher, it will be preferable;
- Connect your GoPro to a power source.
Video setup
Option 1: Set up video conferencing software.
- Skype : go to “Settings” > “Sound + Video” > “Camera”;
- Webex : select the video icon > “Video Communication” > in the drop-down menu click “Select Camera”;
- Zoom : Select the arrow next to Start/Stop Video > Video Settings > Select Camera;
- You can switch between two active GoPro cameras while broadcasting by selecting the one you want from the drop-down menu when you click Select Camera.
Option 2: Set up OBS or similar streaming programs.
- Open StreamLabs OBS or another OBS and follow the instructions to add a video source;
- In the case of OBS, click “+” in the video source menu;
- Click "Video Capture Device";
- Click "New" and name your video source;
- Select your equipment in the drop-down menu (for example, Elgato Cam Link 4K) and click “OK”;
- The GoPro image should appear on your monitor.
Pro tip: GoPro is capable of streaming up to 1080p60 via HDMI, but most services are limited to 1080p30. However, for the best image quality, make sure the scene you are shooting is well lit.
Now you're ready to use your GoPro as a webcam!
Programs for processing video from an action camera
6 free options for PC or smartphone users:
| Purpose | For Windows | For phone |
| Programs | 1. VSDC Free Video Editor is a multifunctional editor. You can download videos directly from the action camera and after saving them in the PC memory. Cropping, gluing, various effects, text and other tools are available in the program menu. | 1. Quik – a couple of touches on the screen, and you can create a video from pictures, add transitions and various effects to videos, synchronize with music. tracks. |
| 2. ShortCut – a program with a convenient and uncomplicated interface, with a set of tools for processing video materials. You can add audio to videos, adjust the color saturation and sharpness of the picture, etc. If necessary, all changes can be “rolled back” back. | 2. Camera MX - the program allows you to create video transitions, speed up/slow down frames, work with video parameters (brightness, sharpness, contrast), add all kinds of effects. | |
| 3. DaVinci Resolve Lite – video editing, color correction of footage, adding music, etc. The editor is a professional program. | 3. Better Camera – HDR, panorama, portrait and night mode, time-lapse, focusing and much more are in this program. |
Advice for owners of Apple gadgets is to take advantage of the capabilities of the iMovie program. The software copes with processing 4K videos).
Read: Action cameras: what are they and what are they used for?