05/21/2013 windows
Various errors related to the hal.dll library occur in almost all versions of Windows: Windows XP, Windows Vista, Windows 7 and Windows 8. The text of the error itself may differ: “hal.dll is missing”, “Windows cannot start, the file hal. dll is missing or damaged”, “The file \Windows\System32\hal.dll was not found - the most common options, but others also happen. Errors with the hal.dll file always appear just before Windows fully boots.
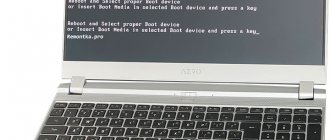
Blue screen Hal.dll is missing
The error “hal.dll is missing or damaged” can appear in several variations, here are the most common ones:
- "Windows cannot start because the following file is missing or corrupt: Windows root\system32\hal.dll. Please reinstall a copy of the above file."
- "Winnt_root"\System32\Hal.dll is missing or damaged: Reinstall a copy of the above file."
- "Cannot find \Windows\System32\hal.dll"
- "Cannot find hal.dll"
The hal.dll error appears shortly after turning on the computer. Windows XP has not yet had time to boot completely when this message appears.
Causes of Hal.dll
The cause of the “windows root system32 hal dll” error is the hal.dll file being damaged, deleted, or moved from its intended location.
Additional reasons:
Damage to the boot.ini file or possibly physical damage to the hard drive.
Also, if you see the inscription hall dll (with two lls), then the cause may be a virus. In this case, simply scan your system with an antivirus program and the problem may be resolved.
This problem sometimes occurs with the Msvcr110.dll missing error.
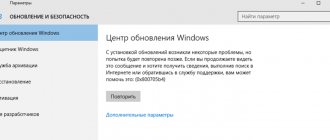
Boot order in BIOS
Before the PC starts loading the operating system, you need to go to the BIOS settings menu. To do this, use the key indicated on the initial screen. After clicking, you will be taken to a menu where you need to switch to the “Boot” section and move the current hard drive to the top of the list. Then save the changes using the key so that the computer restarts again.
If you have another drive with the operating system, try connecting it. If it loads properly, then you can safely rule out a problem with the computer hardware.
Expert opinion
Basil
Project manager, comment moderation expert.
Ask a Question
The appearance of the BIOS menu may differ from that shown in the screenshot. However, the names of the sections and their purpose are the same.
How to fix the “Hal.dll is missing” error yourself?
- Restart your computer. It is possible that the hal.dll error appeared accidentally.
Note:Because hal.dll errors appear before Windows XP fully boots, you will not be able to restart your computer properly. Instead, you will need to force it. On the system unit, you will see a forced reboot button.
- Check that the boot order in the BIOS is correct. The hal.dll error may appear if the boot order in the BIOS is incorrect: pay attention to which hard drive comes first.
- Run Windows XP System Restore from the command line. If this solution did not help and you continue to see a blue screen and hal.dll error on it, move on to the next step.
- Correct or replace the boot.ini file. This will help you if the cause was actually the boot.ini file, and not the hal.dll file, which is more often the culprit of the error.
Note:If restoring boot.ini did not fix the hal.dll error and it appears again after reboot and you have recently installed Internet Explorer 8(IE8) on Windows XP, uninstall it. In this particular case, IE8 may be the root cause of the hal.dll error.
- Create a new boot sector in Windows XP. If the boot sector is damaged or not configured correctly, a dll error appears.
- Recovering data from damaged sectors on a hard drive. If the physical part of your hard drive that stores any portion of the hal.dll file has been damaged, then you will most likely see a system32 hal.dll error.
- Recover hal.dll file from Windows XP CD. If the hal.dll file is causing the problem, restoring it from the original Windows XP CD will resolve the issue.
- Install Windows XP by recovery. This type of installation will replace missing or damaged files. Continue troubleshooting if this does not resolve the problem.
- Perform a clean installation of Windows XP. This type of installation will completely erase your Windows XP from your computer and reinstall it.
Note:Although this is an almost 100% way to resolve any hal.dll errors, this process is very time-consuming due to the fact that all your data must be backed up and then restored.
- Check your hard drive.
If all the previous options for fixing the hal.dll error did not help, including installing a clean Windows XP, then the problem most likely lies with the hard drive. Test it for errors to make sure. If the hard drive fails any of the tests, replace it and then install a new Windows XP on your computer.
If you recently changed your boot order or connected external or additional hard drives, this may be causing your problem.
Important: If you cannot access your files to back them up, you should understand that you will lose them completely if you install a clean Windows XP.
This issue applies to Windows XP, including Windows XP Professional and Windows XP Home Edition.
In other operating systems, such as Windows 8, Windows 7, Windows Vista, the hal.dll error can also occur, but the reasons for it are so different that it is a completely different troubleshooting guide (see below).
Method 3: Check if your hard drive is damaged
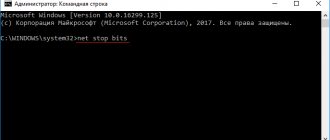
- Click the search icon on the taskbar and type "cmd" (without quotes).
- Right-click Command Prompt and select Run as Administrator.
- Click Yes again if the app prompts you to grant permission.
- At the command prompt, type "chkdsk /f" (without the quotes), then press Enter.
- If the program needs to restart, simply press Y and press Enter.
- Once the process is complete, restart your computer and check if the error is fixed.
How to fix Hal.dll errors in Windows 7, 8 and Vista
Guide to Resolving "Missing Hal.dll" Error in Windows 8, 7 and Vista
Hal.dll error message
Since we have already discussed the hal.dll error in Windows XP above, I will briefly remind you in what form these errors can appear in Windows 7, Windows 8 and Windows Vista, which occur in the middle of the system boot:
- "Windows cannot start because the following file is missing or corrupt: C:\Windows\system32\hal.dll. Please reinstall a copy of the above file."
- "Cannot find \Windows\System32\hal.dll"
- "C:\Windows\System32\Hal.dll is missing or corrupt:
Reinstall a copy of the above file."
Causes of Hal.dll
The cause of the “windows root system32 hal dll” error is the hal.dll file being damaged, deleted, or moved from its intended location.
Another possible cause is a damaged hard drive, but in most cases in Windows 8, Windows 7 and Windows, it appears due to problems with the master boot code.
Also, if you see the inscription hall dll (with two lls), then the cause may be a virus. In this case, simply scan the system with an antivirus program and the problem will be solved.
Basic functions of the library
As for the functionality, we can say that this library is a kind of layer that allows not only the user, but also any software developer to use application commands to directly access, say, some kind of “hardware” component, even without taking into account its brand , name, manufacturer, etc.
In general, this is a universal bridge that allows the program to run on any hardware in a universal mode. To make it clearer: in some ways, the functionality of the HAL.dll library can be compared to the same DirectX in terms of its operating principle.
How to fix Hal.dll error in Windows 7, 8, Vista
- Restart your computer. Start with this. It's unlikely, but the hal.dll error could be caused by a temporary issue that can be resolved by restarting your computer.
Note:Since hal.dll errors appear before Windows has fully loaded, there is no way to properly restart your computer in this case. Instead, you should force it. On the system unit, you can find a forced reboot button.
- Check the boot sequence in BIOS. The error will appear if the BIOS is configured so that at boot time it lists a different hard drive first than the one with a normally used copy of Windows installed on it.
- Perform a system restore. Running the repair process in Windows 7 and Vista is an automated Windows fix download, this tool will fix the hal.dll error related to corrupted or missing hal.dll file in most cases.
- Update the boot code to use BOOTMGR. If the boot code volume is corrupted or configured for a boot manager other than BOOTMGR, then you will see a "hal.dll is missing" error.
Note:Boot code volume problem is the most common cause of hal.dll error in Windows 7, 8 or Vista.
I describe it as the fourth step because the first ones are the easiest to perform. However, if you are comfortable with advanced tools in Windows, feel free to take this step first.
- Hard drive test. There is a possibility that the problem is a damaged hard drive. Replace the hard drive if the test results show a problem and then install Windows 8, 7 or Vista again on the New Drive.
- Perform a clean installation of Windows. This type of Windows installation will completely erase all your data (including errors) and boot you into a new system.
Note:
If you have recently installed an internal or connected an external hard drive, made changes to the BIOS, or seen the BIOS flash, this could be the cause of your problem.
Important: A clean install will eliminate any software causes of the hal.dll error, but when doing this you must be sure that your hard drive is working properly and you have tried all other troubleshooting methods.
Method 2: Cleaning up unnecessary files
- Click the search icon.
- Type "disk cleanup" (without the quotes), then press Enter.
- Select the drive you want to clean up, then wait while the app calculates the amount of free space.
- Make sure temporary files are selected.
- Click OK.
- If you want to free up more space, check the box next to the option and click OK.
- Restart your computer and check if the error is resolved.
Recovering from a boot disk
If this file is missing on the computer, it must be restored using the operating system distribution. In this case, the standard procedure of rolling back to a checkpoint will not help. You need to create a bootable USB flash drive with Windows 7 and connect it to your computer. Then follow these steps:
This procedure will only work if the boot drive contains an OS distribution that matches the version and bit depth of the installed version.