A wireless WiFi connection today allows millions of gadgets to gain free access to the Internet. Now, to connect, you don’t have to lay meters of wires and then disguise them so that they don’t catch your eye every day.
Therefore, all laptops, tablets and phones are equipped with special modules that provide WiFi connectivity and allow you to enjoy this technology.
Connecting a Lenovo laptop to Wi-Fi is not difficult if the necessary drivers related to the adapter are installed. But, if the user is new to computers and is connecting a router for the first time, then difficulties are possible. This article describes how to connect a Lenovo laptop to WiFi.
WiFi activation
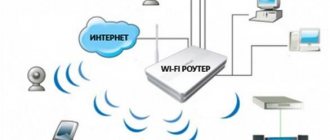
To activate, you need to connect the router to the network and connect an Internet network cable to it.
Next, it is checked whether the computer “sees” the router. To do this, LMB needs to click on the connection icon located on the right in the taskbar, usually between the battery charge icons and the keyboard language. A window will open in which the network connected to the laptop will be visible, and if the message “connected, protected” appears, then the module is connected. If the message “connect” appears, then the user will need to enter the network security key.
When you first connect to the router, you enter the network name (SSID) and password, which is written directly on the router (at the bottom of it).
Important! In the future, it is recommended to change the password with your own so that no one can guess the key to the user’s Wi-Fi.
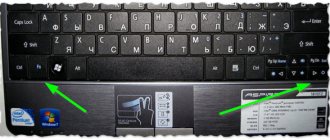
Using Function Keys
The buttons labeled F1-F12 are on the top row and, in combination with holding down the Fn key, activate or deactivate some useful options. With their help, you can quickly turn on the wireless adapter. The button with the image of an airplane (in many Lenovo laptop models this is the F7 key) enables flight mode, in which Bluetooth and Wi-Fi modules do not work. Pressing it again takes the computer out of the specified state.
In some models, the Wi-Fi adapter is turned on with the F5 button (while holding down Fn). In this case, you need to focus on the icon in the form of a computer or a radio antenna with semicircular waves.
The presence of such bindings depends on the laptop model: some have only a button on the keyboard to switch to Airplane mode, others only have a button to turn on the adapter. The absence of symbols indicates that the key is not responsible for performing any function, so the mentioned combinations will be useless. A full description of the combinations should be found in the printed or electronic instructions for the laptop.
Connecting the adapter
Setting up the Internet on Lenovo smartphones and tablets
To see if the module is working in the laptop, press the Windows key, enter Windows Services, then Control Panel, then “Network and Sharing Center” - “Change adapter settings”, Network connections will become visible. If a red cross is visible on the Wireless connection, you need to right-click on the Wireless connection, first selecting “Enable” or “Diagnostics”.
Device for LG TV
This is a WiFi USB adapter for LG TV, named AN-WF100. It is best suited for models that support wireless networking by default. The average cost of the device is 4,000 rubles.
The adapter expands the functionality of the designated devices. To properly configure the connection, you need to strictly follow the instructions or entrust this work to a specialist.
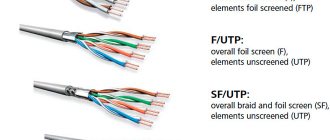
Adapter technical data:
- Complies with IEEE 802.11a/b/g/n standard.
- The optimal standard for streaming video is 802.11 n.
- Interface type: USB 2.0.
- Required current for consumption: 450 mA.
- Physical data: 6.7 (length) x 2.35 (width) x 0.9 (height) cm.
- Warranty – 1 year.
- The declared operational period is 3 years.
Operating frequency spectra (in hertz):
- 2.400~2.483.
- 5.150~5.250.
- 5.725~5.850.
Data transfer dynamics:
- 802.11a/g - 54 Mb/sec.
- 802.11b - 11 Mb/sec.
- 802.11n: 300 Mb/sec.
Checking drivers
How to replace a Wi-Fi module in a laptop: what it looks like on laptops from different manufacturers
If these methods do not work, the installation of the necessary drivers is checked. The problem is solved in two ways:
- Self-check drivers.
- Official website of Lenovo.
Press Win + R and insert devmgmt.msc into the window. Device Manager opens, then in “network adapters” select the underlined line and right-click on it. Click “update drivers”, then click “update automatically”, wait until the computer itself checks the drivers. Then reboot it.
Drivers for the laptop adapter can be freely downloaded from the Lenovo website:
- Find the Lenovo website. Website address https://support.lenovo.com/kr/ru/;
- On the website, go to the “Downloads” item;
- In the “Drivers” item, find the driver file, the name contains Wireless or WiFi and which corresponds to the laptop OS;
- Upload the file and run;
- Install the driver according to the instructions.
Wi-Fi keeps turning off: how to stop it
Laptops have a built-in battery to ensure autonomous operation. Initially, in the settings, in order to save energy, you can set the option to turn off the Wi-Fi module when inactive. But there are users who do not need this feature. They constantly use the Internet, and regular spontaneous shutdown of the module can be annoying. To disable, perform the following steps:
- Open network connections on the laptop.
- Go to the wireless connections menu by right-clicking.
- Select the “Properties” item in it.
- In this window, select the settings item and the tab through which you can manage the power supply.
- Find an item with a similar name like: “Allow the computer to turn off this device to save energy” and uncheck the box next to it.
- Click “Ok”.
After this, the laptop will not automatically turn off the Wi-Fi module and interfere with the user's work.
Network connections
Note! Keeping Wi-Fi on all the time drains the battery faster.
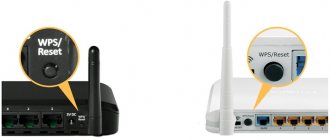
WiFi switch
Setting up Wi-Fi on a laptop with Windows 7: connecting via a router
How else to connect WiFi on a Lenovo laptop? Some Lenovo configurations have a switch to enable Wi-Fi. It is located at the end of the laptop or located as a separate key near the power supply. It shows an icon with an antenna. This action will help if, for example, WiFi suddenly does not turn on on the Lenovo t400.
Turning on using the monitor cover
In order to enable Wi-Fi on the Lenovo Z50, there is a special method that will allow you to quickly deal with the problem. If the previous methods were ineffective, there is another, spare one. This is the most banal action, which turns out to be very effective on a specific model. Simply close the lid of your laptop monitor, hold it closed for a few minutes, and then open it again.
This action causes the network adapter to restart and start searching for available networks again. Oddly enough, the “trick” works great. Therefore, before trying all other methods, you need to check whether this will work with your laptop. Recently, this manipulation has begun to work on most Lenovo models.
Lenovo Energy Management
If the wireless Internet keys on the laptop do not respond, the user can select the Lenovo Energy Management program on the Lenovo website. Link to the program: https://support.lenovo.com/kr/ru/search?query=Lenovo%20Energy%20Management&SearchType=Customer%20search&searchLocation=Homepage.
Note! The utility activates buttons to launch Wi-Fi. If the installation is done correctly, a message will appear on the screen where you can select “Enable” or “Disable” the wireless connection. The main advantage of this program is that later it will independently join the network.
Running WiFi on the motherboard
If everything is fine with the network adapter, but WiFi does not appear, you need to check the possibility of disconnecting the adapter antennas from the motherboard. They may not have been connected during assembly or may have become detached during transportation. Then the Internet does not start on the laptop when it is distributed through the router. You should remove the bottom cover and see if the antenna wires are connected to the motherboard.
Connect the device to a wireless network via a router
To connect the equipment to the router, you need to use the tray, which is located at the bottom of the screen on the right. By pressing the left mouse button you will call up the Internet connection menu. This displays the range of access points to which you can connect your laptop. Select the desired position of your channel and enter a security password if necessary, then click “next” and you can use the World Wide Web.
Windows problem - unable to connect to wireless network
In some cases, the Windows operating system may display the error “could not connect to the connected connection.” Let's try to figure out ways to fix this situation and how to enable Wi-Fi in a Lenovo laptop.
How to solve a problem?
First of all, make sure that the router is functioning correctly. If all equipment works, reboot them, and then run system diagnostics. To do this, right-click on the wifi icon and select the correct position.
If the connection settings are correct, wait 15 seconds, the laptop will connect to the wireless network itself. Otherwise, you will have to restart the computer.
The settings may have gone wrong; to debug them, contact your provider.
What to do if the problem persists?
When all the announced solutions have not brought a positive result, then you need to contact a specialized service department for service work. The problem is likely that the module's antenna is disconnected from the laptop's motherboard. Only an experienced specialist with repair skills can solve the situation.
Quick setup of Wi-Fi on Lenovo laptops and all-in-one PCs
Steps required to quickly set up Wi-Fi:
- Make sure airplane mode is disabled in Settings.
- View in Settings - Network and Internet Wi-Fi - enable.
- Diagnose problems.
- Check the adapter connection.
Important! In all pre-installed Windows systems, regardless of version, there is a network management utility from Lenovo. The program has Wireless or WiFi in its name. Here you can change the current position of the adapter. The program is located in the Start menu or All Programs menu. The utility shortcut can be located in the Windows control panel.
List of services
Below is a list of the main services without which the Internet connection will not work or will not work correctly.
- DHCP Client: The service used when connecting. It should be set to enable automatically, not manually.
- DNS Client: Should also be set to "Enable Automatically".
- Network Connections: As the name suggests, it is responsible for these functions. You can set “Manual” even if the Internet is in use.
Share
Send
Cool
There may be slight differences in symbols or connection sequences among different Lenovo laptop models. But the general algorithm of actions in any case remains the same as in all models.
WiFi does not start on Lenovo laptops
How to enable WiFi on a Lenovo laptop or an ideapad netbook from the same manufacturer if the adapter does not find a wireless connection on its own? You can manually record DNS addresses.
Note! Go to “Network Connections”, right-click “Wireless Networks”, click “Properties”, then find IP version 4 (TCP/IPv4), select it, click “Properties” again. Include everything as shown in the picture and enter the numbers in the lower boxes. Then the laptop reboots and the connection is connected automatically.
Wi-Fi may not turn on after reinstalling the OS. This process may not install all drivers. Some antivirus programs can also restrict free access to Wi-Fi. Therefore, you need to carefully review the enabled settings on your antivirus.
Not every Lenovo model has a wireless connection module activated initially. Sometimes you need to perform some actions to launch it.
First you need to find out what is wrong - the laptop or the router:
- You can connect the network cable directly to your laptop. The Internet is working, which means the cause of the malfunction is in the router.
- Connect via smartphone to the router. If the connection between the router and the phone works, then the problem with the lack of Wi-Fi is in the laptop.
Note! If the laptop does not “see” the router at all, you can first restart the router. To do this, you need to unplug it from the outlet for a minute or turn on the start button.
Sometimes it is not possible to use the established network channel. Then you need to look at the router settings:
- You can change the communication channel from Automatic to another;
- Change frequencies or type of wireless connection;
- Change your network region to another country.
When the laptop does not recognize its own router, but notices foreign connections, you need to go to the settings of your own router:
- The router's IP is written in the address bar of any browser. The IP information is located on a sticker at the bottom of the router.
- From the router’s start page, you need to go to the advanced settings page, then open the Wi-Fi tab, then open the main settings.
- In the main settings, check the “enable wireless connection” checkbox.
Note! What to do if there is no Wi-Fi module at all? In some Lenovo models, this issue is resolved through the BIOS.
The laptop reboots and while the reboot is in progress, press the F2 key. In the BIOS that opens, go to the Configuration section, find the Wireless LAN item in it, and press Enter. Then, point at the Enab led sign and Enter again. Then go to the Exit section, press F10 and Enter again. After the restart, the WiFi module will be installed in the manager, and the WiFi symbol will be installed on the panel.
Now you can click on the Wi-Fi symbol with LMB and a window will open with the networks that are available for connection. All that remains is to find your router and register its details.
What difficulties may arise
Most often, Lenovo cannot be connected to the Internet for two reasons - a disabled Wi-Fi module or a lack of drivers. If, even after correcting these problems, you are unable to connect the device, you need to contact a service center; the Lenovo laptop may be faulty and requires repair.
Enabling the Wi-Fi module
You need to go to the “Control Panel”.
In the Windows 7 operating system, you need to left-click on the “Start” button (located in the lower left corner of the screen), in Windows 8 and 10 - right-click, and then select the “Control Panel” section in the menu that opens.
The control panel for all types of operating systems has virtually no differences, and the required item does not differ at all in different versions.
Open the “Network and Internet” section, then “Network and Sharing Center” and select “Change adapter settings”.
Here are all the options you have to connect your Lenovo device to the Internet. You need to pay attention to the “Wireless network” item. If the icon and bars indicating the signal level are gray, it means the adapter is disabled.
To enable it, you need to right-click on the wireless connection icon and select “Enable”.
Important! To perform this action, you must work under an administrator account, or be prepared to enter his password when prompted by the system. Otherwise, the adapter will not be able to be turned on.
If the “Wireless connection” icon turns color, you can turn on the Wi-Fi module. You can connect to the Internet.
Advice! You can turn on the Wi-Fi adapter in another way - on all Lenovo models there are special keys for this. Depending on the Lenovo brand, the keys may be in different places, but they always have an icon of either an antenna with a divergent signal or an airplane.
Lack of drivers
It may also happen that the Network and Sharing Center window does not display the wireless connection icon at all. This means that the Lenovo laptop does not have software installed for the Wi-Fi module, or it is faulty for some reason. In the latter case, you will have to contact a service center, but you will be able to install the necessary software on your own.
- To do this, right-click on the “Computer” icon. In Windows 7 it is located on the desktop, in versions 8 and 10 it is called “This PC” and can be opened by clicking on the “Explorer” icon in the taskbar.
- A window will open in which you need to select the “Device Manager” section.
- Expand the list of “Network adapters” and determine the one you need – it will definitely contain the words Wireless or Wi-Fi – right-click and select “Update drivers”.
- First of all, you should try to update using Windows. To do this, click “Automatic search for drivers” from the suggested options. The system itself will try to find and update the Lenovo device.
But this method is good if the laptop can connect to the Internet without working Wi-Fi, for example, through a local network. Otherwise, you will have to download the drivers yourself from any other computer or laptop with Internet access.
https://support.lenovo.com/ - on the manufacturer’s website you will find drivers for the required Lenovo laptop model. This will not be difficult - the site will request a specific Lenovo brand and display all the options for it on the page. From the resulting list, select the one that contains the words Wireless or Wi-Fi. Left-click on the “Download” button, go to the “Downloads” folder and double-click to start the installation.
Important! Always download drivers only from the official Lenovo website! Otherwise, there is a risk of receiving infected files, causing significant, or even irreparable damage to the laptop.
After successful installation of the drivers, the already enabled wireless adapter icon will appear, and you can try connecting to the Internet.
Here are the main reasons why Lenovo may have problems connecting to the Internet. If the solutions given above did not help, and Wi-Fi could not be turned on, the problem is much more serious, and in this case, the help of a technical specialist is required.
Software method (in Windows settings)
Try using Windows Mobility Center. To call it, press the Win + X key combination.
There may be a “Turn on wireless” button.
If it is there and active, then after pressing Wi-Fi should work.
In Windows 10, you can open this window through search.
But on my Windows 10 laptop there is no wireless control in this window. Therefore, go to the settings, to the “Network and Internet” section and on the Wi-Fi tab, try to turn it on.
I think these tips are enough. If you know other ways in which you can enable Wi-Fi on a Lenovo laptop, then write in the comments.
I also recommend this article: Wi-Fi does not work on a laptop. What to do?
If nothing from the article helped, then check the function keys again. Especially if you have Windows 8 and lower. Download and install the Hotkey Features Integration utility, which I wrote about above.
Wi-Fi is connected, but there is no internet
If there is Wi-Fi, but below you see a connection with a yellow triangle and there is no Internet, then we proceed like this.
- Win+R;
- ncpa.cpl;
- Right-click on wireless network and select properties;
- We select the fourth channel and go into the devices. Obtaining an IP must be checked in offline mode, that is, the top checkbox of the two. But DNS, check the second box and enter the numbers as in the picture above. Next, click “OK”.
If after this there is no Internet, then most likely you have problems with setting up the router. To get started, just reboot it. To do this, unplug the power cord from the router outlet, and after a minute, plug it back in. If it doesn't help, go here.