If you use burst mode on an iPhone, then you have an idea of its functions. With this option you can take about ten frames per second. This is the best option to shoot a dynamic picture, because the chance that you will get a high-quality scene increases several times. Let's talk about how to do high-quality continuous shooting with iPhone 11 64 used and other models.
In order to perform burst shooting on an iPhone, just go to the “camera” program and hold down the shutter button for a while. This action allows you to take a series of photos! This allows you to get the perfect image, because from a series of photos, whether you like it or not, one will definitely be beautiful! Note that with the release of new iOS, from now on you need to hold the shutter release and swipe it to the left!
Like most iOS features, the shutter button can be activated with a specific gesture. A regular click on it allows you to get standard photos, but if you hold it down, then you get a series!
Viewing photos in burst mode
If you want to view photos taken using burst mode on iPhone, you need to perform a number of specific steps:
- Open the photo app on your iPhone.
- Click on the burst photo. If you look closely, you can see that they look like a list of different photos.
- Click the “select” button, which is located at the bottom of the display.
- Scroll through the virtual list to view all the resulting frames.
The dot below the image below is a mark indicating the best image (that is exactly what Apple believes) in terms of the sharpest detail and precise concentration. The final conclusion remains with the user, so you don’t have to pay any attention to the robot’s opinion.
By the way, if you want to get a great smartphone to take a series of photos, we recommend paying attention to the used iPhone 7 Plus 32gb .
View photos
To organize your photos and videos on iPhone, use the Years, Months, Days, and All Photos views in the Library tab. Rediscover your best photos in Years mode, relive important moments in Months mode, focus on your best photos in Days mode, or see all your photos in All Photos mode.
To view photos, tap the Photo Library tab and choose one of the options below.
Years. You can quickly search for a specific year in your library and view significant events as a slideshow.
Months. You can view collections of photos taken over the month, grouped by significant events - such as an outing with the family, a social event, a birthday celebration or a trip.
Days. You can view your best photos in chronological order, grouped by time or location.
All photos. View all your photos and videos. Touch the button
to zoom in or out, view photos by aspect ratio, filter photos, or view photos on a map.
In Years, Months, and Days mode, the Photos app removes similar photos and various extraneous images (such as screenshots, whiteboards, receipts, and receipts). To see all your photos and videos, tap All Photos.
Saving individual photos from burst shooting
To save photos from burst mode on iPhone, you should set the icon that looks like a check mark in certain fields that are located in the bottom right corner of the screen. Then click on the button called “ready” (top right corner). After these steps, you are given two options: leave selected photos or all of them. If you prefer the first option, you must click on the “only favorites” button.
Some people wonder how to enable iPhone burst shooting. To perform this action, you must:
- Open the “camera” program (if the smartphone is in a locked state, move from right to left on the screen - it will help you quickly open the application) or unlock it first.
- The camera should then be pointed at the subject.
- Then click and hold the shutter button for a while until you take a picture. There will be a characteristic sound, a calculator with the number of photos taken will appear a little higher.
All frames are sent to an application called “photos”, in which an entire album called “series” is dedicated to them.
A non-obvious gesture in the Camera of the new iPhone. Taking a series of photos in one motion
When I used the iPhone X a year ago, every month I had to clear out dozens of meaningless and identical photos from my photo gallery.
We are talking about serial photos, the so-called burst mode: when the camera takes a dozen pictures per second and saves everything in the smartphone’s memory.
I myself was to blame for their appearance, but Apple did not make the situation any easier. The fact is that the serial shooting mode was turned on too easily : just hold your finger on the shutter button for half a second, and the iPhone already starts shooting frames as if it were crazy.
With the transition to the iPhone 11 Pro Max, this problem disappeared: all smartphones with an A13 processor, including the iPhone SE, have a modified Camera application interface. Now holding the shutter button only launches the fast video recording mode, Quick Take.
But how do you now take burst photos on new iPhones? In case you need it. And preferably quickly, without digging into the menu. Continuous shooting is important in moments where every split second makes all the difference.
It turns out that Apple thought of everything and made a simple gesture. Which, alas, is far from intuitive after ten years of using iOS.
To take a series of photos in the Camera app, you quickly swipe left on the shutter button and don't release it.
The button itself will display the number of photos already taken. As soon as you release your finger, a series of pictures will be saved in the iPhone's memory.
Now it's definitely better than the old Camera interface. Fewer meaningless episodes. But again, you could tell users about this in the Tips app. It’s not for nothing that it’s been built into iOS for many years...
Source
Continuous shooting with a timer in a standard Camera
If you want to start shooting bursts with a timer, the first step is to set it up. The pressing time will be in minutes or seconds. It will beep before taking a picture. The only caveat is that you will hear a squeak not at the beginning of the report, but immediately before the shooting itself. At the same time, there is a flash, a shutter sound and the photo is ready. Of course, it is more logical if the squeaking occurs at least a few seconds in advance, so the sounds will not occur simultaneously and overlap one another. The mode itself is in perfect order both in terms of the number of frames and the pressure applied; on the iPhone, the serial photography program takes photos one after another.
Playing a video
When viewing your library in the Library tab, videos start playing automatically when they appear on the screen. Tap a video to play it full screen without sound, and do any of the following:
Tap the player buttons below the video to pause or play the video, and turn the sound on or off; tap the screen to hide the player buttons.
Double-tap the screen to switch between Full Screen and Fit to Screen views.
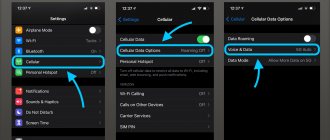
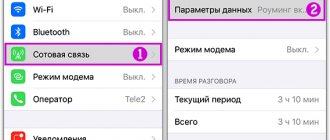
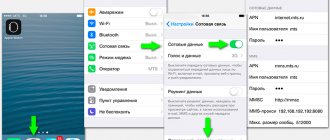
Turn off burst mode on iPhone
Most users use this mode, so how to turn off burst shooting on an iPhone? For example, to disable the timer you need to:
- Open the camera program directly.
- Find the icon for the timer.
- Click on the “turn off” bar.
You can turn off the described mode using HDR (indicates a specific extended area). This feature is designed to take higher quality photos even in poor lighting conditions. When you take multiple photos, your iPhone makes one of them. HDR mode enables continuous shooting because HED is capable of leaving only two copies of the image. Enabling it is very simple: launch the camera program, click HDR at the top of the display, then click “enable” in the special menu that slides out.
You can also turn off burst photography using the camera and flash. First of all, as usual, you need to open this application on the display or control center. Then, at the top of the panel, tap the flash button. Then click “enable” in the menu that appears. Thanks to this mode, you can take a virtually unlimited number of pictures within a certain time. Then choose the most successful ones, in your opinion. It is worth considering that you should not hold down the shutter button too much, otherwise video recording may begin.
By the way, did you know that you can change the charging sound on your iPhone : how to do it and is it worth changing it at all?
Add captions and view details for photos and videos
Captions add context to your photos and videos and allow you to search for photos and videos by captions. Select a photo or video, then swipe up to view or add a caption in the text box below the image.
By swiping up on a photo or video, you can also view the following information:
Effects that can be applied to Live Photos; See Edit Live Photos.
People whom the Photos app recognized in your photo; See People recognition in the Photos app.
Link to other pictures taken nearby.
In the Shared Albums section, you can add comments and likes to photos and videos. Your comments and likes are visible to album subscribers. See Share photos on iPhone using Shared Albums in iCloud.
Getting started with Camera
Quicker! Where's the camera? On the lock screen, swipe up. You can also swipe up from the bottom of the screen to show Control Center, then tap .
Note. If you launch the camera from the locked screen, you can view and even edit photos and videos on the locked screen by simply tapping the thumbnail in the lower left corner of the screen. You must unlock your iPhone to send photos and videos.
You can take both photos and videos in HD quality on your iPhone. Additionally, in addition to the iSight camera on the back, the device comes with a front-facing FaceTime camera for video calling and self-portraits. The LED flash additionally illuminates the subjects. It can also be a flashlight - just swipe it in Control Center. See Control Center.
High dynamic range
HDR (High Dynamic Range) mode allows you to take beautiful pictures in high-contrast environments. The best parts of three different shots taken at different exposures (long, normal and short) are combined into one photo.
Using HDR mode. (iSight and FaceTime cameras on iPhone 5s or later) Tap the HDR button at the top of the screen. For the shot to be successful, neither the iPhone nor the subject must move. (In HDR mode, the flash is disabled.)
On iPhone 5s or later, you can select HDR Auto and iPhone will use HDR when needed.
Save a photo with normal exposure in addition to the HDR version. Go to Settings > Photos & Camera > Keep Original. In this case, Photos will retain both the original and the HDR version. HDR versions of photos in albums are indicated by “HDR” in the corner of the photo.
iCloud Photo Sharing
With iCloud Photo Sharing, you can create albums of photos and videos that others can share, and subscribe to other people's public albums. iCloud Photo Sharing (iOS 6 or later and OS X Mountain Lion or later) lets you invite people you know to view your albums. If desired, friends can leave comments. If people you know use devices running iOS 7 or OS X Mavericks, they can even add their own photos and videos. You can also publish the album to a public website so that anyone can view it.
Note. To use iCloud Photo Sharing, your iPhone must be connected to the Internet. The service can be accessed over both wireless and cellular networks. Cellular data charges may apply. See Usage Information.
Turn on iCloud photo sharing. Go to Settings > iCloud > Photos. You can also go to Settings > Photos & Camera.
Sending photos and videos. When viewing photos or videos, or selecting multiple photos or videos, tap , select iCloud Photo Sharing, add comments, and share content to an existing shared album or create a new one. You can invite people to view your album using their email address or mobile phone number from iMessage.
Enabling an open website. Select a shared album, tap Users, then turn on Public Website. Click "Share Link" to share the site address.
Adding objects to a shared album. Select a shared album, tap + , select items, and tap Done. You can add a comment. Then tap Publish.
Removing photos from a shared album. Select a shared album, tap Select, select the photos or videos to delete, then tap . Only the album owner or object owner can delete objects.
Removing comments from a shared album. Select a photo or video with a comment. Touch and hold a comment, then tap Delete.
Only the owner of the album or the author of the comment can delete comments. Rename a shared album. When viewing a shared album, tap Edit, then tap the album name and enter a new one.
Adding and removing subscribers, turning notifications on and off. Select a shared album and tap the Users section.
Subscribe to a shared album. Once you receive the invitation, select the General tab, then tap Accept. You can also accept an invitation sent by email.
Adding objects to a shared album to which you are subscribed. Select a shared album and tap + . Select items and tap Done. You can add a comment. Then tap Publish.
View the album "Family" . When you set up Family Sharing, a Family album is automatically created in Photos on the devices of all family members. All family members can upload photos and videos to the album, leave comments and receive notifications when new objects are added to the album. For more information about using Family Sharing, see Family Sharing.
How to view the gallery of a locked iPhone?
To access the gallery
photos, you need to call the Siri voice assistant on the lock screen and ask “Who am i?” ("Who am I?"). Information about the owner of the iPhone will appear on the screen with a phone number to call or initiate a FaceTime call.
Interesting materials:
How to synchronize Children's watch with your phone? How to synchronize children's smart watches with a phone? How to sync Fitbit with your phone? How to sync photos from phone to tablet? How to sync Google Chrome with your phone? How to synchronize the game from phone to phone? How to sync chrome on phone? How to synchronize contacts from VK to your phone? How to sync OneDrive between phone and computer? How to sync a folder on your phone with Google Drive?