Those who purchased the latest iPhone models (X, 8, 8 Plus) should not be concerned at all with the question of when to change the battery in the iPhone. While owners of earlier models often have to deal with this problem. As paradoxical as it may sound, Apple deliberately and secretly overused battery energy to achieve marketing goals.
Owners of less-than-new models have received complaints about battery problems after the latest iOS 10 update. During the course of the prosecution, Apple representatives said that they had to “cripple” older phones to improve the overall performance and lifespan of the devices.
Why replace your iPhone battery?
All smartphone batteries weaken over time, but last year it was revealed that iOS versions starting with 10.2.1 reduce the peak performance of older iPhone models with dead batteries to prevent unexpected shutdowns. Apple says these outages will be caused by older iPhones using more power than the battery can supply at one time. Initially, the reduction in peak performance should only be noticeable when using particularly demanding applications.
The iPhone uses lithium-ion batteries (as do all smartphones), which degrade over time due to the battery's chemistry. Apple says the iPhone's battery is designed to retain 80% of its original capacity after 500 full charges.
Replacing your old iPhone battery with a new one will return it. Plus, a new battery will mean your iPhone will last longer before it dies.
If you want to check your battery health (available in iOS 11.3 or later), you can do so by following these steps:
- Open the Settings app.
- Click Battery and then Battery Status.
This will show the maximum capacity of your battery. If your iPhone's performance is slowing down due to battery drain, you can disable it here. However, disabling performance throttling may cause the application to terminate unexpectedly or crash.
Replacing the battery on an iPhone from “A” to “Z”: when and how to change it, which one and where to buy
Initially, this material was planned in two parts. But, having posted the first part on Yandex.Zen back in August, I completely forgot to post it here. To write a sequel, I needed a subject for a photo shoot. The other day I finally got my hands on an iPhone that needed a battery replacement. I was happy, took a photo, today I released the second part, rushed to post it here - but the first one is not here either))) Therefore, the text will be long - I combined the two parts into one material. But everything will be in one place. Go.
1 - When to change
There are unspoken
numbers of residual capacity when the battery should be replaced
.
It is especially important to know these limits in two cases - when you buy an iPhone secondhand (this is understandable - you need to know whether there will be a hassle with a replacement, and therefore bargain or not buy a specific device at all), and also in the fall (since winter has already come , and a severely drained battery will not give you life in the cold). You can find the remaining capacity as a percentage in Settings → Battery → Battery status
.
Case pipe So, the indicators:
- iPhone with a 4-inch screen
(5S, SE-1): at 84% it is no longer worth buying the device at full price, and at 80% it is advisable to change the battery. - iPhone with a 4.7-inch screen
(6, 6S, 7, 8, SE-2) - below 83% it’s not worth buying a device, below 78% - a replacement. - iPhone with the “Plus” index
(6 Plus, 6S Plus, 7 Plus, 8 Plus) - below 80% it’s not worth buying a device, below 75% there is a clear replacement. - iPhone “with an eyebrow”
(X, XR, XS, 11) - below 80% is not worth buying, below 74% - replacement.
The most important thing to understand is that usable capacity is not measured from zero to 100 percent
.
There is no capacity of 20-30% at all. If the battery capacity is 70%, in practice this does not mean that it will work only a third less. This means that the battery will melt before your eyes, and in the cold the smartphone will turn off and reboot. In other words, everything below 70% is very bad
, and not “only fell by a third.”
- Now we are talking only about mobile devices. For laptops, everything is a little different, and a battery with a capacity of 60-70% on a MacBook can be even more invigorating
2 - What to change for
This is quite a sore point.
The fact is that original new batteries are not available for free sale
.
You need to know this, as sellers are actively speculating on this topic, offering the “original brother” for a different price tag. There is no new “original” on sale at all - just remember
. The maximum is taken from the donor, but it’s a pig in a poke, step away and wash your hands.
In addition, there are a lot of different third-party batteries of varying prices and degrees of lousiness.
.
This huge industry is based on the reluctance of users to overpay to the official service for installing an original battery - especially on older models, the cost of replacement can reach half the market price of the device and even more. The rule that I came up with for myself is that it is better to buy a branded spare part than a copy of the original.
In this case, the brand selling the battery is trying to create its own image and reputation, which means you can count on some kind of quality. At the same time, companies producing copies often do not even have an adequate name, and what exactly you are buying is unknown.
I have chosen three brands that I trust and use myself. By clicking on the link, you can select your iPhone model there.
Battery links:
- Baseus brand (medium version)
- Essager brand (slightly cheaper)
- Nohon brand (more expensive)
What you need to know before replacing
Which iPhone model do you want to replace the battery on?
If it's iPhone 4-5-6-6S (and Plus)
- it will be quite simple here.
If it is iPhone 7 and newer (8-10)
- there is a nuance.
Starting with the “seven”, Apple introduced casing sizing, which is designed to provide protection from splashes.
In my opinion, this is a rather useless thing, but it makes opening the device very difficult.
Of course, if this is his first autopsy. Unfortunately, if you have a “Seven” or newer and have never taken it apart before, most likely you will not be able to replace the battery yourself
.
In addition to the “hot table” that helps open these models, appropriate experience is required so that you do not break the screen glass when trying to replace the battery. You can check whether your device has been opened using the process that I will describe below.
What you need
Several tools.
Some batteries (for example, Baseus) come with such tools. They are often not very good quality (obviously), but they are definitely enough for one replacement. Prepare:
- screwdrivers:
Pentalobe 0.8mm and regular plus 1.2-1.5mm; - for iPhone 7 and later
- 0.6mm tri-blade Y-shaped screwdriver; - several plastic blades
of different sizes and thicknesses - these could be picks, credit cards, etc.; - sucker;
Suitable, for example, is a mount for a DVR in a car; - tweezers
, preferably with straight, sharp ends; - patience and good mood
(more).
As with any analysis of equipment, a magnetic mat is very helpful - I never tire of recommending it to everyone, it’s just a mega-convenient thing.
Costs ~200 rubles. ATTENTION
You perform all manipulations with your equipment at your own peril and risk. If you are not confident in your abilities, take your smartphone to a service center!
Just now I noticed that I forgot to take a photo of the tweezers. It will be a little lower
Replacement algorithm
So, turn off the device and get started.
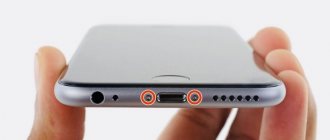
- The first step is two screws on the bottom end.
Unscrew them very carefully, as the screws are delicate and it’s quite easy to “lick” them. It is better not to use knives, nails, or screwdrivers of a different size/section for this purpose.
- Next, take the suction cup
and place it as close as possible to the bottom edge; there is a nuance - the Home button should remain outside, as it will not allow the suction cup to catch.
- Now take a thin spatula or pick.
Place your smartphone horizontally on the table, press it to the table with your left hand and at the same time pull the suction cup horizontally upward, while carefully looking at the bottom of the screen panel; as soon as it rises a little above the line of the aluminum body, try to carefully hook it with a spatula and push it under the panel; Please note that the glass of the screen rests on a plastic frame, so the spatula must be inserted under the plastic. Under no circumstances should you try to pry the glass itself! If it separates from the plastic frame, there will be a gap that will be impossible to get rid of.
- At this step, owners of iPhone 7 and newer can understand
whether it is worth continuing the process. If the screen frame does not move, it means that it is better to entrust the sizing in place and opening the device to a professional.
By the way, even in this case, if everything has already been purchased and you are excited to change the battery yourself, you can only ask the technician to open the device and give it to you. Not everyone agrees, but it is quite possible.
- If the screen frame is successfully lifted with a spatula
, carefully, without releasing the suction cup, make light “screw” movements with the spatula along the line of the screen panel, from bottom to top along each end. The screen panel is held in place by latches, and your goal is to disengage them without damaging the screen.
- On models 5S and SE-1
, right under the fingerprint scanner there is a sneaky cable that connects the screen and the body and will not allow you to open the phone completely. Open it very carefully, don't tug. When you open the screen about 20-25 degrees, you will see this cable - you need to unhook it. Most likely, the cable connector on the side of the case will be covered with a small plate - it can be snapped off from the bottom up with thin tweezers.
- Having unfastened the latches, open the smartphone
like a clamshell, but no more than
70-80 degrees!
Inspect the internal condition of the board and battery. Fingerprints on metal screens or matte surfaces will indicate third-party interference inside the device even before you. - On iPhone 7 and newer models, the screen opens like a “reverse book”
- that is, on its side, from left to right.
The trains are also on the right side, not on top. Unlike older models, on the “seven” and newer the screen can be opened completely with a book and placed next to it on the table without removing it from the board. When opening it
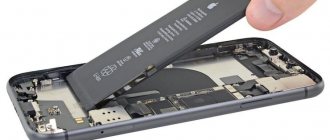
, take this into account and unlatch the fasteners first from the bottom, left and top, and only then open the screen to the side. - At this stage, you need to disconnect the battery cable
without touching the internal elements of the smartphone with your fingers, so as not to damage your device.
On the iPhone, the battery connector is covered with a metal plate. It is located on the right side, on the board, just below the middle of the board, and is fastened with screws. On models 4-5-6-6S these are two Phillips screws, and on the “seven” and newer there are four three-lobed Y-shaped screws that require a special screwdriver. Unscrew and place them in the same way as they were screwed in
, pick up the plate with thin tweezers and place it next to the screws in the same position.
This is extremely important! The screws cannot be mixed up, as you can easily damage the board by screwing the screw in the wrong place!
- Here I advise you to “throw in” a new battery.
If he doesn’t work or is married, you will save yourself from wasted work. Fold back the cable of the old battery, place the new one directly on it and connect it. Carefully covering the screen, turn on the device, wait for it to boot and check the capacity of the new battery. If everything is fine, turn off the iPhone, disconnect the battery and continue.
- Now this is complex, painstaking work
not
relevant
for iPhone 7 and newer .
Look at the top of the device, where the screen is still in contact with the body. You will see a square plate on four screws. Under this plate there are three connectors - they combine a matrix, a sensor, Touch ID and a selfie camera module with a speaker. It is necessary to unscrew the plate and disconnect three cables - all this must be done without opening the device wider than 90 degrees (right angle). I advise you to disconnect the cables only with a spatula and very carefully - there are small transistors next to the connectors that can be easily removed and lose the sensor. Place the plate and screws as they were in the device.
- Put the screen aside and exhale deeply.
Now you are face to face with the battery.
And here it is interesting. The battery is glued to the body.
However, it's done cleverly, and you won't need a hairdryer. There are tabs on the bottom of the battery, by pulling on which you can simply pull out the adhesive strips from under the battery and it will separate on its own. Look closely - the tabs look like two (or three on Plus) narrow black pads on the bottom edge of the battery. If you carefully pick one up, you will see a white tape under the black film. This tape needs to be pulled out from under the battery. BUT! It breaks very easily! You need to pull strictly at an angle of 45 degrees and - attention - extremely slowly! It is very important. As soon as I hurried, the tape breaks and remains deep under the battery. Very slowly pull out both tapes with a characteristic funny sound and put the old battery aside.
- Did you break the tape?
Me too, more than once.
Let's get out. First of all, leave the hairdryer alone, it won't help. Let's do it differently. There is a Taptic Engine unit under the battery - unscrew and remove it
, it is on two screws.
You have plenty of space under the battery. Now take thin tweezers, slightly lift the bottom edge of the battery, grab the tattered tip of the white tape with the tweezers and quietly, quietly pull it out. Tweezers tear the tape, so grab it with your fingers as soon as possible and then pull it with your hands. Great! Don't forget to put the Taptic Engine back in place. If you have a 5S or SE
, don’t unscrew anything. The principle of getting out of an emergency is the same, only you will have to bend the bottom edge of the battery harder (without fanaticism) and pick up the tape with tweezers as it is.
Antistatic tweezers with sharp tips. Cost me about 50 rubles, I think
- Now you need to glue the new battery.
Take strips of glue and carefully glue them onto the battery. It is important that they lie flat, without folds or wrinkles. It is better to remove all folds. If you have to cut part of the tape, it’s not a big deal, as long as the surface is smooth. Make sure that the tabs of the tapes come out, as they did on the old battery. Then next time it will be easier to carry out the same procedure. I don’t recommend using tapes without reeds - you’ll screw the next repairman, or yourself if you have to remove the battery earlier due to a defect. - Place the battery in the case.
Make sure that the cable lies flat against the connector.
It may be easier to connect the battery, and only then put it in place (do not touch the board with your hands). Iron the battery firmly along the lines of the adhesive strips to secure it. If you connected the battery cable, disconnect it! - Now I advise you to wipe the edges of the screen and body from the adhesive substance
- if there is any. If you don’t wipe it off, after assembly it can constantly cling and stain the screen, body, hands and cases. If you have a "seven" or newer, you bought a frame with adhesive and you basically want to restore the adhesive - now is the time to do it. - The remaining process is reverse assembly.
Reconnect the screen cables and screw on the iron plate. Connect the battery and cover it with the second plate. Then carefully seat the screen into the body from the top to the bottom - the top end is held on by hooks, not by latches. Tighten the two bottom bolts.
Ready.
The device can be turned on and measurements can be taken. Beauty!
Side effects
The main problems can only be caused by
a block of three cables at the top of the device
, if you were not particularly polite with them.
- If stripes
of any shape and size appear on the screen, you have damaged the cable; The cable is often one with the screen module, cannot be repaired and changes along with the screen - If part of the sensor or the entire sensor does not work
, you have removed one of the transistors next to the screen cable connector. The transistor can be restored by soldering at a service center for approximately ~1,500 rubles. - If the camera or speaker does not work
, the cable is damaged. Reconnecting rarely works, but you can try. As a last resort, replace the camera/speaker unit; it is inexpensive and simple.
~~~