Transferring files between iPhone and computer can be difficult. Luckily, several new methods have emerged over the years to make this process relatively easy.
However, the average user may still encounter difficulties. Therefore, below we will look at some ways to transfer files between iPhone and PC on Windows.
Via iTunes?
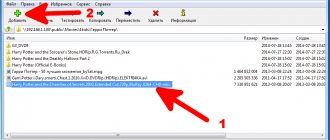
Although not everyone likes working with iTunes, this is one of the official methods from Apple. To use it, you need to install the program from the Microsoft store, or download it from the official website.
- Connect your iPhone to your computer or laptop using a USB cable.
- Open the app and click the "iPhone" button in the top left corner.
- Now click on “Settings” on the left sidebar, after which the utility will show a list of available categories.
- Open any section, for example "Photos", and then click on the file that you want to transfer to your computer by clicking "Sync".
- The application will ask you to specify a location for recording on your computer - select the desired folder.
What are the best third-party voice recorder apps?
Users go to the AppStore for sound recording programs because the functionality of the built-in application is quite modest. In particular, the Voice Recorder program does not allow you to record telephone conversations - this is again due to Apple's privacy policy. As soon as an iPhone user makes an outgoing call, the voice recorder automatically stops recording. This is very inconvenient, especially considering that telephone interviews are becoming increasingly popular.
Among the programs that allow you to record telephone conversations are IntCall , Audio Recorder (for iPhone with jailbreak), Google Voice . You can learn about the advantages and disadvantages of the first two utilities from the material “How to record a telephone conversation on an iPhone?” The main disadvantage of the third is that it always warns the interlocutor that the conversation is being recorded.
Third-party voice recorders have a lot of other options that the built-in tool “never dreamed of.” The most useful thing is that third-party applications allow you to adjust the recording quality: adjust the microphone sensitivity level and sampling frequency. A product called ALON Dictaphone is completely different in that it can automatically turn off recording when the speaker falls silent and resume it if speech is heard again (voice activation function). Third-party voice recorders have one common drawback - as a rule, these are paid programs .
Via iCloud
iCloud cloud storage allows you to transfer files between iPhone and any other platform, including Windows. Essentially, you upload your files to the cloud and then download them to your computer. However, by default you only have 5GB of memory available to you. So if you want to use iCloud to transfer larger files, you'll have to pay a subscription.
To reset data from iPhone, follow these steps:
- Open the Files app on your smartphone or tablet.
- Navigate to the data you want to transfer to your computer.
- Long-click on the desired file, and then select the “Copy” option. If you need to upload several files, mark them first.
- Go to the iCloud Drive app and paste the copied files there. After that, they will be uploaded to the cloud.
- Next, download iCloud Drive for Windows from the official website. Once the application is installed, go to This PC. There you will see a new section.
- After authorization via Apple ID, Explorer will open with all saved folders and files in the cloud.
- Simply drag the documents to the desired location on your PC, or use the download icon to navigate through File Explorer.
Part 5: Frequently Asked Questions about Transferring Music from iPad/iPhone to Computer
1. Can iPhone Transfer support transferring music from iPad to iPad?
Yes, you can use iPhone Transfer to move music from one iPad to another with ease. And it also allows you to transfer music between iPhone/iPod.
2. Can you put purchased songs from the iTunes store on iPad in iTunes?
Music purchased from the iTunes store on iPad can be transferred to iTunes on your computer.
3. Can I import music from my computer to iPad?
Any music saved on your Windows PC can be transferred to your iPad using the Apple iTunes app. To transfer music from your computer to iPad, you first need to move the music files to iTunes, and then sync your iPad with iTunes.
4. What can I sync when using iTunes for iPhone/iPad?
You can sync albums, songs, playlists, movies, TV shows, podcasts, audiobooks, photos, videos, contacts and calendars.
Using Windows Explorer
You can also transfer files from an Apple smartphone through Windows Explorer. To do this, you will need to connect your Apple tablet or phone to your PC using a USB cable, and also install iTunes.
- Once the operating system recognizes the connected device, you need to open File Explorer. If you don't have a This PC shortcut on your desktop, go to Start and then open the Taskbar.
- Now go to the “This PC” section. The connected device will appear in the “Portable Devices” section.
- Open your phone storage and then go to “DCIM”. This is where all your photos and videos are stored.
- Select the files you want to transfer, and then copy them to your computer.
This method can only be used to transfer photos and videos. If you need to upload some other files, you will have to use a different method.
Part 2: How to Transfer Music and Playlist from iPhone/iPod to iTunes
When we talk about transferring content to iPhone, iTunes might be the first thing that comes to your mind. Apple developed iTunes to help customers manage files and purchase content. There are some things you should know about transferring music from iPhone to iTunes:
1. iTunes uses a USB cable to transfer data, so you need to prepare a Lightning cable. We recommend that you always use original Lightning cable or proven products to avoid data loss and damage to your device.
2. Only music purchased from the iTunes Store can be transferred from iPhone to iTunes. Songs downloaded from YouTube and other websites, or from third-party apps such as Pandora, are not allowed in iTunes.
3. The original iTunes library will be replaced when you copy music from iPod to iTunes. So you have better iTunes backup.
If you are not worried about these drawbacks, you can follow the steps below to move music from iPod to iTunes.
How to Transfer Songs and Playlist from iPhone/iPod to iTunes
Step 1: Install the latest version of iTunes on your computer. If you were using an older version, expand the Help menu in Windows and click Check for Updates to get the latest version to install on your computer. On a Mac, open the iTunes menu in the top ribbon and click Check for Updates to update iTunes.
Step 2. Use a USB cable to connect your iPhone and computer, wait for iTunes to detect your device (iTunes not recognizing iPhone?). If you've set up iTunes' automatic sync feature, it will prompt you to sync our iPhone as soon as your device is detected. Be sure to select "No"; otherwise, your music will be overwritten by the iTunes music library.
Step 3. Next, go to the "File" menu in the upper left corner of the window and click "Devices" > "Transfer Purchased from 'iPhone'". iTunes then initiates syncing the music from your iPhone to your iTunes music library.
Step 4. If you want to get playlists from iPhone to iTunes, go to your iTunes library after transferring, hold down the Ctrl key on Windows or Cmd key on Mac, highlight the songs you want, right-click on it and select "Add to Playlist: My playlist."
Note : By default, the music will be saved to C:\Users\username\My Music\iTunes\ in Windows.
To find music from iPhone on Mac, open Finder and choose Go > Home > Music > iTunes.
If you want to organize music from iPhone, go to iTunes > Preferences on Mac or Edit > Preferences, go to Advanced tab, here you can find and change the location of iTunes Music library and organize music in iTunes . Library as you like.
This method is free, but it is a little more complicated with iTunes sharing to share iTunes songs among iOS devices.
Some iPhone users have complained that iTunes won't sync music. If you encounter a problem adding music to iTunes, you can find troubleshooting here.
Using cloud storage
You don't have to use iCloud to transfer files over the cloud. You can use any other cloud service, such as Google Drive, Yandex Drive, Dropbox and others.
Below are instructions for using Google Drive to transfer files:
- Download the Google Drive app through the App Store on your mobile device.
- Log in or register a new account.
- Next you will be taken to the application interface. Click the "Create" button.
- Then select "Upload Files".
- Now mark the necessary data that you want to move, and then click “Download”.
- Next, download the Google Drive program on your computer, or log into the same account through a browser,
- After that, you will see all the files that you have transferred to the cloud on your phone. Select them and move them to any folder.
If you want to use another cloud service, the steps there will be approximately the same. This method of data transfer is not the most efficient, since the transfer speed will depend on your Internet connection.
Is it possible to record a call on WhatsApp?
How to save an audio recording of a WhatsApp call? There is no official way. You will have to use your phone's voice recorder or install a special application.
The easiest and fastest way to record a WhatsApp conversation is to use the audio recorder on your phone. The audio quality will be reduced, but you can hear the other person’s words without any problems.
In the instructions we will figure out how to record a conversation on WhatsApp, without installing additional applications.
Using messengers
Through the messenger you can send small files, such as videos, music and photos. For this, it is better to use Telegram, since the mobile and desktop versions of the application work independently of each other.
- Open the messenger and go to the “Favorites” tab. This is your personal correspondence where you can save various documents.
- Use chat to send the required file.
- Next, launch the messenger on your computer and also open the “Favorites” tab.
- Right-click on the sent document and download it.
Using social networks and instant messengers
We figured out how you can send a voice message on iPhone using the standard iMessage application. But if you want to use other methods of delivering audio messages, then you will have a wide choice. All instant messengers and some social network clients offer the function of recording voice messages.
First, let's see how to send voice messages in the VK application on iPhone. In the official VKontakte client, the function of sending audio messages appeared in version 2.9.1 in 2016. It's a little late, but it's too late to complain now - voice messages work great.
To send audio through the VKontakte client, open the dialogue and click on the microphone. A recording window will appear on the screen, after which you can start speaking the text. Before sending, you can also play back the voice message to make sure you said everything correctly and the app recorded it clearly, without unnecessary noise.
If you use messengers to communicate, then the procedure for sending voice messages will not surprise you. However, there are some differences: for example, in WhatsApp, audio is sent immediately after recording, without the opportunity to listen again.
If you want to send a long voice message via WhatsApp on iPhone, follow these steps:
- Open the chat.
- Touch and hold the microphone icon.
- Swipe up on the lock icon to record a message without holding down the microphone.
- Click "Send" when you're finished recording your message.
If you change your mind about sending a long message, you can click “Cancel” while recording. This trick won't work with short voice messages: they are sent as soon as you release the microphone icon.
WhatsApp has a convenient way to control whether the other person has listened to the message. If the microphone next to it is gray, it means no audio was playing. A blue microphone appears next to listened to messages.
There are no fundamental differences in the operation of voice messages in Viber and Telegram. You can also record long messages and send them. The only drawback is that there is no way to control whether audio was played. But in Telegram, voice messages continue to play even when you exit the chat to the general contact list or other dialogue.
The voice recorder application on the iPhone is not the most popular, but it can still be used in certain cases, and sometimes it can be useful.
There are many similar situations, for example, recording a lecture or interview. Everything recorded using a voice recorder is stored in the iPhone as voice notes, and there is often a need to send them to another iOS device.
And this is done very simply. The standard iMessage and Mail apps can send audio notes, so there's virtually no problem there. To send a voice note, you need to select it in Voice Recorder , then click on the “Share” icon and select the Messages or Mail application.
After the user receives an email with an attached voice memo, he can listen to it on his iPhone or iPad. By the way, it will be noted that using this technique you can send a voice note to yourself personally, and then save it in the right place (for example, on a computer) - this will not be superfluous in case you don’t want to pull these notes from iTunes.
You will need this!
Posted by Dorothy Collins March 30, 2022 10:44
Voicemail is one of the most popular features on iPhone. Unlike traditional text messages, voicemail allows people to communicate with friends and family using their voice. There's no denying that voicemail is more convenient than text messages. Many people prefer to use voicemail to communicate with business associates, friends and family members. We find that some people are looking for ways to save voicemail from iPhone on forums and social networks. This makes sense when you consider that voicemail takes up more space than text messages. To free up iPhone internal storage, people should download voice messages from iPhone to computer and delete them on iOS device.
Additionally, if you are upgrading to a new iPhone or have two iDevices, you need to master the skill of transferring voicemail from iPhone to iPhone. Luckily, Apple has catered to such demands and released several ways to move voicemail between devices using iCloud or AirDrop. In addition to Apple services, you can learn more about the features of this tutorial as we tell you four ways to save voicemail from iPhone X/8/8 Plus/7/7 Plus/6/6s/5/5c/5s/4 Moreover, we will share step-by-step guides to help you complete this task easily.
By email
Transferring media files via email is also a fairly simple method. All you need to do is send the files to your email address. This method is recommended if the data you want to transfer is small, for example, it weighs 5-10 MB.
If this method works for you, follow these steps:
- Select the file you would like to transfer.
- Tag it and click on the “Share” button.
- Select "Mail" from the available options.
- Next, send the selected file to your own email address.
- Finally, log into your account via your computer.
- Open an email you recently sent to yourself to download the attachments to your computer.
How to create a voice message in VK
Today, many users use recorded voice messages for conversations instead of text messages. This way you can say something important much easier and faster than if you type sentences by letter in VK.
Button for creating a voice message in VK
By default, this option is available in the mobile application. You need to open your messages in the VKontakte application and click on the button with the microphone. Say your message and click on “Send”.
Voice message in VK
The same function is available in the web version if a microphone is connected to the computer. When you select this feature in your browser, it will ask you for permission to use your microphone.
Allow the browser to use the microphone
This must be provided and you can immediately record your message. If the recording does not work out, you can delete it immediately. A successful entry will be sent to the recipient by clicking on the appropriate button below.
Via Wi-Fi
AirDroid is a popular Android application. But many people don't know that it is also available for iOS devices. The program works in a similar way, allowing users to transfer files from iPhone to PC via Wi-Fi.
- Download and install AirDroid on your iPhone and make sure your phone is connected to the same Wi-Fi network as your computer.
- Open the app and activate smartphone detection in the “My Devices” section.
- Open a browser on your computer and enter the IP address listed on your iPhone.
- Accept the request to connect via phone.
- Now you can see your iPhone files and control it remotely.
- Use the Upload File or Upload Folder options to transfer your data.
How to trim a recording on Xiaomi?
Trimming and editing video on a Xiaomi smartphone
- Open the “Gallery” application on your Xiaomi smartphone.
- Find the video you want and briefly click on it.
- At the bottom, select “Change”.
- Trim mode allows you to trim your source footage to the right (front) or left (back).
5 Dec.
2022 Interesting materials:
How do I know if I have an SSD? How to find the Hypotenuse in an isosceles triangle? How do you know if the chicken is ready? How to find out and review the cadastral value of real estate? How to find out username in Ubuntu? How to find out the device name and MAC address? How to find out the TIN of a foreign citizen? How to find out the TIN of an employer by name? How to find out the IP address received from the provider? How to find out IP address in Linux?
Using a Leef iBridge flash drive
If you have a Leef iBridge flash drive, you can use it to transfer data. This device is unique in that it has two inputs: Lightning and USB. Therefore, just connect the flash drive to your phone, copy the necessary files to it, and then insert the flash drive into your PC. The principle of operation is quite simple, you should not have any problems.
What to do if you can’t download the file
An example of how to send an audio recording on WhatsApp using File Explorer:
- Go to Explorer or any other file manager.
- Open your smartphone's memory.
- Find the folder MIUI for Xiaomi phones.
- Open section Sound_recorder.
- The file can be found in one of the folders in the new window.
Where are audio recordings from the voice recorder stored for sending to WhatsApp? The location depends on the brand of the phone and the installed operating system. To avoid wasting time searching for the desired section, open the voice recorder, select the audio and insert it into the WhatsApp chat.