A user who believes that the built-in voice recorder on an iPhone can fully replace a portable device for recording conversations is greatly mistaken. When using a voice recorder, the owner of an Apple device will encounter a number of inconveniences: firstly , the recording itself will be of rather low quality, and secondly , transferring the audio file to a PC for subsequent processing will not be easy. The low quality is explained by the fact that call recording is an additional feature for the iPhone; Difficulties with data transfer are due to the privacy policy, in which Apple firmly believes.
However, if you need to make an urgent and unplanned recording, the iPhone will help out. For this reason, it is important to know exactly where the voice recorder is located on your Apple device and how to use it.
Where is the voice recorder on an iPhone?
Voice Recorder is a standard pre-installed application that comes with every iPhone model. You can find it on the desktop of your gadget (called by the “Home” button). Where is the voice recorder on the iPhone? If you have not rearranged the icons, then traditionally its icon will be on the second page of the screen.
The search will not be long - the icon is signed with the word “Dictaphone”. If your iOS device is older than 7, then this application will be indicated by a blue icon with a microphone icon. On gadgets with a “younger” version of the OS, there is an icon with an oscillogram - a graphical drawing of a sound wave. Fun fact: The icon shown on this icon represents the word Apple.
If you still can’t find where the voice recorder is on your iPhone, then do the following:
- Go to Settings.
- Next is “Storage”.
- Scroll through the list to see if there is a Voice Recorder app.
If the program is not found in this way, then there is only one conclusion - it has been removed from the device. You can find it again by downloading this application from the App Store.
Bonus: 5 best iPhone apps
If the standard basic application for recording sound does not suit the iPhone owner, then the user can download any application from the official iOS marketplace, AppStore. The selection of software of this kind on this resource is extremely extensive, therefore, in order to reduce the time of searching for the necessary program, this article presents a rating of the best voice recorder applications for portable Apple gadgets.
| Name | Description | Rating |
| Voice recorder - voice recording | The voice recorder records sound in good quality and also has additional features: creating tags, converting audio files into notes. | ★★★★★ |
| Voice recorder - audio editor | An application with almost endless functionality, such as autopause when there is no sound, recording at a certain time, using a Bluetooth microphone | ★★★★★ |
| Smart voice recorder – Lilia | The main feature of this recording program is noise reduction of background sounds. | ★★★★★ |
| Voice Recorder - For Recording Sound | Standard application for recording sound. The only feature that can be highlighted is the choice of format for the future recording. | ★★★★★ |
| Recording and changing your voice on a voice recorder - Cool prank prank on the phone | Although this application can record sound like a standard voice recorder, the main function of this program is to change the voice for practical jokes and pranks. | ★★★★★ |
4.5/5 — (28 votes)
How to record sound?
Knowing where the voice recorder is in iPhone 6, 4, 8, 5, 7 and other versions, we will want to use this program. It's quite easy to do this:
- Launch the application by clicking on its icon.
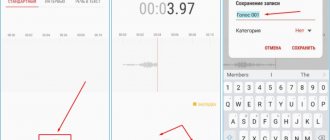
- Click on the big red button in the middle of the screen to start recording.
- During the process, pay attention to the scale - an indicator of the recording volume in decibels will be displayed there. It is important to ensure that the scale is at the average level. When the volume is small, the sound will be quiet and unintelligible, and when it is large, it will wheeze and unpleasantly hurt the ear. In addition, the recording time is displayed on the scale.
- If you want to pause the process, then tap on the red square in the white circle (the big red record button turns into it). Resume recording - press the big red button on the screen again.
- You can listen to the recording by tapping on the “Start” icon (inverted triangle). Stop playing - click on “Pause”.
- Pay attention to the volume icon (horn) in the upper right corner. When it is inactive (white), audio will be output from the speaker for phone calls. The horn can be activated (its color will change to blue). In this case, the sound will come from the speaker for listening to music, giving signals, i.e. it will become more audible. In both cases, you can adjust its power using the volume rocker as standard.
- By clicking on the blue edit icon on the right side (including while listening to a recording), you can trim the audio file, delete it, or cancel the changes.
- Do you want to save the audio recording? Click on "Done".
- The file can be saved either under a standard name (“New entry 1, 2, 3”, etc.), or after erasing it, under your own.
Is it legal to record calls in Russia?
Recording calls in itself does not violate the law. However, it is important to know what you can do next with such a recording and what you cannot do.
There are categories of information that cannot be accessed without the consent of the owner. This includes trade secrets, privacy information and personal information. If the call concerns domestic issues, it does not fall into the listed categories, and it can be recorded and stored, but not in the public domain. For personal purposes, you can use call recordings without restrictions (for example, recording calls in order to later remember all the important details of the dialogue).
The secrecy of telephone conversations is protected by Article 138 of the Criminal Code of the Russian Federation. If you or the interlocutor during the conversation decided to record this call, the article does not apply to you. But if you deliberately record someone else’s conversation, in which you yourself do not take part, then you face sanctions for such a crime, from a fine of 80,000 rubles to correctional labor for up to one year.
That is, if you communicate with your boss and record the call, then this is legal. And if your boss is talking on the phone with your colleague, and you record the conversation, then such a recording is a crime.
It is important to remember that you cannot transfer audio recordings of a conversation to strangers without the consent of your interlocutor. Violation is subject to administrative liability under Article 13.14 of the Code of Administrative Offenses of the Russian Federation and a fine of 500 to 1000 rubles.
Working with records
We know where the voice recorder is located in the iPhone 7, as well as in earlier and later versions. But how to find recorded files, how can you work with them? It's simple:
- Go to the Voice Recorder app.
- In the bottom half of the screen there will be a list of all the audio recordings saved on your device.
- Click on the one you need.
- The audio file can be listened to by clicking on “Play” through headphones, conversation speakers and music broadcasts.
- Editing (cropping) is also available.
- An entry can be deleted from the device’s memory by tapping on the trash can.
- Click on the “Share” icon - the audio file will be sent in a message (including iMessage), by email, as well as in applications that support this function - Vkontakte, What's App, etc.
- In the same “Share” you can save the entry in “Notes”, “Files”, or copy it for pasting somewhere.
Part 1: How to Record Audio on iPhone Using Native Screen Recorder
Before iOS 11, iPhone users needed to record audio on iPhone using a computer and other software. If you want to record audio on iPhone without an external device, you can download and use some unofficial apps like Airshou. But these apps required complex installation. Now, in iOS 11 and later, Apple has developed an official native screen recording tool so you can record what you want. With this built-in screen recorder, you can not only record video of your iPhone screen, but also record audio and voiceovers. And the recorded videos will be saved in your Photos app. We can say the easiest way to record your iPhone screen and audio. But this native screen recorder doesn't have an app, it only has a control option in the control center. And you need to turn it on before you start recording. If you want how to record audio on iPhone using built-in screen recorder, you can follow the below steps.
Step 1. Add Screen Recording Shortcut
Go to the Settings app, then scroll down and tap Control Center. Then click "Customize Controls" from there. When you are on the Settings page, scroll down to find Screen Recording and then tap on the green plus icon that is next to it to add Screen Recording to Control Center.
Step 2. Start recording audio on iPhone
Once you have added this custom screen recorder to the control center, you will see a Screen Recorder toggle that you can easily click on after opening the control center. If you want to record, simply swipe up from the bottom of the screen to access the control center, then tap the Screen Recording icon. After three seconds, screen recording will begin.
Note: By default, Screen Recorders will also record any music and sounds in the app while the recording process begins. If you want to change the audio resource, such as recording your voice, you can simply press and hold 3D Touch on the screen recording icon and set it the way you want.
Step 3. Stop audio recording on iPhone
If you want to stop this recording, you can access the control center again and tap the screen recording icon to stop it. Or you can long press or 3D Click on it and then click "Stop Recording". Another way, you can simply click on the red recording indicator, which is located in the status bar, and then click on Stop. And then this video will be saved in your photos. You can also edit the audio files as you wish by clicking the Edit button.
Don't Miss: How to Fix AirPlay Not Working
Sending an audio file to your computer
The easiest way to share a recorded file with a PC or laptop is to use iTunes. This is done like this:
- Connect your iPhone to your computer via USB. Launch iTunes.
- Click on the smartphone icon in the program window that opens on your computer.
- In Devices (right side of the screen), select Music.
- Definitely oh!
- Start synchronization.
- Once the process is complete, again in the right block of the iTunes window, in the “Playlists” section, find “Voice Recordings”.
- Right-click on the file of interest and select “Show in Explorer. "
- From the folder that appears, the sound recording can be copied to any other.
So we have looked at a number of issues related to the voice recorder on an iPhone. However, many users prefer to download third-party applications with a similar function instead. The reason is simple: the standard program interrupts work when making or answering a call. And when activated in telephone conversation mode, it warns the interlocutor about the recording with a constant beeping sound, which spoils the audio file.
The Voice Recorder application is not the most popular on the iPhone. Often it is not used for weeks or months. But there are times when it becomes necessary.
As a rule, many users have a problem sending the recording they made to their computer.
It's actually quite simple. You can upload a recording to your computer, or indeed to any other device, in the following ways:
- by email;
- text message;
- by sending a message via a social network or instant messenger;
- by uploading the recording to cloud storage;
- synchronizing your iPhone with your PC via iTunes.
How to send an entry?
Recordings made through the voice recorder of an Apple smartphone can be sent to friends via MMS or email.
To send an audio file from an iPhone, you need to:
- Select a note in the voice recorder interface, click on the export button (a similar button is also available in the information section).
- Select an email address so that a new message with an attached file opens in the mail program, or click on MMS - then it opens in the message program.
If the message is too heavy, the system will prompt you to transfer the entry to your computer. The iTunes utility will automatically move all audio notes to the media library when you connect the gadget to a PC or laptop. Thanks to synchronization, the user will be able to listen to recordings on the computer. A backup copy will also be created, and if files are deleted from the mobile gadget and then needed again, you can always find them in the media library.
In the process of exchanging data between the PC and the smartphone, audio files in the form of notes are moved to the playlist of the voice recorder program. If it has not been created previously, the iTunes utility will do it. And even after moving the notes to the computer, they will remain in the voice recorder until the user manually deletes them. At the same time, if you erase files from the memory of your mobile device, they will not disappear from the playlist of the iTunes utility. But when you delete notes in the utility, they will be automatically erased from the iPhone’s memory the next time data is exchanged between the two devices.
Using the music bar in iTunes, the user can sync a playlist with the iPod application on an Apple smartphone.
Method 1: Without iTunes
First, go to the Voice Recorder application itself. Next follow the steps:
This is a way out when you don’t have time to connect to a computer, but you need to quickly send the saved audio recording to your friends and acquaintances. This can be done in a few seconds if your email account is configured on your smartphone.
The second method is more complicated, but no less reliable. You need to synchronize with iTunes.
To do this, you should perform the following steps:
- Select device.
- Click Sync.
- View everything that was recorded on the voice recorder in Voice Recordings. Extract the ones you need from there by selecting Show in Explorer.
- Send to the selected address.
Another option that many iPhone owners use is to install the iFunBox file manager. With the help of this popular program, many functions are performed, including processing data from the voice recorder. Working with the manager is not difficult, the interface is clear.
In this manual, we will look at the option of recording a voice and transferring the resulting audio file to a computer using the Voice Memos program.
This program is part of the preinstalled programs that come with your iPhone. This is what the program icon looks like on the iPhone desktop:
Open Voice Memos.
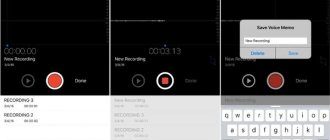
To start recording, press the red button 1.
For recording, you can use either the built-in or external microphone or headset. Control the recording level. It can be adjusted by changing the distance to the microphone and the volume at which you speak.
Stop recording by pressing the red button again. When you stop recording, the trim tool 2 becomes available. With its help, you can trim unnecessary fragments at the beginning and end of the recording.
Click on this tool. The diagram on the screen will change - the recorded fragment will now be shown in full. Along its edges there will be red vertical lines with small circles 3, which serve as markers for the beginning and end of the final recording.
Click on one of the circles and move it to cut off the empty space on the diagram. After the unnecessary parts on the diagram have been removed, click the “Trim” button 4 and confirm this action 5.
To save the audio file, click the Done button 6, in the window that opens, enter its name 7 and click Save. The newly recorded file will appear in the list of voice notes.
Now you need to transfer this file to your computer
You can transfer audio files recorded in Voice Memos to your computer in the following ways:
- Sync iPhone data with iTunes.
- Using the AirDrop service.
- Using the iMessage service.
- Send files by email.
Description
Before you think, you need to understand what application we are talking about. It is possible that this program is not included in the operating system by default.
Voice Recorder is an application that allows you to make your own audio recordings using your phone. The program is included in the list of standard system utilities. Performs the function of a real voice recorder. The user will be able to create and play recordings on the iPhone. The device's built-in microphone is used to create tracks.
But where is the voice recorder on the iPhone? Is it originally included in this phone? Yes, such a utility exists. The main thing is to know where to look for it.
Transfer an audio file by syncing data with iTunes
In order for audio files recorded using Voice Memos to sync with iTunes, this option must be installed in iTunes. To set up Voice Memos synchronization, follow these steps:
- Connect your iPhone to your computer and open the iTunes app.
- Click the iPhone 1 button in the iTunes menu. This button appears in iTunes when you connect your iPhone.
- Go to the Music section 2 and check the “Sync Music” 3 and “Include voice memos” 4 checkboxes.
After this, start synchronization by clicking the “Sync” button 5 located in the lower right corner of the iTunes window.
When you sync your iPhone with iTunes, audio recordings made using Vioce Memos are placed in the playlist of the same name. Click the Music button 6 to go to your iTunes music library and highlight the Voice Memos playlist 7 in the side menu. In the list of audio files, you will see a line with the name of the audio file 8 that was recorded using Voice Memos.
This file is stored in iTunes in this form. But, in the file system this file is stored with a completely different name. To see this file in the file system, select its line in iTunes 8, right-click and select “Show in Finder” 9 from the context menu.
A file manager window will open with the selected file 10. The file name reflects the time it was created, but not the name it was given in Vioce Memos. Rename the file using standard operating system tools to make it easier to find it in the file manager in the future. You can also move it to a special folder created for virtual museum or tour audio files.
Voice recorder on iPad - Voice Recorder review
What are the main requirements for a voice recorder: 1. Recording quality
I would say the recording quality on the iPad is excellent - voices recorded from several meters can be heard quite clearly. If we speak 20-50 centimeters from the iPad, then listening to what is recorded is very pleasant. There are no particular interferences - of course, I didn’t get around to analyzing the file in special programs - I’m just talking about visual impressions.
2. Ease of use of the program
Look how ascetic the program interface is, but at the same time everything is very stylish. For the interface, I would give the program an A.
3. Ability to easily transfer recorded files.
Files are written in CAF format. More about this format below. Such files are played on the computer using the usual favorite Apple player - Quick Time. Copying files to your computer is very simple:
In the iPad -> Programs section in iTunes, we find Voice Recorder and see Caf files there, which we can save to the computer using the “Save” button.
4. Ability to edit files - remove pauses.
I did not find such a possibility. It's a pity. Sometimes you want to cut out pauses at the beginning and end - you will have to transfer all the processing to the computer. Although you can, for example, edit the file parameters: name, give it a label.
I would give the overall rating to the program 4+ out of 5. A minus point is precisely for the inability to edit recorded files, and a plus for the fact that you can pause recording. Overall, it’s a very, very good voice recorder for iPad.
Sending an audio file by email
Select the line of the audio file that you want to transfer to your computer and in the panel that opens, click on the Share icon 1.
Select the email icon 2 from the options provided for sending a file.
A window for sending an email message will open with the audio file you selected attached. The “From” field will contain your email address, and the subject field will contain the name of the phonogram being sent.
Enter the recipient's address in the "To" field 3. This can be the same address if you use the same address on both your computer and smartphone. Or another. It is important that the letter can be opened on a computer and the file attached to it can be saved.
Click the "Submit" button 4.
After you open the email on your computer, save the attached audio file to the prepared folder.
4. Record Phone Calls (Developer: Arun Nair)
The application supports recording of both outgoing and incoming calls. The utility has a very user-friendly user interface; there will be no problems with recording calls. Along with the main functions, the application offers the ability to edit posts and upload them to Slack, Google Drive, Dropbox. Call recording works without an Internet connection. There is a free trial period of 3 days. After this you need to pay for a subscription.
It is important to remember that in the application you need to select a Russian service number, otherwise the operator will charge a fabulous amount for a call to the service number of the application.
Sending a soundtrack via iMessage
The iMessage service only works with Apple devices, so it can only be used if, in addition to your iPhone, you also have a computer with the Mac OS X operating system.
To send an audio file via iMessage, click on the line with its name and in the panel that opens, select the Share icon 1. From the suggested file transfer options, select Message 2.
The iMessage service window will open, ready to send the file (it's already attached to the message).
Enter your computer's email address 3 in the recipient field.
Click Send 4. The message will be sent.
Open the Messages application on your computer and save the resulting soundtrack to the file system.
Transferring a sound recording from an iPhone made using the standard Voice Recorder application to a computer is not difficult at all. To do this, it is enough to have a cable to connect the mobile device to the PC and the program
Part 4: How to Record iPhone Music Using GarageBand
It's easy to use Screen Recording and Voice Memos to record audio on iPhone, but these two apps only offer basic features and you won't be able to find more advanced features from them. Besides recording audio using Screen Recording and Voice Memos, you can also download GarageBand on your iPhone to record music. GarageBand is an amazing software developed by Apple, so it is very easy to get. With it, you can create your own music and edit it. You can also use such a great app to record audio on iPhone. It provides you with more advanced features to record better music. You can follow the following steps to record iPhone music with GarageBand.
Step 1. Download and launch GarageBand.
Download GarageBand from the App Store and then launch it on your iPhone. After this, the “My Songs” page will automatically open. You can simply click the + Plus icon to create a new song in GarageBand.
Step 2. Select Audio Recorder
You can open the Instrument Browser, where you can slide to select the instrument you want to record sounds or play music with GarageBand. You need to select Audio Recorder from these tools.
Step 3. Record Audio on iPhone
Tap the Record icon in the top control bar to record audio using an audio recorder. When you're done recording, just click the play button. You can then press the button again to play the recorded audio.
Step 4. Edit your music
You can also match the programmed sound effect to the recorded sounds using Audio Recorder. And you can edit your audio tracks and recordings as you wish.
How to download a recording from an iPhone voice recorder via iTunes
1. Connect your smartphone to your computer using a cable and launch iTunes.
2. Go to the section with information about the device by clicking on the device name in the panel on the left or on the icon located at the top.
4. Following the completed steps, click on the “Apply” button, then synchronize the contents of your mobile device with your PC.
Voice recordings transferred from iPhone in this way can be listened to right there in iTunes. Audio files are available for playback in the playlist created during synchronization.
iCall call recording
This utility allows you to record incoming calls in just one click. Outgoing calls can also be recorded, but the process of enabling recording will be a little more complicated. Recordings can also be shared with colleagues and friends and saved to your device. The Pro version gives you more options than the regular version: the recording duration is unlimited and there are no ads in the application. A subscription can be purchased for a week, month or year.
How to transfer recordings from iPhone voice recorder without iTunes
iTunes is a good solution if you frequently connect your mobile device to your PC to synchronize and create backups, but if you rarely use iTunes or the program is not installed on your computer at all, it will be more convenient to transfer voice recordings in another way.
Method 1 - file managers for iOS. A program, like the well-known iFunbox, is installed on the computer. The mobile device is connected to the desktop, after which you use the program to find the desired voice recording and copy the audio file to the PC.
Method 2 - cloud data storage. If you actively use cloud file storage services, this method is the simplest solution. You don't need cable, iTunes or alternative managers. It is enough to export the recording, for example, to Dropbox, wait for the data to synchronize and take it from the Dropbox folder on your computer.
If you haven’t found an answer to your question or something didn’t work out for you, and there is no suitable solution in the comments below, ask a question through ours. It's fast, simple, convenient and doesn't require registration. You will find answers to your and other questions in the section.
This guide describes iOS 7 features for iPhone 4/4S/5/5c/5s.
CAF format. What it is?
And now the promised details about the CAF format. CAF stands for Core Audio Format. Caf is a container for storing audio data. This format was developed by Apple to overcome the limitations imposed by the Aiff and Wav formats: in particular, the file size limit of 4 gigabytes. In theory, the CAF format allows hundreds of years of audio data to be recorded into a single file.
CAF is used in Apple devices, for example, the SMS ringtone for iPhone is written in this format. Caf files are well suited for surround sound recording.
Record
Create an entry
. Press or press the center button on the headphones. Press again to pause or resume recording. To save the recording, click Done.
Recordings made using the built-in microphone are monaural, but stereo recordings can be made using an external stereo microphone. The external microphone connects to the headphone jack or Lightning connector (iPhone 5 and later) or to the 30-pin dock connector (iPhone 4S and earlier). Look for accessories that have Apple's "Made for iPhone" or "Works with iPhone" logo.
Setting the recording volume level
. Move the microphone closer to the recording subject. For best recording quality, the maximum volume level on the level meter should be between –3 dB and 0 dB.
Muting the audio for recording start and end signals
. Use the volume buttons on your iPhone to set the volume to the minimum level.
Multitasking
. To use another program while recording, press the Home button and open the desired program. To return to Voice Recorder, tap the red line at the top of the screen.
Listening to a recording
. Click an entry in the list, then click the button. Click Pause Recording.
How to record a note on iPhone voice recorder?
The presence of a voice recorder in a smartphone also makes it a portable recording gadget. It is noteworthy that the user can choose exactly how he will record - through the microphone that is built into the device, through a Bluetooth microphone or through an external microphone.
Reference. If you connect an external microphone, you need to do it into the dock connector or headset jack. As the latter, it is allowed to use headphones from Apple or accessories from other manufacturers compatible with Apple gadgets (they must have the appropriate compatibility label), you must:
- Find its icon on the display and click on it.
- Set the required volume level.
- Maintain this level in the range from -3 to 0 decibels to ensure maximum sound quality.
To record an audio file, do the following:
- Press the large red button (or the button on the headphones).
- The process will start, you can dictate information.
- To pause voice recording, you need to click on the corresponding icon in the program interface or again on the headphone button. As you can see, all actions are simple and do not require special knowledge or skills.
At the very beginning of the recording, when the user begins to say something, the device makes a short sound, similar to a bell. But it can be disabled by setting the ringer switch to silent mode.
If you need to use other software during the recording process, you need to block your smartphone or press the home button.
Transferring recordings to your computer
When a synced voice recording is deleted from iTunes, it remains on the device it was recorded on, but is deleted from all iPhones and iPod touches it was synced to. If a synced voice recording was deleted on iPhone, it is copied back to iPhone the next time the device syncs with iTunes, but it cannot be synced again in iTunes a second time.
Sync voice recordings with iTunes
. Connect your iPhone to your computer, then select it in iTunes. Select Music at the top of the screen (between Programs and Movies), select music sync, select Include Voice Memos, and click Apply.
Voice recordings synced from iPhone to your computer will appear in the Music list and Voice Recordings playlist in iTunes. Voice recordings synced from your computer will appear in Voice Recorder on iPhone, but not in Music.
The Voice Recorder application is present in the set of standard programs of any Apple iPhone, from the very first models to the more modern ones - 4, 4S. Most likely, the gentleman's set of subsequent versions of iOS will also be equipped with this, sometimes useful, application. I think there’s no point in talking about the step-by-step operation of recording voice notes, I pressed the red button and the recording started, but here’s how to download voice recorder recordings from an iPhone
some users do not know how to connect to the computer and find their location.
Before we look at the procedure for downloading voice recordings from an iPhone, I would like to talk about one feature of the Voice Recorder program. The fact is that on an iPhone you won’t be able to record a telephone conversation using a standard voice recorder, so you won’t be able to play Bond by recording the voice of the caller on the other end of the line using standard means. Thus, Apple does not violate the rights of the interlocutor.
Now on topic, there are two official ways to download voice recorder recordings from an iPhone to a computer - using synchronization in iTunes or you can transfer the recordings by email.
Sync voice recorder recordings to iTunes
This method of copying recordings from an iPhone voice recorder to a computer is possible with the help of a USB cable.
1. Launch iTunes and . Click on the phone that appears in the “Devices” section
2. In the “Browse” tab, check the “Process music and video manually” checkbox
3. Then, in the “Music” tab, put the markers: “Synchronize music” and “Include voice recordings.” Click the “Apply” button to start synchronization.
4. Synchronization will help you download voice recorder recordings from your iPhone and they will appear in iTunes in the “Music” section
Downloaded voice recorder recordings are also displayed in the “Voice recordings” section, located in playlists or in devices. You can listen to them here
5. If you want to rewrite downloaded recordings to Flash, you will have to find them on your computer, this is easy to do - right-click on the recordings, select “Show in Windows Explorer” (depending on the OS version, this item may sound a little different) and it will open folder with your notes.
If you don’t have a computer or iTunes at hand, but you urgently need the recordings, you can use the second method, using email.
Send voice recorder from iPhone by mail
In order to transfer voice recordings from a phone via email, we will need to make a recording using the Voice Recorder application. Then we perform the following steps:
1. Click on the button with three horizontal stripes 2. Select the voice recording you need and click the blue arrow button 3. Select “E-mail”, enter the recipient’s address and send
The disadvantage of this method is that it is not possible to send all voice notes together at once; you have to send them one at a time, which is not very convenient. If there are a lot of recordings, it is more convenient to transfer them using iTunes.
There is also a third way to copy voice recordings of a voice recorder from an Apple iPhone to a computer, using , you can try it; i-FunBox helped out many who were unable to transfer voice recordings of a voice recorder to a computer using iTunes and mail.
reading time: 2 minutes
iPhone smartphones have a built-in voice recorder. Compared to professional call recording programs, it has significant disadvantages. They consist in the low quality of recorded files and the difficulty of transferring files from a smartphone to a personal computer. Let's look at how to turn on the voice recorder on iPhone 6 and other versions of the smartphone.
Replacement of the voice recorder on iPhone in the form of third-party applications
When purchasing an iPhone, the user receives along with the smartphone an impressive set of pre-installed programs and services. On the one hand, such a set is very useful and convenient, since it saves the user from having to search for the applications he needs to work. For example, a clock, a phone book, a calendar, a voice recorder, a media player, an alarm clock, maps, a navigator and many other utilities. We have become so accustomed to them that the thought of replacing them with alternative options does not even arise.
A set of useful applications turns your phone into a multifunctional device. Why carry a watch or a notebook when such options are provided by the smartphone manufacturer. But pre-installed services have one serious drawback - limited capabilities. They are able to satisfy only the basic needs of the owner. As planned by the developers, the user himself will download and install the application with the set of options he needs.
This expression is true for the iPhone's pre-installed voice recorder. Software from other developers has broad functionality, a user-friendly interface and offers more options to its users.
IntCall
Paid application for recording telephone conversations IntCall from TeleStar Ltd. The utility supports the iOS system. The latter is installed on iPhones. Accordingly, you can install the program on any smartphone. It is only necessary that the device meets the minimum system requirements. This information is in the description block for the software.
The utility works in conjunction with a pre-installed voice recorder. If the latter records only the voice of the speaker into the microphone, then IntCall records the conversation of both interlocutors. Since manufacturers are concerned about the confidentiality of information, trying to make sure that it is not available to third parties, the recorded information is saved exclusively in the phone’s memory.
Despite this secrecy, the functionality of the application still allows you to distribute recorded files. The user can:
- send them by email;
- download to your computer using the iTunes File Sharing option;
- send via instant messaging service like WhatsApp;
- export to cloud services like Google Drive.
The disadvantages of the application include the low volume level of the interlocutor. Since the owner speaks directly into the microphone, his voice on the recording is always clear, while the voice of the interlocutor is barely audible. Additional settings or speakerphone mode can correct this drawback.
Audio Recorder
A shareware utility to replace the standard voice recorder on your phone. It allows phone calls and simple voice. There are no restrictions on the number of entries. It all depends on the free space of the internal or external drive. The functionality of the application includes:
- transcribing the audio track into text using modern technologies;
- instant start and stop of the voice recording process from the device’s home screen;
- expanded support for cloud services. The list of services is an order of magnitude higher than that of a regular voice recorder;
- voice broadcasting via social networks;
- several audio file formats;
- password protection of records;
- editing, trimming and overdubbing audio tracks;
- rewind and set playback speed;
- adding your favorite entries to the favorites directory.
The program is shareware, as to gain access to some options you need to subscribe to a paid subscription. Recording telephone conversations assumes that the operator supports conference calling standards.
It is impossible to download the program on iOS in the App Store application, so you need to search on third-party resources.
Google Voice
The Google Voice app allows you to record voice, phone conversations, send text messages, transcribe audio to text, and make voice calls. That is why the program has become so widespread among users.
It works both on Android and iOS phones and on personal computers. Regular synchronization of devices allows you to access files from anywhere in the world and from any device.
Advantages of the application:
- one number from Google for all user devices;
- free calls and messages within the service;
- filtering of incoming calls. The system itself determines the number, and if it is on the list of unwanted calls, rejects it;
- redirection;
- distribution of calls between subscriber phones.
The presented list is not limited to just these functions. Google, as always, surprises with the availability of a wide range of opportunities for its customers. Therefore, the functionality of the application is very wide.
How to record in the application
You can turn on the voice recorder on iPhone 7 (and other versions) and start recording an audio file as follows:
- Bring the device with the application turned on as close to the source as possible.
- Press “Rec” (to pause, press again).
- Click “Done” to complete recording.
- When the message “Save voice recording” appears, enter a name.
- Click "Save".
To listen to a recording in a file:
- Click on the button with the image of a speaker.
- Select the desired track (file) in the list.
- Click “Play” to listen.
- Use the slider to rewind.
- To trim a recording, use “Editing”.
Managing notes
To delete a file, you just need to click on the name of the note and then on the delete button.
To view any information about a recording (for example, when it was created, its duration, etc.), you need to click on the information section, which is located next to the file name. In the same section, the user can assign any name to the file.
To trim a note anywhere you need:
- On the program screen, click next to the entry you want to shorten.
- Click on the crop button.
- Using time markers, drag edges to the audio to define the start and end of the recording.
- Listen to what happens after editing.
- Confirm the operation by clicking on the cut button.
After this, the audio file will be saved in a modified form, and the edits made will no longer be undone.
Transferring files from the recorder to a personal computer or mobile devices
How to transfer Voice Recorder application files to a personal computer or other devices? To transfer to mobile devices, you should use MMS messages and the “Share” button. To transfer to another iPhone, you can use the iMessage application, which will be completely free.
Transferring files to a computer is much more problematic. Let's figure out how to send a recording from an iPhone voice recorder to a computer.
- Use email; to do this, you need to set up the Mail application on your iPhone.
- Click the "Share" button.
- Select "Mail".
- Enter your email address in the "To" field.
- Send an email with the Voice Recorder application file.
- Save the file on your personal computer.
It is advisable to have two email addresses for sending and receiving files. An email with the file usually arrives within a few minutes, but the sending process may take a while.
You can record Voice Recorder application files directly from iPhone to a personal computer if you properly synchronize your smartphone with iTunes.
- Launch the iTunes application.
- Connect your smartphone to your personal computer.
- Enter the mobile device management menu.
- Enter "Settings".
- Select "Music".
- Activate the “Enable voice recordings” checkbox.
- Click "Synchronize".
- Start file sharing.
- Enter the “Voice Recordings” section in the “Music Playlists” block.
- Find the recorded voice recording file.
- Click the right mouse button.
- Click "Show in Windows Explorer".
Part 5: Optimal Solution to Record iPhone Audio with Apeaksoft
The last method we want to introduce to you is using Apeaksoft. iOS Screen Recorder to record audio on iPhone. Apeaksoft iOS Screen Recorder is a recording software that you can use to record iOS screen as well as audio and other sounds. It is one of the most professional software that provides you with the easiest way to mirror and record your iOS device on computer. You can see your iOS screen on your computer in real time and even record it with just one click. It is also a comprehensive application that fully supports all models of iOS devices, including iPhone, iPad, and iPod Touch. Moreover, it is now compatible with iOS 11/12/13/14 and above. Additionally, iOS Screen Recorder supports customizing recording settings to suit your needs. Once the recording is completed, you can output HD videos in MP4 format with high quality. You can also easily share your recording on websites. But iOS Screen Recorder is currently being developed for Windows only, so you can only download the Windows version to use it. To learn how to record audio on iPhone, just read the following detailed instructions.
Free Download
Step 1. Download iOS Screen Recorder
Firstly, download Apeaksoft iOS Screen Recorder from Apeaksoft official website to your computer. And then complete the installation according to the instructions it gives you. Once it's installed, you can run it.
Step 2. Connect with the same Wi-Fi
The condition for successfully mirroring an iPhone to a computer is that both devices are connected to the same network. So check whether your iPhone and computer are on the same network connection or not.
Step 3: Mirror iPhone to Computer
Now you can mirror your iPhone to computer by relying on AirPlay. Therefore, you need to enable AirPlay first. The method for enabling AirPlay and mirroring to your computer is slightly different between different versions of iOS.
(1) For iOS 7, iOS 8 and iOS 9: Swipe up from the bottom of the iPhone screen to access Control Center, then find and tap AirPlay. Next, you can see Apeaksoft iOS Screen Recorder from the list that AirPlay shows you. Just select it and then enable mirroring.
(2) For iOS 10: Swipe up from the bottom of the iPhone screen to turn on Control Center, and then tap the AirPlay Mirroring button that has a TV icon. Then select Apeaksoft iOS Screen Recorder from the list to connect to it.
(3) For iOS 11: Similar to the previous two cases, you need to swipe up from the bottom of the iPhone screen to access the control center first. And then select Apeaksoft iOS Screen Recorder on Apple TV in the search page to enable the mirroring feature. Learn more about How to Screen Record on iOS 11.
Step 4. Record Audio on iPhone
When you see your iPhone screen on your computer, you can record the iPhone screen as well as the audio by pressing the right circle button. If you want to stop recording, you need to press the button again. At the same time, Apeaksoft iOS Screen Recorder will open for you the folder in which the recorded audio files are saved.
Check this post to get more iPhone screen apps.
Benefits of professional voice recording apps
Figuring out how to turn on the voice recorder on iPhone 5 (and other versions) is quite simple. After all, the functionality of the application is insignificant. For this reason, many iPhone smartphone owners download and purchase professional or amateur voice recording applications on the AppStore, which have much more features. Many of them offer users to record telephone conversations. The built-in Voice Recorder application turns off recording when starting a telephone conversation, as the manufacturer is subject to the privacy policy. Namely, this voice recorder function is important for many iPhone owners, especially relevant for telephone interviews.
The built-in Voice Recorder application competes with IntCall, Audio Recorder, and Google Voice programs. They also have their drawbacks, but in many ways they are superior to the voice recorder application preinstalled on the smartphone.
Among the advantages of third-party voice recording programs are the ability to adjust the recording quality, adjust the microphone sensitivity level, and adjust the sampling frequency. Some applications can turn off recording when a person becomes silent, and quickly turn it on when a person starts speaking. The main disadvantage of such programs is the fact that they are paid.
How to use a voice recorder on iPhone
The voice recorder function in iPhone allows you to quickly record important information and save it to the device’s memory or Apple’s cloud service server. The control interface often changes with each release of a new model, new options appear, and old ones are improved. However, the operating principle remains unchanged.
The application allows you to:
- create voice recordings;
- save them to audio files;
- edit them;
- share them with other users or devices using email, instant messaging, social networks and other services.
The main controls are the start and end recording buttons. In most versions of the application, this function is performed by one button. When starting and stopping the process, the icon image simply changes:
- red circle - start recording;
- two horizontal stripes or a red square - end the recording.
The last action automatically saves the file to your phone. Its name can be seen under the oscilloscope screen. It is assigned according to the selected voice recorder settings. The application and saved files are managed from the general menu.
To record voice, the device has a built-in microphone, where you can speak your text. An alternative to standard equipment is a headphone microphone. The advantage of the headset is your hands are free and there is no need to bring the device closer to your face for better recording quality. We all know that the range of microphones is limited, and the further it is from the sound source, the more extraneous noise will appear as a result.
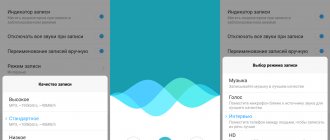
Also in the settings the user can adjust the recording level:
- simple;
- advanced.
The first option involves reducing sound quality in order to save space on the drive. Recording with advanced quality takes up more space, but the sound quality will be much higher. Everyone will be able to choose the best option for themselves.
How to turn on the voice recorder on iPhone and start recording
In order to launch the application, you need to click on the icon located on the desktop or in the “Utilities” folder of the general menu. When the phone is in locked mode, the utility can be activated from the quick launch panel. Also in the phone options there is a voice assistant Siri, which allows you to turn on the voice recorder using a voice command.
The last option is very convenient because it involves performing a minimum number of actions to call the application and saves time. Voice commands are installed in the general application control menu. But the assistant also has its drawbacks. If a person is on the street or in a noisy room, the utility will not always be able to accurately recognize the command and will generate an error.
In such cases, you should use the Quick Launch toolbar. In the settings menu, the user must include it in the console and indicate the place in the list where it will be located. Placing a shortcut is done by simply dragging and dropping.
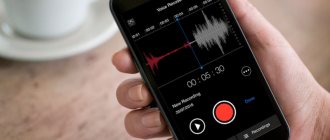
In order to record audio information on your phone, you need to open the recorder and press the record button. An oscillogram of the audio stream will appear on the screen.
The interface of different models differs from each other. However, the developers do not change the principle of operation of the device. The control console, like the screen itself, may vary. All this is done to simplify the lives of users.
How to stop recording on iPhone voice recorder
Touching the button with two horizontal stripes or a red red square ends the recording operation. In fact, the designation of these elements may differ between models. But thanks to the intuitive interface, their differences do not cause much inconvenience to the user. The default settings have a recording time limit of 15-20 minutes.
The software voice recorder automatically saves the recorded data into the device's memory. She independently gives the file a name. The naming principle is quite simple. In the settings there is a field where the name prefix is set. The default is "New Entry". The name is subsequently assigned sequential numbers. The system has an internal counter by which it continues to number files. If the save folder is empty, then the order of numbers starts over.
The functionality of the voice recorder allows the user to listen to and edit the resulting recording. The user can perform these actions in the same window by calling the required option from the menu. After editing and trimming the file, you must click the “Finish” button and the system will save the changes.
"Recording-Dictaphone"
Another free resource is “Dictaphone Recorder”, from the developer Lin Fei. As the name itself says, everything is simple and clear: download, turn on and record whatever you want. The menu, not overloaded with many functions, is ideal for the average user who only needs a voice recorder from time to time. It has everything you need and nothing you don't. The program size is only 6.9 MB, just right for the sixteen gigabyte version of the iPhone 6.
A pleasant interface and navigation, the ability to group files, select a format and export via iTunes, WiFi or iCloud are the key to success among most users. Great choice, and free too.
ALON Dictaphone
If you are looking for a powerful multifunctional voice recorder, then ALON Dictaphone, from the company of the same name, is what you need. True, the application is paid, but with it you get a whole media combine that is suitable not only for iPhone of any series, but also for iPad.
This is the choice of a professional; with such an assistant you can safely conduct an interview, and without editing, immediately send it to the editor. Fortunately, there is a function for sending data in any possible way. The recording comes out very high quality and detailed, with a frequency of 48000 Hz and 320kbps. ALON supports working with an external microphone. By the way, you can adjust the desired quality level yourself so as not to overload the iPhone’s memory.
It is possible to re-record individual sections of the finished track if, for example, they were not successful. In order not to spoil them, the application blocks incoming calls on the iPhone during recording, and no extraneous sounds will spoil the material.
There is a voice activation function for recording - it automatically stops when the speaker stops talking. This helps save both space in the gadget’s memory and battery power. It is very convenient to sort all sound files according to any criteria, as well as play them.
The application costs 279 rubles. (available for order in the Apple iTunes store). It will take up little smartphone memory - only 22.4 MB, the menu is Russified.