Apple ID login to all possible services. That is, this is a single identifier for all Apple services. It is created when you first set up a new gadget, regardless of its type. During operation, you can change it if there is a need to adjust it. Using ID you can:
- immediately restore data when switching to another device running on iOS;
- activate the smartphone search mode in iCloud and remotely block it;
- get 5 GB of free memory;
- do shopping;
- text and use the device for video communication.
All this is just the tip of the iceberg of possibilities. You can create a single “account” yourself and for free
How to connect iPhone to computer
To establish a connection that allows you to log into your iPhone from a computer, you will need to meet the following conditions:
- iPhone (with at least 25% battery charge).
- Lightning - original USB cable (supplied).
- Apple iTunes installed on your computer.
If the iTunes program is not installed on your PC, you can download it for free from the developer’s official resource. Just click "".
The program installation file must be launched. To do this, go to the “Downloads” folder on your computer, double-click on the distribution package, and start the installation:
- The start window lists a description of the program’s capabilities; after reviewing, click “Next”.
- In the next box, if Russian is required, please mark. Then specify the path where the application will be installed, click “Install”.
- Wait until the installation is complete; the application must copy its files to the PC’s hard drive.
- Check the box next to “Open iTunes after installation” and click “Finish”.
As soon as the program starts, we move on to the second step - connecting the phone to the PC, with further synchronization.
Via USB cable
The port for connecting a USB cable for all iPhones is located on the bottom end panel under the Home button. To connect Apple gadgets, it is recommended to use only the original cord, which is always included with the iPhone. If it is not there, this means that the iPhone model is either not a Chinese counterfeit, or the salon consultants use the device’s equipment for their own needs.
To connect your iPhone to your computer, follow the step-by-step instructions:
- Take a wire, insert one connector into the port on the phone, connect the second to a PC or laptop into any USB connector.
- After connecting two devices, the computer will take some time to initialize the new device.
- During the first synchronization, if Windows 8 or higher is installed on your PC or laptop, the installation of Apple Mobile Device drivers should automatically start.
- Answer affirmatively to the query “Trust this computer?” - Click “Trust”.
- Next, unlock the gadget and enter your account login/password (Apple ID).
- After permission, iTunes should launch automatically. If this does not happen, start it manually.
- After synchronization, to log into your iPhone via your computer, you need to click on the phone-shaped icon; the icon will appear in the top panel on the left.
- You can also enter the gadget through the Explorer menu, in the “My Computer” section, the phone will appear as a separate disk.
- Then you need to go to the “Internal Storage” folder, then select “DCIM”. If the folder is not displayed, unlock your device.
- Folders will be displayed in a new window, those folders with the ending Apple contain all the data (photos, videos, audio) from the iPhone.
After the first initialization of the gadget with a computer via iTunes, you can completely abandon the wired connection via a USB cable in favor of a Wi-Fi connection.
Logging into your iPhone via a computer without iTunes limits the exchange of information between devices. While iTunes installed makes it possible to fully carry out all manipulations in a synchronized device, including updating and restoring.
Via Wi-Fi
Installing the iTunes application on your PC or laptop makes it much easier to create a direct Wi-Fi connection between devices. Synchronization is fast and does not require any complex additional settings. What should be done:
- Connect your iPhone to your computer or laptop via a USB cable. Next, launch the iTunes application.
- After synchronizing the devices, find your gadget, which will appear on the top panel with a phone icon.
- On the left side of iTunes, select the “Browse” function, go to the right menu “Options”, o. Finally, click “Apply”.
- Next, you need to confirm the settings and click “Synchronize”.
To connect devices via Wi-Fi connection, a Wi-Fi adapter must be installed on your computer or laptop. All devices must be connected to the same local network.
How to change the country (region) in your Apple ID account on your computer
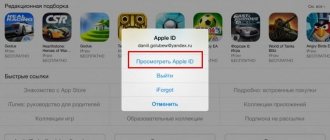
A similar procedure can be performed on a computer. And it doesn’t matter at all whether it’s a Mac or a Windows PC. On a Mac, open the Music application, and on a PC, iTunes. In the “Account” menu, select “View…”
In iTunes on Windows, select “Account” - “View”
Select “Change country or region”
Select your country from the drop-down list, read and accept the terms and conditions, enter your bank card details and billing address. After clicking on the “Continue” button, the bank card and other specified details are checked and the country (region) is changed.
How to log into iPhone iPhone via computer
iCloud is a cloud service from the Apple developer, designed for use on iOS and Mac OS devices. It is convenient to use the cloud as online storage for important information and save backup copies of files from your device. If necessary, you can log into iCloud from any computer, even without an iPhone at hand.
A prerequisite for logging into the cloud is having an Apple ID. All iOS device owners know what it is. This is an email that is created when registering an account on Apple gadgets.
The developer has provided two ways to log into the cloud via a computer. The first option is to log in through the official iCloud resource. The second option is using a special program from Apple for PC. Both methods are simple, intuitive, and do not require technical knowledge.
Option 1: Official website
Logging into the cloud through the official website is the easiest way, which does not require prior installation of additional applications and programs. What you need is a stable network and the ability to use any search engine. Algorithm of actions:
- Open to the official resource of the iCloud service, use the direct link.
- Enter in the field the email and Apple ID password that was created when registering your account. After entering your personal data, click on the arrow to log in.
- When logging into the service for the first time from a computer, the user will be required to accept the terms and conditions.
- Next, the user will see a new window with a menu in the account; here you need to select the “iCloud Drive” icon.
- After logging in, the entire contents of the cloud storage will immediately open; all that remains is to select a specific folder.
- The service provides a convenient opportunity to both upload files from your computer to the cloud and upload files from storage to your PC.
Vyacheslav
For several years he worked in mobile phone stores of two large operators. I understand tariffs well and see all the pitfalls. I love gadgets, especially Android ones.
Ask a Question
Question to the expert
Is it possible to upload all the photos at once - in one motion?
It is impossible to upload files by folder from the cloud to your PC. Each photo needs to be uploaded separately, so many people find this process inconvenient, especially with a large number of photos.
Option 2: iCloud for Windows
A special iCloud client application for OS Windows, after installation, will allow you to fully use all the capabilities of a mobile gadget on a desktop computer. How to launch and log into the iPhone cloud via PC:
- First, you need to download the application to your computer, preferably from the official Apple resource.
- Then double-click to open the download file, accept the terms, and start the installation.
- After installation, the client application should open automatically. In the appropriate fields you need to enter your identifier - Apple ID and password. Click on the bottom panel “Sing in”.
- After successful login, you need to mark the type of synchronized content that will be processed in the future. You can mark all sections if you wish. It is recommended to activate the “My Photo Stream” option. Click "Apply".
- After the settings, you need to close the application and restart the computer to initiate the synchronization process.
- After the reboot, all marked folders will begin to appear in the computer menu as a separate category. For example, this is how the folder with “Photos” will appear in the menu.
Once synchronization is complete, all synchronized files will remain on your PC, and you won’t even need network access to view them.
If the settings were o, the “iCloud Drive” folder will appear next to the “Photos” folder. This folder will contain all the data sent to the application of the same name on the iOS mobile gadget.
Why change the country (region) in your Apple ID account
The main reason for this procedure is due to the fact that in a new place the user has to use applications that are not available in the App Store of the country from which he came. So, in the Russian App Store you simply won’t find HBO Max, Hulu, Disney+, or YouTube TV. These services do not officially work in Russia, so they will not be available in the regional store. But US residents have been using them on an ongoing basis for several years. In addition, specific applications of banking institutions, transport companies and retail chains may be available only in a specific country.
Another reason lies in the payment method used for purchases in the content store. Since 2012, Apple has allowed only a card from a banking institution of the country specified in the account settings to be linked to a user account. This is quite understandable, because once you move to the USA, you will make payments in an American store in Russian rubles. Moreover, Apple considers using an account linked to the previous country on a permanent basis in a new country a violation of the license agreement and the rules for using the App Store and iTunes Store.
Another thing is that, unlike Google with its Play Store, Apple does not specifically check where the user is actually located, and allows you to register an account with the desired country anywhere in the world, the main thing is that you have a valid bank card of that country at hand. I myself have been using the Russian store for almost 9 years, using either a Qiwi wallet or Yandex Money (now YouMoney) as a means of payment, and to download specific applications I was forced to leave the main account and log into a specially created another one. I’ll say right away that this in no way affected the language of the device’s interface (I always use it in Russian) or Apple Pay. Regardless of the region specified in the Apple ID settings, you can link a bank card to Wallet in the desired country that works with Apple Pay and easily pay for purchases in stores using your iPhone and Apple Watch.
How to log into iCloud email from iPhone
There are various steps you take to sign into your iCloud email. It depends on what iOS application the iPhone owner uses. You can access your email account through the proprietary pre-installed Mail application, as well as through third-party email clients from other developers.
To the Mail app
To log in to @icloud.com mail through the standard application, you need to complete several steps. The step-by-step authorization plan depends on whether you are logging in for the first time or whether the mailbox has already been used. Let's look at step-by-step actions for two options.
Login to your iCloud account for the first time
- On the main screen of the device, tap the “Settings” icon, find the Apple ID management section, click on the first icon from the options menu - your own name or avatar.
- Then you need to open the “iCloud” tab and activate the “Mail” icon in the new window. Next, click “Create”, the request will appear at the bottom of the screen.
- All you have to do is come up with your email name (preferably short, easy to remember), and click “Next”.
- When choosing a mail nickname, you should adhere to the requirements. The rules are standard - the nickname must include Latin letters and numbers. You can also add symbols, periods, and underscores. The nickname must be unique, that is, not busy!
- As soon as a unique nickname for the @icloud mail is selected, you need to click “Done”. That's all. The iPhone will immediately display the active Mail icon screen in the list of options. Some time after activation, the gadget will receive a notification asking you to connect your mailbox to the FaceTime video calling service from Apple. Depending on your desire, you can accept or reject the offer.
- To use the new @icloud mailbox, you need to open the Mail application by tapping the icon on the gadget's home screen. Click the “Boxes” section and check whether the created address is added to the list of available ones. After this, you can start sending/receiving emails.
It’s worth registering an @icloud address once in order to use your email account on all iOS gadgets without restrictions in the future.
Login to existing @icloud account
When you already have an active @icloud address, you can easily use it on your new gadget. To do this, you need to know the Apple ID password that was linked to your email account during registration. You can access your account on a new iPhone on which your Apple ID has not yet been used by following these instructions:
- On the main screen of the gadget, tap on the “Mail” icon. In the new window “Welcome to Mail!” click "iCloud".
- Then you need to enter your email address and password for the connected Apple ID. Click “Next”. Read the notification and confirm “OK”. This feature is enabled automatically, since logging into an existing account on a new iPhone actually links the gadget to an Apple ID.
- On the next screen you can make more detailed settings. Disable synchronization for different types of data with the added account, disable the “Find iPhone” option. To do this, you need to drag the sliders to the appropriate position. Click “Save”. As a result, the added account will be displayed in the application, and a notification will appear at the top of the screen.
- When all the settings are completed, you can start using the added address - receiving/sending letters.
When the purpose of adding old mail to a new device is simply to access emails in your @icloud mailbox, it is recommended to disable all additional options except for Mail and iCloud Drive.
Other email clients for iOS
After the @icloud.com mailbox is activated on the gadget, you can successfully access Apple's email service through iOS clients and third-party developers: Gmail, Mail.ru, Inbox and others. Step-by-step steps to install the popular Gmail email service on iPhone:
- You can install the Gmail application for iOS devices through the AppStore or through iTunes.
- When you launch your email client for the first time, you need to click “Login” on the welcome screen. In the new window, to add an account, select the Gmail tab of the same name.
- If Gmail is already used on this gadget with another email client other than iCloud, you need to make settings. Go to the options menu (three lines on the top panel), open the list of accounts, click “Manage accounts”. Click “+ Add account”.
- On the “Add an account” - “Email setup” screen, select “iCloud”, then enter the e-mail in the appropriate field, click “Next”.
- In the next window, on the Apple ID management page, you need to create a password for Gmail. The action will automatically launch the web browser and open the “Manage your Apple Account” login page.
- Sign in using Apple ID and password. Give permission, click “Allow” under the notification about an attempt to log into Apple.
- Then a verification code will be displayed on the screen; the numbers are entered on the page in the iPhone web search engine. After authentication, the created Gmail address controlled by your Apple ID will be displayed on the screen.
- To generate a password, you need to go to the “Security” section, open the “Application Passwords” tab, tap “Create a password...”.
- First you need to come up with a label for the password, then enter Gmail in the “Security” window and click “Create”.
- An encrypted combination will be generated almost instantly, which is an activation key. This key allows third-party applications to access Apple services. The secret combination will be displayed on the screen in the corresponding field.
- Select the received key with a long tap and click “Copy” in the pop-up menu. Then, on the search engine page, click “Done” and go to the “Gmail” application.
- In the Gmail for iPhone screen app, tap Next. Go to the “Password” input field, long tap to call up the “Paste” option, paste the copied code. Click “Next” and wait for the verification to complete.
- The final stage is to come up with and enter a nickname for the address that will be used to sign all letters sent from this mailbox. This is done adding an iCloud account to the Gmail app for iPhone. You can proceed to using the mail service.
Before opening the login for third-party email addresses, it is recommended to configure security. It is recommended to install two-factor authentication, which will become a reliable protector of the Apple ID installed on the iPhone.
What will happen to the library in Apple Music when you change the country (region) in your Apple ID account
The only significant loss when changing your country (region) will be the complete loss of your music library in Apple Music. The fact is that compositions and albums available in some countries may not be available in others. Therefore, Apple requires you to cancel your Apple Music subscription and complete the subscription period before changing your country/region in your Apple ID account settings. Considering drm encryption of downloaded tracks and the inability to use the media library without an active subscription, before directly changing the country (region) in the iPhone settings, a warning window appears with information that the user’s media library will be deleted. If you do not agree to delete the media library, it will be impossible to change the country (region). This window also appears due to the fact that for a month after the cancellation and expiration of an Apple Music subscription, users’ media libraries continue to be stored on the apple company’s servers in case they change their mind and return to using the service.
For me, who switched to Spotify a long time ago, losing my library in Apple Music was no problem. But for those who are firmly attached to the branded Apple music service and do not want to deal with hemorrhoids with services like Soundiiz to transfer the media library from one account to another, you will have to remain on the old Apple ID in your current country of residence, and create an additional new one to download the necessary content.
If you forgot your iCloud password
There is no official way to recover your password. The only thing that iPhone owners are asked to do if they have forgotten their password is to reset the old password and replace it with a new one. This process can be done in the following ways:
- via email;
- using control questions;
- using two-step verification (for outdated models);
- through two-factor authentication (for new models);
- contact technical support.
You should contact the support service when you cannot solve the problem on your own.
Resetting your password via email
The most used option for changing your iCloud password. Fast and clear. The reset process is performed on all iPhone models without exception, even through a computer. Step-by-step algorithm of actions:
- Open a web browser, enter https://iforgot.apple.com in the search field (special page for unlocking iCloud if the password is forgotten). Fill in the Apple ID field. Click "Continue".
- In the next window about. Click "Continue".
- The system offers a choice of two options for resetting a forgotten password. In our case, mark the e-mail. Click "Continue".
- After this, the system will send a letter to your email, you need to go to your email, open the message and strictly follow the instructions.
- If the letter does not arrive in your inbox, you need to check your Spam folder. The email contains an active link to go and reset your password.
- After clicking on the link, a new tab will open where you need to enter a new password for authorization. The password requirements that must be met will also be indicated.
- All that remains is to come up with a unique option, after which you can log into iCloud using a new password.
Immediately after this, a new notification about the successful password change will be delivered to your email inbox.
Changing your password using security questions
When you don't have access to your email, you should select the "Answer security questions" option to reset your password. Similar to the previous option, you need to follow the link to the site to reset your password, only this time select the second option.
The security system will ask you to enter your date of birth to prevent possible hacking. Please note that you must provide the exact information entered into your account.
Then two questions will appear on the screen. When creating an account, each new user is asked three security questions. Now you need to choose two random questions and answer them correctly.
If you answer correctly, a new form will appear that lists the requirements for correctly entering the new password. You need to come up with a good password that complies with the rules, click “Reset Password”. Immediately after this, a notification will appear indicating that the password has been successfully changed.
How to reset and change your password using two-step verification and two-factor authentication can be seen in the video instructions.
Rate this article
Let's sum it up
You can find out your Apple ID in the Settings menu of your iPhone, as well as in the App Store, iTunes Store, and the desktop version of iTunes. If your phone is locked, you can get information using a trusted device or on the company's official website. You can find the former owner’s Apple ID without his help by carefully reviewing the saved data; if the search does not produce results, you need to contact the support service - a specialist, after asking the necessary questions, will be able to deactivate the old account, which will allow the owner to create a new one.