Connecting and setting up a gamepad on Windows 10, 8, 7
Let's start with the base. To connect a gamepad, you will need the gamepad itself and a program for subsequent configuration (if these are old games).
There are four different programs to choose from:
- MotionJoy Famepad Tool;
- JoyToKey;
- ScpToolkit;
- Xpadder.
We will discuss the nuances of each program separately below.
A universal way to connect to Windows using ScpToolkit
This method is called universal because it works on all versions of Windows. In addition, it does not require any special skills from you and setup takes only 2 minutes. To connect a gamepad, you need:
- download ScpToolkit for your PC;
- install the application;
- connect the joystick to the computer and launch ScpToolkit;
- check the boxes next to the drivers that need to be installed (depending on the gamepad you are using);
- Click the Install button and wait for the drivers to download and install.
Now you can use the joystick as a control and play.
Connecting a joystick using the MotionJoy Famepad Tool
This is another set of drivers and utilities for Windows operating systems. Installation is simple, the program is intuitive and does not take up much space on your PC.
The program not only helps in installing drivers, but also allows you to configure the buttons and their meanings as you wish. To connect a gamepad using the MotionJoy Famepad Tool, you need to:
- download the installation file and install the program;
- connect the joystick to the PC;
- select connection mode;
- configure the necessary buttons;
- press “Start”.
This completes the setup and installation and you can start playing.
Connecting using JoyToKey
This is an ideal program for gamers using Windows 10. JoyToKey will allow you to use the gamepad even in games that do not support it.
To get started with JoyToKey, you need:
- download the program and install it on your computer;
- connect the gamepad to the computer;
- open the game parameters and copy the buttons that you will use in it;
- assign these buttons to the gamepad;
- start the game.
The only disadvantage of this program is that it is entirely in English, but you will not encounter any problems with the setup.
Xpadder (for Windows)
This program is an analogue of the previous version. Allows you to emulate pressing buttons on the mouse and keyboard using a gamepad. The software is intended for those games that cannot be controlled using joysticks by default.
To use Xpadder you need:
- download the program and open the xpadder.exe file;
- press the “Launch” button three times and wait for the installation to complete;
- launch the program and connect the gamepad to the computer;
- click on the icon with the gamepad shown;
- select “Settings”;
- upload an image of a controller similar to your gamepad;
- configure the buttons on the joystick;
- click “Accept”.
If a similar joystick is not in the proposed files, you can take a photo of yours and upload it to the “Controller Images” folder.
XBox 360 Gamepad for Windows
The simplest and most accessible gamepad in terms of connection. All you have to do is purchase and connect it to your PC. Windows itself will detect a compatible X-input device and download the drivers. After the central button shows one burning segment, you can safely go fight monsters, conquer race tracks and enjoy life.
Pros and Cons:
+ Easy to use, pure Plug And Play; + The gamepad itself is inexpensive; + All games on Windows with gamepad support are designed specifically for the XBox layout; + Reliable and unpretentious; - Only wired connection, if you have a wired version, the wireless version of the gamepad is more expensive; — Not everyone likes the orientation of the sticks (analog controls), it’s a matter of habit and personal preference.
How to connect any gamepad to a computer - step-by-step instructions for different types of joysticks
In this section, we will talk about connecting different joysticks to your PC. Remember that up to 8 controllers can be connected to 1 computer (up to 4 if they have a headset).
Let's look at how to connect gamepads from PS4, PS3, Xbox, Nintendo Switch and joysticks from older generation consoles.
How to connect a Playstation 4 (DualShock 4) joystick to a computer
The process itself is very simple:
- connect DUALSHOCK 4 to your computer using the charging cable;
- wait for the drivers to install;
- check if your gamepad appears in the “Sound” tab in the list of Devices;
- if yes, you can start the game.
Please note that if the sound on the computer disappears, this is normal. The audio stream will be redirected from your gamepad.
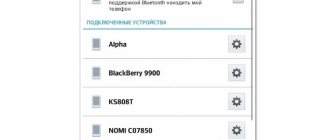
To connect a PS4 gamepad via Bluetooth, you need a special receiver for your computer; if there is no Bluetooth controller, you will have to buy one. Next you need:
- hold down the Share and PS buttons on your gamepad;
- wait until the backlight starts flashing white;
- connect the Bluetooth module to the PC;
- Click the Bluetooth icon in the tray and select “Add device”;
- in the window that opens, select “Add Bluetooth”;
- act on the prompts that will appear on the screen.
By the way, if you didn’t know, Steam can automatically detect your gamepad, which is very convenient.
What about those who want both vibration and touchpad functionality? We have a solution for this too:
- download the DS4Windows utility;
- install it on your PC and run the program.
The first window looks like the screenshot:
The first button is pressed by Windows 10 owners and click Finish. For owners of Windows 7 and 8, you must first click the first button, wait for the driver to install, click the second button and only then Finish.
A program window will open and you can customize it to suit your needs.
Gamepad from PlayStation 3 (DualShock 3)
There will be more problems with a PS3 joystick, since it is not automatically detected and you cannot immediately pick it up and play. To launch, you can use MontionJoy or SCP Toolkit.
Launch via MotionJoy:
- download and install the program;
- connect the joystick to the computer via USB;
- wait until Windows finishes trying to find drivers for your gamepad;
- wait until the program recognizes your joystick;
- open the Driver Manager page and find your gamepad, click Load Driver;
- After loading the driver, go to Home, click the New button, assign keys on the controller.
Please note that the program does not always work correctly on Windows 10. If this happens, then change the date to 2014.
The steps for SCP Toolkit are exactly the same as with the previous program. Installation and configuration will take you no more than 20 minutes.
Of course, you can use a PS3 gamepad, but it’s much more logical to take any universal joystick in the store and not install any additional software.
Xbox One Controller: Step-by-step connection to PC
There are two ways to connect this gamepad to your computer: via USB, Bluetooth.
To connect via USB you need:
- connect the gamepad to the computer via the wire used for charging;
- wait for the drivers to automatically configure.
Please note that in the settings you need to enable auto-update of drivers so that they are automatically downloaded and installed on your computer. This is done in Windows settings.
To connect via Bluetooth, you need:
- make sure that your gamepad has a controller for Bluetooth;
- turn on Bluetooth on the computer;
- press the center button on the gamepad;
- hold down the button located on the top panel near the triggers for 3 seconds;
- Go to the “Settings” menu on your computer, select “Devices” and find “Bluetooth and other devices”;
- select your gamepad and click the “Pair” button.
You can use the connection option via a receiver, but for this you will have to buy two controllers, which is not completely justified.
Connecting Xbox 360 and One gamepads: wireless and wired
There are three options to connect these gamepads: via cable, via Bluetooth and via a wireless adapter.
Connection via cable is carried out as follows:
- take a micro USB cable from your gamepad;
- connect it to your computer;
- wait for the drivers to download automatically;
- go to “Settings” and find “Device Manager”;
- right-click on the Microsoft XboxOne Gamepad and select “Driver Updates”;
- in the window that opens, set “Automatic search”.
If for some reason the gamepad does not work, then try moving it to a different connector.
To connect via a wireless adapter, you will need the adapter itself, which costs about $20 and Windows 7 or higher:
- connect the adapter to your computer;
- go to the “Bluetooth and other devices” tab;
- click “Add Bluetooth;
- Click on “XboxOne Gamepad”.
Everything is ready, now you can try the gamepad in any game.
Since the S and X series gamepads have built-in Bluetooth, you can connect to your PC if it has Win 10 installed:
- turn on the controller on the gamepad;
- turn on Bluetooth on your computer;
- activate the gamepad in the “Devices” tab.
Usually activation occurs the first time, and you will be able to play your favorite game.
Nintendo Switch Pro Controller
You can also connect this gamepad via USB or Bluetooth. We connect the joystick via USB using Steam - this is the easiest and won’t take much time:
- launch Steam on your PC;
- connect the cable with your gamepad to the computer;
- the screen will ask you to select a gamepad and go through calibration;
- There you can customize buttons and other elements for yourself.
Important! This method is only suitable for games on Steam.
If you play through third-party services or without them, then you can connect your gamepad via Bluetooth:
- download the x360ce program;
- turn on Bluetooth on your computer;
- disconnect the gamepad from USB;
- press the button located next to the charging connector;
- wait until the diode starts flashing;
- find your gamepad in the list of devices;
- click the “Connect” button.
All that remains is to configure the buttons themselves and start playing. This is a universal method that will suit any game.
Is it possible to connect gamepads from older consoles?
Yes, but you have to try. If PS1, PS2, Xbox and the old Dreamcast you can order a special adapter on Amazon, and it is very easy to find it, then for very old models you need to look for special versions that have a USB cable.
Unfortunately, there are no other connection options.
What to look for when choosing?
When choosing a gamepad, pay attention to the connection type. Wireless joysticks allow you to play from a distance, but they take time to charge. But you can connect the USB cable and continue the game. The controller will be charged in parallel.
Wired models have more advantages. Yes, there is the possibility of tangled wires, as well as the inevitability of sitting in front of a monitor. But wired models are cheaper and do not need to be recharged.
In addition to technical parameters, ergonomics are also important. The joystick should feel comfortable in the hand and not be heavy. Analog sticks are usually made of a rubberized material to prevent your fingers from slipping while playing. Their presence is important, since most games use this type of control.
If you are a fan of fighting games, then pay attention to the D-pad. It should be divided to make it easier and more convenient to make combinations.
How to check and calibrate a joystick
To check the functionality of the gamepad, you need to connect it to your computer. Next you need:
- press Win+r;
- enter joy.cpl in the command line;
- select your joystick model, right-click and select “Properties”.
If you don't see your gamepad in the list, then the device is not working properly. Try reconnecting the cable or checking the charging.
To calibrate the joystick you do not need to download special software. There are built-in tools in Windows itself. Go to Control Panel, select Devices and Printers, and then find your controller. Right-click on it and select “Game Controller Settings.”
A new window will open where you need to go to the “Properties” tab and select “Options”. After this, click on the “Calibrate” button and the “Device Calibration Wizard” application will open in front of you.
To begin setup, click “Next”. Remember that the left joystick is configured first, and then the right. Follow the on-screen prompts and complete the calibration.
Rating of the best gamepads for PC 2021-2022
| Place | Name | Price | Rating |
| The best gamepads for PC by price/quality for 2021-2022 | |||
| 1 | Microsoft Xbox Series | Find out the price | 9.9 / 10 |
| 2 | Sony DualSHock 4 v2 CUH-ZCT 2TE | Find out the price | 9.8 / 10 |
| 3 | GameSir G4PRO | Find out the price | 9.7 / 10 |
| The best wireless gamepads for PC | |||
| 1 | Sony DualSense | Find out the price | 9.9 / 10 |
| 2 | Microsoft Xbox Series plus USB-C | Find out the price | 9.7 / 10 |
| 3 | Artplays AC55 | Find out the price | 9.5 / 10 |
| Best PC gamepads with Xlnput support | |||
| 1 | Logitech G Gamepad F310 | Find out the price | 9.9 / 10 |
| 2 | HORI Real Arcade Pro V for Nintendo Switch | Find out the price | 9.8 / 10 |
| 3 | Logitech G Wireless Gamepad F710 | Find out the price | 9.7 / 10 |
| The best PC gamepads with vibration feedback | |||
| 1 | Dual Shock 4 | Find out the price | 9.9 / 10 |
| 2 | iPega PG-P4008 PS4 Wireless Handle Bluetooth | Find out the price | 9.8 / 10 |
| 3 | Microsoft Xbox Elite Wireless Controller Series 2 | Find out the price | 9.6 / 10 |
| The best budget gamepads for PC | |||
| 1 | IPEGA PG-9076 | Find out the price | 9.9 / 10 |
| 2 | Retro Genesis Controller 8 Bit | Find out the price | 9.7 / 10 |
| 3 | Defender X 7 | Find out the price | 9.6 / 10 |
Table of contents:
- Rating of the best gamepads for PC 2021-2022
- How to choose a gamepad for PC in terms of price/quality ratio?
- The best gamepads for PC by price/quality for 2021-2022
- 1.Microsoft Xbox Series
- 2. Sony DualSHock 4 v2 CUH-ZCT 2TE
- 3.GameSir G4PRO
- The best wireless gamepads for PC
- 1. Sony DualSense
- 2. Microsoft Xbox Series plus USB-C
- 3. Artplays AC55
- Best PC gamepads with Xlnput support
- 1. Logitech G Gamepad F310
- 2. HORI Real Arcade Pro V for Nintendo Switch
- 3. Logitech G Wireless Gamepad F710
- The best PC gamepads with vibration feedback
- 1. Dual Shock 4
- 2. iPega PG-P4008 PS4 Wireless Handle Bluetooth
- 3. Microsoft Xbox Elite Wireless Controller Series 2
- The best budget gamepads for PC
- 1. IPEGA PG-9076
- 2. Retro Genesis Controller 8 Bit
- 3. Defender X 7
- Which company should you choose?
- Customer Reviews
- Useful video
Difference
Before moving on to the analysis of this issue, it is worth deciding what a joystick is. Some believe that this is a classic game console controller. In fact, this is still the same data input device on a PC, but it looks a little different. If we translate this word from English, we get “aircraft control stick.”
Now it has become clearer what kind of device this is. The joystick is a lever that swings in two planes. But this option is less often used in games. Most often a joystick is called a gamepad. But this does not change the settings. The process is the same for both devices.
Question details
How to connect a wired gamepad DEFENDER GAME MASTER G2 to the game Warface
This resource provides technical support only for legal desktop products from Microsoft Corporation.
Please contact technical support for the game with which you are having problems.
If the gamepad does not work not only in this game, make sure that all the necessary drivers are installed for it. For drivers, you will need to contact the technical support of the manufacturer of your gamepad.
Did this fix your problem?
Unfortunately, this didn't help.
Fabulous! Thanks for marking this as answer.
How satisfied are you with this answer?
Thank you for your feedback, it will help improve our site.
source
Step 3: Installing Additional Drivers
If the game is not associated with the Steam platform, for example, it was purchased and installed on another service, you will have to download additional software. There are several such programs, but the principle of their operation is not much different. Let's look at setting up Dualshock 4 in Windows 10 using the DS4Windows application as an example.
- Go to the official software page and click “Download now”.
Download the latest version of the application.
- If a localization is needed, click “Languages”.
Select Russian from the list.
- We unpack the archive with the crack and copy the “ru-RU” folder to the directory where the program archive was unpacked.
- Run the file DS4Windows.
- The device should appear in the Controllers tab.
- If it is not detected, go to the “Settings” tab and click “Install controller/driver”.
- In the welcome window, click “Install driver for DS4”.
- After installation is complete, click “Finish”. If the manipulator is not detected, reconnect it.
- If the gamepad is detected in the “Controllers” tab, you can start the game. In this case, it is possible to create a custom profile - change the layout, configure the touchpad, light panel, etc. To do this, open the “Profiles” tab and click “New”.
- We make all the necessary changes, specify the profile name and save it.
Now the Dualshock 4 is ready to work on a computer with Windows 10. The DS4Windows program will need to be launched every time you need to use the gamepad.
We are glad that we were able to help you solve the problem. In addition to this article, there are 12,719 more instructions on the site. Add the Lumpics.ru website to your bookmarks (CTRL+D) and we will definitely be useful to you. Thank the author and share the article on social networks.
Describe what didn't work for you. Our specialists will try to answer as quickly as possible.