Outputting sound through the laptop's built-in speakers or external speakers connected to it is not possible and appropriate in all situations. To immerse yourself in the atmosphere of a movie or game, cut out extraneous noise, communicate without interference via voice or video communication, and also not disturb others (for example, at night or in a room with poor sound insulation), it is better to connect the headphones to the laptop using one of the methods suitable for the user. The features of each type of connection and equipment configuration will be discussed below.
Ways to connect headphones to a laptop
Connecting headphones to a laptop depends on their type. Wired headphones are connected via a cable, and for wireless models you need to configure the connection. Next, you will learn how to connect headphones to a computer or laptop via cable, Bluetooth and Wi-Fi.
Via cable
The simplest and most common are wired headphones. They are connected via a cable to the appropriate connectors on a computer or laptop. There may actually be several options here. For example, if you have a headset with one wire, and your computer has 2 inputs (pink and green), then you need to purchase a special adapter. Thanks to it, both speakers and microphone will work in your headphones. The opposite situation (when the headphones have two plugs, but the laptop has only one input) is solved by another adapter.
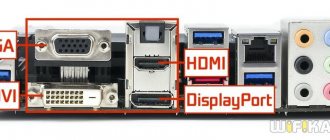
In all other situations, when the number of plugs is the same, simply insert them into the correct sockets. On a laptop, as a rule, the microphone and headphone jacks are located on the side panel. Green is headphones, pink is microphone. Additionally, next to the entrance there is a small image for recognition.
After connecting, check the sound (don't forget to increase the volume on the system). If there is no sound, settings in the OS are needed. This point will be discussed separately in the following sections.
Via Bluetooth
Wireless headsets are often connected via Bluetooth. Before connecting, you need to perform a number of preparatory steps:
- Make sure your device has a Bluetooth module. Read the specification in the documentation or on the Internet.
- Check the functionality of the Bluetooth adapter. To do this, go to Device Manager and then right-click on the adapter. In the properties in the “General” tab there should be an inscription “The device is working normally.”
If the Bluetooth adapter does not work, update or install the drivers. After checking these points, you can proceed to connecting a Bluetooth headset. To do this, follow the steps below:
- Turn on Bluetooth on your PC or laptop. In Windows 10, it is activated through Start. Click on it and select the “Settings” section (gear icon) -> then “Devices”.
- In the window, move the Bluetooth slider to the “On” state. Click on adding a device.
- Turn on the headphones by pressing the corresponding button. You can find out how to turn on the headphones in the manual.
- Activate pairing mode on the headset. This is described in detail in the instructions. On some models, the mode is activated by long (for 10 seconds) pressing the power button.
- Once the headset is in pairing mode, in the Add Device menu, click Bluetooth. In the list of available devices, click on the found headset.
- Wait for the process to complete. At the end you should see “Connected”.
If the sound does not come to the headphones after connecting, go to the “OS Settings” item.
Via Wi-Fi
There is a class of headsets that transmit a signal to a laptop via a radio module. Such products have a special base station. It can be connected via standard audio inputs (microphone and headphones). In this case, insert the plugs into the required sockets (use an adapter if necessary). Then you should pair the connected headphones with the base station (read about this in the instructions).
The second option is that the base station is connected via a USB port. For correct operation, you may need to install drivers. Follow the instructions and then pair.
Programs for connecting a computer with headphones via Bluetooth
There are many applications that make the process of connecting Bluetooth headphones to your computer much easier. You should consider the possibility of such a connection using the example of the Toshiba Stack program.
How to connect a Bluetooth headset to Toshiba Stack?
There is one application thanks to which the Bluetooth sign can be placed on the PC desktop. The program is called Bluetooth Toshiba Stack. It operates on any version of Windows OS. It is convenient to use when purchasing a data adapter. You can use the program for free for only 30 days. However, you can also find a “pirated” version on the Internet.
Bluetooth Toshiba Stack
Configuring and installing Bluetooth software
First you need to download the program. Then run the file that was downloaded, or more precisely “Setup.exe”.
Then follow the installer's step-by-step instructions. You should click “Next”.
Give your consent to follow the license. Click "Next".
All preparatory stages for installing the program have been completed. You need to click on “Install”.
The process usually takes 2-3 minutes.
As soon as the drivers are installed, you should click on “Finish”, after which the offer will prompt you to restart your PC. Before agreeing, you should close all open programs.
Then open the path shown in the screenshot.
Don't close the window right away. First, you should open the folder with the downloaded files, and then open the “Crack” directory and from there copy the files to the folder with the installed application. You can transfer files to the utility’s unpacking environment by dragging and dropping with the left mouse button.
If the system asks about replacing files, you must confirm. To create a shortcut on the desktop, you need to point to the “BTAssist” file, right-click, point to the “Send” item and select “Desktop” there.
Now you can control those devices that have a Bluetooth module: transfer data, listen to audio files using a headset.
The laptop does not see headphones after installing Windows 10
If the laptop does not see headphones on the Windows 10 operating system, do not panic. Before completely reinstalling the OS, follow a few simple steps that will solve the problem in most cases.
General Tips
Each user is recommended to perform a number of actions if Windows 10 does not see the headset:
- Make sure the connector you are using is working. Try inserting the headphones into a different jack;
- check the volume level on the headset and laptop;
- make sure you are inserting the plug into the correct socket;
- if you use an adapter, check its functionality;
- Check on the motherboard that the connectors are connected via progressive HD Audio.
Ways to connect headphones to a laptop
Connecting headphones to a laptop depends on their type. Wired headphones are connected via a cable, and for wireless models you need to configure the connection. Next, you will learn how to connect headphones to a computer or laptop via cable, Bluetooth and Wi-Fi.
Via cable
The simplest and most common are wired headphones. They are connected via a cable to the appropriate connectors on a computer or laptop. There may actually be several options here. For example, if you have a headset with one wire, and your computer has 2 inputs (pink and green), then you need to purchase a special adapter. Thanks to it, both speakers and microphone will work in your headphones. The opposite situation (when the headphones have two plugs, but the laptop has only one input) is solved by another adapter.
In all other situations, when the number of plugs is the same, simply insert them into the correct sockets. On a laptop, as a rule, the microphone and headphone jacks are located on the side panel. Green is headphones, pink is microphone. Additionally, next to the entrance there is a small image for recognition.
After connecting, check the sound (don't forget to increase the volume on the system). If there is no sound, settings in the OS are needed. This point will be discussed separately in the following sections.
Via Bluetooth
Wireless headsets are often connected via Bluetooth. Before connecting, you need to perform a number of preparatory steps:
- Make sure your device has a Bluetooth module. Read the specification in the documentation or on the Internet.
- Check the functionality of the Bluetooth adapter. To do this, go to Device Manager and then right-click on the adapter. In the properties in the “General” tab there should be an inscription “The device is working normally.”
If the Bluetooth adapter does not work, update or install the drivers. After checking these points, you can proceed to connecting a Bluetooth headset. To do this, follow the steps below:
“I can’t connect” - problem solving
If you don't find the Bluetooth button. The headset does not connect. It doesn’t see the headphones, there is no sound, it wheezes, beeps or other problems - then you need to check for installed drivers. As a rule, this is the only reason in this situation.
- You need to go to the device manager and look at the installed drivers. Press + R and enter devmgmt.msc.
- Now we need to find Bluetooth devices. If they are not there, then look at “Other devices”, you may see them there, but with yellow triangles.
- To install firewood from here, you need to connect to the Internet. Right-click and select “Update Driver”. Then select Internet search and install.
- If Bluetooth is available and the drivers are installed, then it is best to reinstall them or install the latest version of the program.
- You need to go to the official website of the laptop: Asus, Lenova, Toshiba, Samsung, Acer, etc.
- Find the “Support” or “Drivers” section. Here you just need to search, but often these sections are located at the very bottom of the page.
- There you select your laptop model, your operating system and download drivers for Bluetoo
- If you didn’t find the section with drivers or something went wrong, you can download the full driver package from this link - https://drp.su/ru/foradmin. Scroll down and download the corresponding archive.
- Then install and reboot the laptop. Next: you already know how to connect a wireless headset, just do all the steps again as written in previous chapters.
After this, the problem should resolve itself. But as practice shows, even this does not always help. Especially often such problems arise precisely at seven. Whatever one may say, it is already outdated, both in terms of characteristics and adaptability, connecting devices. And this is a completely normal phenomenon - since in her time, there was no widespread popularity of wireless devices.
The laptop does not see headphones after installing Windows 10
If the laptop does not see headphones on the Windows 10 operating system, do not panic. Before completely reinstalling the OS, follow a few simple steps that will solve the problem in most cases.
General Tips
Each user is recommended to perform a number of actions if Windows 10 does not see the headset:
- Make sure the connector you are using is working. Try inserting the headphones into a different jack;
- check the volume level on the headset and laptop;
- make sure you are inserting the plug into the correct socket;
- if you use an adapter, check its functionality;
- Check on the motherboard that the connectors are connected via progressive HD Audio.
Audio Device Diagnostics
The first thing you should try is to troubleshoot using standard Windows tools. To do this, follow these steps:
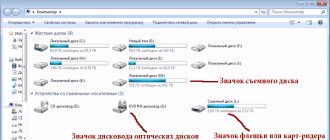
- In the lower right corner, right-click on the speaker icon. Select Detect audio problems.
- After searching for hardware, the system will ask the user which device is experiencing the problem. Select what you need.
- Wait for the process to complete. The system can fix the headset problem. If this does not happen, she will indicate what the reason is.
You can also view additional information.
Updating the driver
Often, incorrect operation of the sound card driver prevents you from using headphones. You can update them through the “Device Manager” menu. On your sound card, right-click and select Update Drivers.
However, the most reliable way is to install it yourself. Go to the official website of your motherboard manufacturer and find the latest driver.
OS settings
If there is no sound in the headphones, and the microphone does not work, you need to select the right playback and recording devices:
- In the lower right corner of the screen on the Start panel, find the speaker icon, and then right-click on it. Select "Playback Devices".
- Find your headphones in the list and right-click on them. Select "Connect". Set them to work by default.
Similar steps must be performed for the microphone in the “Recording Devices” section:
- In the lower right corner of the screen on the Start panel, find the speaker icon and right-click on it. Select the "Recording Devices" line.
- Among the recording devices, find the connected headphones, right-click on them, and then turn them on by default. Say something into the microphone and see if the signal indicator changes.
This method is used to configure headphones with a microphone. Also, setting up headphones on Windows 10 can be done in the Realtek HD manager or a standard mixer.
Realtek HD Manager
If the above steps do not help, try making the settings in Realtek HD:
- Open Control Panel and click on Realtek HD Manager (may be called Dolby Digital or Sound Booster).
- In the window that appears, click “Advanced device settings.”
- Select "Separate all output jacks as independent input devices" for recording and playback devices. Confirm your selection with OK.
- Disable front panel jack detection in the connector settings.
If the sound does not appear, the problem may be with the music file playback codecs. You can download them on the Internet.
Standard mixer
There may be no sound for one simple reason - it is simply turned off in the standard mixer. Click on the speaker in the Start panel with the left mouse button and raise the sliders on the headphone scale, as well as system sounds.
Additional programs
As a rule, motherboard manufacturers with driver disks include additional software for setting up sound. We recommend installing it or downloading it from the official website. Such programs allow you to fine-tune the sound parameters on your laptop or PC. Among third-party applications, it is worth noting FxSound Enhancer and ViPER4Windows.
What to do if there is no sound in the headphones?
But let's assume that everything is in order with the settings. But why don't headphones work on a laptop? It is possible that the reason is that the signal is blocked by some third-party software.
For example, it is often advisable to configure sound using Realtek sound cards not using the operating system, but rather on a Realtek mixer. If you wish, you can even try to change the chain of inputs and outputs involved in playback. When setting up, it is advisable to turn off all effects that may affect sound transmission for now.
The same, by the way, in a sense can be applied to situations when environmental effects are enabled in the operating system itself (in the sound section, the Enhancements tab is responsible for this). Check the parameters of the involved surround processing, but it is better to disable them completely when testing the device.
It’s also worth looking at the state of the “Windows Sonic for Headphones” module, which appeared in the tenth modification of the system. If you are using the more advanced paid Dolby Atmos technology, look at what is set in the parameters of this module.
Variety of plugs or correcting incorrect connections
Before buying headphones, check how many audio and microphone connectors are in your system unit. Modern computers and laptops have a combined jack that transmits both signals through one input.
Older system units have separate microphone and headphone jacks. In such a situation, you need to purchase a headset with two plugs. They will be in different colors:
- pink or red – microphone;
- green – headphones.
Recommendations: How to set up headphones for high-quality sound reproduction
, How to properly set the equalizer (for headphones)
How to make a microphone from headphones
They must be connected to the computer by color into the corresponding sockets. If you bought a headset with one wire, but the system unit needs a model with two, you can buy a special adapter. On one side it will have an input for a combination jack, on the other - two outputs with plugs of different colors. The cost of such a cord varies between 300 - 500 rubles.
Laptop headset: tips for choosing
The question of whether a Bluetooth headset can be connected to a laptop depends rather on the laptop or PC itself. When a Bluetooth module is installed on them, there should be no problem.
If you have not yet purchased a device with which you will receive calls and listen to music, pay attention to the following points:
- In addition to the basic function of receiving a call, any audio must be transmitted through the device. This ensures that you will not have any problems listening to music and it will be played in good quality. Check the ability to listen to music through these headphones.
- Convenient ergonomics. The headphones should fit you well, your ears should not get tired, and the device should hold well. Otherwise, you can ruin your mood or even your health.
- Availability of control buttons. A headset designed for listening to music may contain a volume button, a play button, and a pause button.
- Type of headphones: vacuum earplugs, on-ear, full-size or one earphone. Choose them based on where and how you will wear them, and how comfortable it will be.
Below I will give a couple of models of a good headset as an example of devices that can be connected to both a phone and a computer.
Jabra Classic
Jabra Classic is a Bluetooth headset for a laptop from a well-known manufacturer. The device supports the ability to listen to music, has a power saving mode and search technology.
pros
- good sound;
- ease of setup;
- energy saving;
- reports the subscriber's name;
Minuses
- mono sound;
- simple design;
Price:
about 2500 rubles.
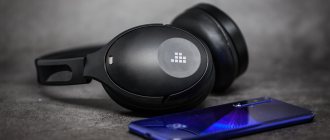
Samsung Level U
Samsung Level U is an excellent headset that can be connected to your smartphone and PC. Plays music and fits comfortably on your head.
pros
- stereo sound;
- comfortable ergonomics;
- 10-11 hours of charge with continuous listening to music and conversations;
- noise suppression;
- your application.;
Minuses
- price;
- sometimes users note the flimsiness of the design;
Price:
about 3600 rubles
Connection sequence and settings
When the headset is connected, you need to check if the sound and microphone are working. With the first option everything is simple, just turn on the music. The second one is a little more difficult. To check the functionality of the microphone, you can use:
1. A classic voice recorder that can be installed on any OS. Typically, in Windows, the program can be opened through: Start - Accessories - Voice Recorder. Start recording and find out if the sound works.
2. You can go to the installed Skype program, find the sound test (Echo/Sound Test Service) and run it. However, in this case, the settings of Skype itself may be configured incorrectly.
3. Immediately go to the computer settings and check that the microphone is turned on.
Each OS has its own path to sound settings, but even users with basic PC knowledge should not encounter any difficulties.
How to enable microphone on headphones on Windows XP, 8, 8.1
The microphone activation procedure takes no more than 5 minutes. To do this, after turning on and checking the headset, if it does not work, do the following:
1. Find the sound image in the lower right corner, right-click on it and select “Playback Devices”.
2. The “Playback” subsection will open. Find “Speakers”, right-click and set “Set as default”. There, look for “Speaker Settings” and set “Stereo” in the configurations. 3. Returning to the subsection, find the “Record” column at the top. And do the same with “Microphone”, only instead of settings, select “Properties” and “Levels”, where you set the indicator to the maximum.
4. After such manipulations, check the operation of the headset in a way convenient for you.
If the accessory does not work, double-check that it is connected correctly. As well as the functionality of the device on another computer or mobile phone (if the model has a combined plug). So, you can determine the serviceability of the headphone and microphone jacks themselves in the system unit.
Important! Setting the default settings and volume level are the same everywhere, only the search paths for the window to make changes are different.
Configuration via control panel for all Windows, including 10
The control panel is a window where shortcuts for settings of all main computer functions are displayed, including sound and recording. To open it in Windows XP, 7 or 8, just click on the “Start” button and find the corresponding entry. Then, select “Sounds” and carry out the manipulations listed above.
Headphone wiring
The Windows 10 interface is designed differently, where there is no usual “start”. To get to the settings, do:
- press Win+S to open the menu;
- find the image of the “house”;
- select Control Panel (desktop app);
- in the window that opens: Equipment and sound – sound.
This will take you to the necessary columns for configuration.
"Microphone not detected" error
Sometimes, in order to understand how to set up a microphone on headphones, you first need to “force” the computer to see it. For this:
- go to the control panel and find “Device Manager”;
- look for the column “sound, gaming and video devices”;
- Find the microphone you need, right-click and select “Enable”.
After this, carry out all the manipulations described above and use the microphone in your headphones, if it is working.
Skype problem
The following difficulties arise:
- You hear your interlocutor, but he doesn’t hear you.
- You don't hear anything.
- You hear grinding, noise, clicking.
Here are some recommendations to solve the problem:
- Install the latest version of Skype.
- Update the drivers for your sound card and Bluetooth.
- Restart your laptop and reconnect your headphones.
- Go to the “Sounds” section and select playback and recording devices - I already wrote how to do this earlier in the same article in the Windows 10 section (everything is done the same on 7).
- Go to Skype settings. Make sure your headset's playback device and microphone are there.
Video material on the topic
To make it easier for you to understand the sequence of actions, watch the video about microphone settings on Windows 7:
Topic materials: 5 best GAL headphones
, 5 best headphones under 1000 rubles, 5 best stereo headphones
6 Best Surround Sound Headphones
8 Best JBL Headphones
How to disable Headphones mode on iPhone
How to connect wireless headphones to your phone
, How to use wireless Bluetooth headphones, Do-it-yourself headphone repair