In the summer of 2014, the Cupertino team introduced the iOS 8 operating system. One of its features was the appearance of the Family Sharing . It made it possible to share purchased content with other family members and avoid purchasing the same applications on several gadgets in the house.
With the development of the Apple ecosystem, this option has acquired a large number of additions and features. Now let’s look at this feature and look at all the nuances of its operation.
Why do you need Family Sharing?
Cupertino offers each user of Apple technology to use their own Apple ID account. In order for members of the same family to use separate accounts, but at the same time be able to share purchased content, we came up with the ability to unite users into a family group.
Initially, the following set of features was available in Family Sharing:
▣ sharing purchased applications, books, music and movies;
▣ creating shared photo albums, calendars and shopping lists;
▣ location sharing for all family members;
▣ search for gadgets of any family member.
Moreover, each user has his own address book, notes in the cloud, mail and other data stored in iCloud for applications and services.
How can I find out the status of an invitation?
After the invitation has been sent, information about its status is automatically displayed in the settings.
- On iOS devices: Settings > Apple ID > Family Sharing > invitee's name.
- On MacOS devices: Apple menu > System Preferences, iCloud icon > Family Sharing > invitee's name.
As you can see, it's very easy to set up sharing content among your family members. The Family Sharing feature is highly recommended for those who want to stay close to the people they love most.
Do you have a MacBook or iMac? Especially for you, we have created an online marathon on setting up useful services on Mac: learn in 8 simple lessons how to quickly set up Apple ID, iCloud and other services on Mac , secure your user data, optimize iCloud storage, etc.
- It's fast: you don't have to search YouTube for setup instructions.
- It's simple: you'll see every step on the screen, with prompts in easy-to-understand language.
- It's convenient: you will learn useful skills without leaving a comfortable chair.
If you have any questions or would like more detailed advice:
Call
+7-978-773-77-77
Write
Personally
Address and work schedule.
Read more
What Apple services are available after activating Family Sharing
With the advent of new Apple services, Cupertino residents are offering different options for their work in individual and family modes.
Each service provides access differently to one or more users in a family.
Apple Music service offers an individual subscription for 169 rubles. per month, and when using a family subscription you need to pay 269 rubles. monthly. At the same time, the streaming service will be available to each of the six family members with separate playlists, settings and recommendations.
◈ The Apple TV+ only offers an individual subscription for 199 rubles. per month. There's not a lot of content and there's no flexible recommendation system, which can be greatly influenced by usage by different family members. You can either use the service with your whole family on one account, or purchase an Apple One family subscription to give everyone in your family access to the service.
Apple Arcade gaming service provides access to a library of games for 199 rubles. per month. With Family Sharing set up, up to six people can use one subscription. In this case, each player will have his own separate account to record achievements and saves.
◈ The new sports service Apple Fitness+ offers an individual subscription option for 249 rubles. per month. If you activate family access, the subscription will be available to all family members. Everyone will receive a separate account with their own recommendations and achievements.
When using Family Sharing, it is much more profitable to consider the option of a single Apple One for all offered Apple services.
Pre-setting
Now let’s move on to installing and configuring Family Sharing from an iPhone, following these steps sequentially:
- Click “Set up family sharing” after logging into your account.
- You can not pay attention to the greeting, but immediately click “Get Started”.
- We open general access to one of the services, for example, to “Purchases in the iTunes Store and App Store”:
Another interesting article for you: How to set up and change vibration mode: disable and enable vibration on iPhone
What single subscription options does Apple have?
A year ago, the Cupertino team presented a single subscription to all their services with a good opportunity to save money. In any case, the total cost of the paid options included in the subscription will be more than the cost of one subscription for everything.
Along with last year’s presentation of Apple One, the Cupertino team showed a new fitness service, which was unavailable in our country and a number of other countries throughout last year. With the localization of this service and its official launch in Russia, a new Apple One subscription plan has become available.
So at the moment, three types of single subscription are available to users: individual, family and Premier.
The first type of subscription is considered personal, and the other two have the possibility of family use. No one forbids connecting an individual plan to all family gadgets using one Apple ID account, but at the same time, all its users will see each other’s data and documents, together form preferences in Apple Music and share the viewing history of Apple TV+.
As you can see, for family use it is better to use the two more expensive plans. They differ only in the amount of free space provided in iCloud (200 GB in Family and 2 TB in Premier) and the presence of a fitness service in the most expensive tariff plan.
In terms of user experience for all family plans, Family and Premier are the same.
Part 2: How to Create Collaborative Playlists on Apple Music
As mentioned in the introduction to this post, Apple Music allows you to create playlists based on your preferences. If you don't know how to create one, here is a detailed guide for you.
Creating a shared playlist
Creating a collaborative playlist is very easy, you just need to follow three simple steps.
- To start the process, the first thing you should do is make sure that you open and launch Apple Music on your device.
- The next thing to do is to go to the My Music option. Once installed, you'll see "Recently Added Playlists", "Apple Music Playlists" you follow, "My Playlists" which are playlists you've created, and a "Show Music Available Offline" option that allows you to see the songs. you saved and downloaded to your gadget.
- Finally, the last step you need to follow is to go to the Create button, which is located on the top right corner of the screen to create a playlist. You can customize its name depending on your preferences and the description and image you specify.
Adding songs to the created playlist
Now that you've finished creating your newest playlist, the next thing you need to do is add songs to it. You can do this by selecting the first or second option.
- Simply navigate to the playlist you just created and don't forget to click the green button to be able to easily add your favorite songs to your playlist.
- The next option that you can also use is to browse or browse the songs that you want to add to your playlist and click on the three-dot icon that you will see next to it.
After this, you will see new options where you will need to click on “Add to playlist...”. There's now a new song added to your playlist!
Now that you already know how to create your Apple Music shared playlist, you can also try the procedure on how to share it with your friends or family members. Read the next part to find out how to do this.
What you need to remember about your iCloud+ subscription
The Apple Cloud Extra Space subscription is the only option that can be added to any of the single subscription options described above.
This feature is provided for a more flexible choice of the required cloud storage. For example, a user with an individual subscription will not be limited to 50 GB of cloud capacity. He can always purchase any of the available iCloud+ plans and expand his cloud space by 50 GB, 200 GB or 2 TB by choosing the desired subscription option.
Topic: What will happen to your iCloud subscription when you switch to Apple One
However, the available cloud storage will be combined from any Apple One subscription option and a separate iCloud+ subscription. So the maximum amount of available storage can be 4 TB when paying for the two most expensive tariffs.
In addition to available cloud space, this subscription provides users with a number of additional features. This is why the service acquired the “+” after the summer presentation of WWDC 2021.
The price for a cloud subscription has not changed, and the “plus” features are not available in all countries. When paying for the iCloud+ service, the user will receive the following benefits:
▶ iCloud Private Relay is an analogue of the VPN service built into Apple technology. At the moment, the feature operates in beta status and is not available in a number of countries due to local legislation restrictions.
▶ Advanced mail capabilities . The service offers the ability to hide your email when working with other sites, replacing it with generated temporary aliases. In addition, the user can create his own email domain for work or personal purposes.
▶ HomeKit Secure Video . This option allows you to store recordings from surveillance cameras connected to the HomeKit smart home control system in the Apple cloud. In this case, the video will not take up available disk space from the user’s cloud.
When you pay for the basic 50 GB plan, you can download videos from one camera, the 200 GB plan allows you to use up to five cameras, and the maximum 2 TB plan will not limit the number of cameras.
Any iCloud+ subscription option includes family use. If you turn on Family Sharing and add up to five additional family members, each of them will have access to additional iCloud storage. The total volume of data stored by all family members cannot exceed the limit of the selected tariff.
Each family member with their own Apple ID account will have an isolated space in the cloud . Photos, videos, documents and other data will not be visible to other family members.
The available space in the cloud will be distributed among all members of family access, and you can view statistics on the occupied space by each user using these instructions.
Part 1. What is Apple Music?
Apple Music is one of the best music streaming services ever introduced to the public. As the name suggests, it was created and developed by Apple Inc. It was actually launched in 2015, which allows users to enjoy a trial period before paying for a monthly subscription.
Apple Music lets you listen to songs even when you're not connected to the Internet—yes, offline playback is possible! You can also combine your songs into multiple playlists. Did you know that it has radio stations and can integrate with the Siri app, which allows you to perform commands using your voice?
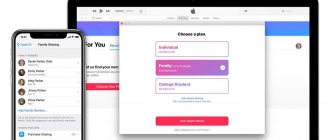
With Apple Music, you can stream popular tracks and songs on demand. It also makes recommendations based on the songs you search for - artificial intelligence. The monthly subscription actually costs $10. You can use a family plan for $15 per month and even a student plan for just $5.
Apple Music is supported by the following gadgets and devices.
Apple Music-enabled devices
- iOS devices such as iPhone
- Mac computers
- Android gadgets
- HomePods
- Apple Television
- Apple Watch
Knowing some basic ideas about Apple Music, let's move on to the main topic of this post - creating and sharing a collaborative Apple Music playlist.
Music can be hidden from other family members
Not everything needs to be shared. You may have purchased music or e-books that you don't want to share with other people. Follow these steps to hide something from Family Sharing:
- In iTunes on a Mac or PC, or iBooks on a Mac if you work with e-books, view the items you've purchased.
- Place your mouse pointer over the element you want to hide and click the X that appears in the top left corner.
- When asked to confirm that you want to hide the item, click OK (see Figure 3). The hidden item will not appear in purchased item lists on other devices.
Apple Family Sharing