Some users of computers running Windows 10 may find one of the features inconvenient. We are talking about the welcome screen that appears when you exit sleep mode or turn on/restart your PC.
The user cannot quickly start or resume work because login confirmation is required before the desktop appears. To improve your productivity, you need to answer the question: how to turn off the Welcome screen in Windows 10.
3 Ways to Disable the Welcome Screen in Windows 10
- The first method involves changing local group policy (LGP), which is responsible for removing the welcome screen, and some system settings.
- The second method is more universal, but also more complex, since it requires making changes to the Windows registry.
- The third method is to use third-party software that modifies system settings hidden from the user.
How to turn off the screen when waking from sleep mode
To disable the display of the screen on which, after the PC or laptop wakes from sleep mode, the user’s “avatar” and a password entry field or login button are displayed, you can use different methods. The choice of a particular one in this situation depends on the edition of Windows 10.
Owners of devices with the “Professional” edition of Windows 10 can use the Group Policy Editor. You can run it by entering the name gpedit.msc in the Runs dialog. To do this, press the hot keys “ Win + x ”, select “Run” or immediately press the “ Win”
+
r ", and enter "gpedit.msc".
Attention! In the Home version (Home) Windows 10/8/7 will give an error when running gpedit.msc, because... The LGP (Local Group Policy) editor is not available in this version of the OS. Read how to fix this here.
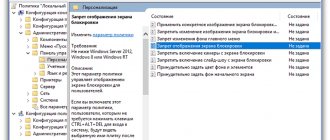
After opening the snap-in, you need to expand the section responsible for the computer configuration. Then open “ Administrative Templates ”, after which open the “ Control Panel ” folder. When you click on the Personalization , a list of customizable options will appear on the right.
In it you should find an item that controls the prohibition of the lock screen. Double-click on this line with the left mouse button. A window will appear to change the LGP parameter, which is responsible for prohibiting the display of the welcome screen. Select the “ Enabled ” option.
Then you will need to save the changes by clicking successively on the “
Apply ” and “ OK ” buttons.
After this, you need to restart your computer to apply the changes. It is worth considering that disabling the welcome screen through the Group Policy Editor is not available in the Home edition of Windows 10. To resolve the issue in this case, you need to use the two methods below.
Additional Steps
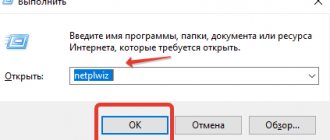
In addition, you will need to disable login and password entry when starting and exiting sleep mode. This operation is performed in an additional item in the User Account Control Panel. To open it, you need to call the “ User Accounts ” function using the Netplwiz command, as described above for the Group Policy Editor by pressing the Win + R .
Then you will need to uncheck the box located above the list of users and reboot the device. After this action, the computer will not require you to enter a password or press the login button after turning on/restarting or resuming from sleep mode.
Along with changing Group Policy, this should also make the Welcome screen disappear.
How to remove the screen by changing the registry
To disable the Welcome screen in Windows 10, you can also make careful changes to the registry. To open it, enter “regedit” in the PC search and select “Registry Editor”.
We must warn you right away that not everyone has a “Personalization” folder. Solutions to this are described further below.
- Open the appropriate editor in any way.
- Select the H-KEY Local Machine section (this one, not the other one).
- Expand the Software directory.
- Sequentially expand the Policies, Microsoft and Windows folders.
- Click on the Personalization section.
- On the right side of the screen, right-click.
- Hover over a single context menu item.
- From the drop-down list, select “Create DWORD value (32 bits).”
- Give it the name NoLockScreen (remove the welcome screen) and the value – 1.
- To restart a computer.
If this option does not work (there is no “Personalization” section), then you need to add another entry to the registry. To do this you need:
- Follow steps 1 to 4 from the previous instructions.
- Right-click on the Windows folder, select “New”, then select “Partition”, give it the name Personalization.
- Right-click on it again and select “Create”.
- Create a 32-bit DWORD value, giving it the name Personalization and the value - 1
- To do this, click on “Personalization” with the right mouse button and select “Edit”.
- In the “Value” field, enter 1 and click “OK.”
- After that, save the changes and restart the system.
If something doesn’t work out, then carefully watch the video instructions at the end of this material on how to change, remove the welcome screen, or remove the lock screen in Windows 10/8/7.
Disabling the welcome screen using third-party software
Changing the registry or LGP does not always lead to the desired result, which is why the screen appears again and makes it difficult to use the computer. The latest solution that can solve this problem is the Logon Changer utility from Tweaks.
While the app's main purpose is to change the wallpaper, it can also modify system settings so that the desktop appears immediately when the PC is turned on or wakes up from sleep mode.
Removing the lock screen in this case is quite simple. You need to download the application from Tweaks.com (to reduce the likelihood of encountering a virus), install it as usual and select a new image for the wallpaper. To do this, you need to click on the “Change default login wallpaper” button.
Standard Windows tools
If you want to turn off your monitor simply because you don't need the extended desktop for a short period of time, you can simply mirror your displays. As a result, you will get a result in which both the internal and external displays will show you the same image. There is no difference which display will be called primary and which will be secondary. All open applications will be reflected equally on both screens.
To mirror your screens, press the keyboard shortcut "Windows + P"
.
Project
menu that appears on the right side of the screen will offer four options for sharing two monitors.
Select the Repeating
to simultaneously display the same image on two monitors at once.
“Windows + P”
keyboard shortcut, you can switch between the proposed options for working together between monitors or use mouse control to select the desired option.
This method will work for Windows 7
and higher operating systems.
When you decide to expand the image to two screens again, "Windows"
will remember which display was the main one and which one was the secondary one.
Turn off the selected screen
If you want to turn off your monitor for a longer period of time or for some other reason, you can use other options in the standard Windows monitor application.
. You have the option to temporarily disable the image feed to any monitor of your choice, and only work on one of them, while the other will be turned off.
To turn off the monitor, press the keyboard shortcut “Windows + P”
. From the pop-up menu on the right side of the screen, you can select the desired option to turn off the monitor:
"Computer screen only"
– this option turns off the second monitor and leaves the main screen of your computer;
"Second screen only"
– this option accordingly turns off the main screen of your computer and transmits the signal only to the second monitor.
According to your requirements and time need, select the desired option and activate it using the keyboard shortcut “Windows + P”
or using the mouse.
When you need to share two monitors again or need an extended desktop, you can use the latter option to display images on two screens. Using the keyboard shortcut "Windows + P"
call the
“Project”
and activate the
“Expand”
.
The dual monitor display will resume.
Disabling through the Local Group Policy Editor
In the first case, you will need to open the Local Group Policy Editor through the Run command. To do this, press Win + R and enter gpedit.msc in the window that appears, or right-click on the “Start” button and click on “Run”. In the Local Group Policy Editor window that opens, go to the Administrative Templates → Control Panel → Personalization menu.
Double-click on “Prohibit display of lock screen” and check the “Enabled” option. Click on the OK button. To check if the method worked, enter Win + L on your keyboard. If you immediately see the password entry screen, then everything worked out.
Method 1: Control Panel Tools
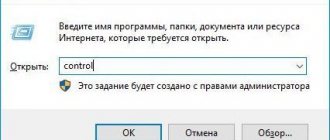
The simplest method for solving the problem under consideration is to use the “Control Panel”, or rather, the customization sub-items. You don't even have to open the main snap-in to perform this operation; it's quicker and easier to open the required tools using the Run tool.
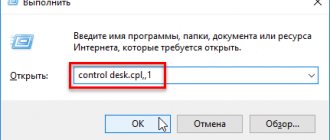
Option 1: Screensaver in standby mode
To disable the screensaver, do the following:
rundll32.exe shell32.dll, Control_RunDLL desk.cpl,,1
Now the splash screen should no longer appear.
Option 2: Welcome screen splash screen
Remove o, then click “Apply” and “OK”. If you have password protection set, you will be required to enter it.
Disabling via Registry Editor
If the first method did not work, then try disabling the welcome screen through the registry editor. Open it again using the “Run” command, as shown in the first method, and enter regedit in the window that appears. In the left menu, navigate to HKEY_LOCAL_MACHINE → SOFTWARE → Policies → Microsoft → Windows. On the right - move the cursor to an empty field and click on the right mouse button. Select New DWORD 32 Value. Rename the setting to NoLockScreen. Double-click on it and enter one as the value. Click on OK.
Changing the Windows XP Welcome Text
In order to change the Windows XP welcome screen, you need to edit the system file logonui.exe. We will edit it using the downloaded and installed Resource Hacker program.
Before making changes to the logonui.exe file, I recommend making a backup copy of it, since the changes may not be reversible and may lead to unpleasant consequences. To make a copy of it, simply copy the file to some other folder.
So, launch Resource Hacker and open the logonui.exe file through the “File” and “Open” menus. This file for changing the Windows XP Welcome screen is located in C/WINDOWS/System32. When the file is displayed in the program, open “String Table” in the left menu, then “1”, and then “1049”.
In the right window of this program you will see standard OS inscriptions that appear in the welcome window. They can all be edited. But since we need to change the Windows XP welcome picture, then we go to line 7 (sometimes there may be a different line number), and change that inscription to the desired one. If you wish, you can change other phrases too.
For example, I had “Welcome”, I corrected it to “Hello =)”. When editing, do not remove the quotation marks; they should open and close the greeting text.
After changing the text, click “Complete Script” and save the changes through the “File” and “Save” menus.
Now, if you did everything correctly, after rebooting you will see your message in the Windows XP welcome window.
Read also
Microsoft releases new versions of the operating system, but some innovations are useless. For example, we can easily do without a welcome screen and a lock screen if you don't have any information to hide from your family.
How to remove the welcome screen in Windows 10
Thus, many users want to get rid of unnecessary screens in order to increase the system loading speed.
Taskbar options
Starting with Windows 10 version 1607, you can pin additional apps to the taskbar and remove default pinned apps from the taskbar. You can specify different taskbar configurations based on your device's locale and region.
There are three categories of applications that can be pinned to the taskbar:
- User pinned apps
- Default Windows apps pinned during operating system installation (Microsoft Edge, Explorer, Store)
Organization-assigned applications, such as Windows Automatic Setup
We recommend using the layoutmodification.xml method to customize the taskbar rather than the earlier method of using TaskbarLinks in the Windows unattended setup file.
The example below shows how different applications would be pinned. Your default Windows apps (blue circles) will be on the left, apps you pin (orange triangles) in the center, and apps you pin using XML (green squares) on the right.
On operating systems configured to use right-to-left languages, the taskbar will use the reverse order.
Whether you apply the taskbar configuration on a clean install or an upgrade, users will be able to:
- Pin additional apps
- Change the order of pinned apps
- Unpin any applications
In Windows 10 version 1703, you can apply the Start/NoPinningToTaskbar MDM policy to prevent users from pinning and unpinning apps to the taskbar.
Taskbar configuration used in a clean installation of Windows 10
In a clean install, if you apply a taskbar layout, only the apps you specify and the default apps that you don't uninstall will be pinned to the taskbar. Users can pin additional apps to the taskbar after applying the layout.
Taskbar configuration applied to Windows 10 updates
If your device is upgrading to Windows 10, apps will already be pinned to the taskbar. Some applications can be pinned to the taskbar by the user, while others can be pinned using a custom base image or using Windows Automatic Setup.
The new taskbar layout for upgrading to Windows 10 version 1607 or later will apply the following principles:
- If a user has pinned an app to the taskbar, those pinned apps will remain in place and new apps will be added to the right.
- If the user has not pinned the app (it was pinned during installation or through a policy) and it is not in the updated layout file, it will be unpinned.
- If the user has not pinned the app and it is in the updated layout file, it will be pinned to the right.
- New apps specified in the updated layout file are pinned to the right of the user's pinned apps.
Speed up system boot
Disabling the lock screen
Method 1: Change Group Policy settings
Important! Unfortunately, this method is not available in Windows Home. If you have this particular version, proceed to the next method.
- Press the combination “Win” + “R”. Enter gpedit.msc and “OK” into the line. Press the combination “Win” + “R”. Enter in the line - gpedit.msc and “OK”
- In this window, open “Administrative Templates”. Then "Control Panel". Next, open the first item “Personalization”. And now double-click on the right on the fourth item in the “Prohibit screen display” list.
Double-click on “Disable Screen Display” - Here you need to set the circle to “Enabled” and click “OK”.
Set the circle to “Enabled” and click “OK”
When you want to return this screen, just follow the same path and set it to “Disabled”.
Method 2. Open the registry
- The combination “Win” + “R” and enter regedit in the line. Call the “Run” window and enter regedit in the line
- Now we expand the HKEY_LOCAL_MACHINE branch. Next we move on SOFTWARE. Let's go to Policies. Open Microsoft. Next, right-click on Windows and “New” -> “Partition”.
Create a section - Set the name for the section to Personalization. We immediately go into it and, by right-clicking on an empty space in the window, create a 32-bit parameter (DWORD).
Create a 32-bit parameter (DWORD) - We set its name - NoLockScreen and in the “Value” column set it to 1.
We set its name - NoLockScreen and in the “Value” column set it to 1.
We reboot the device and no longer see the lock screen.
Method 3. For versions higher than 1607
- In the Start menu, type “information” in the search, select “System Information” and press Enter.
Press Enter on “System Information” - In the information you can find out your version, if it reaches at least 1607, then this method will be the most convenient and easiest for you.
In the information we find out our version of the Windows 10 build - Go to the “Personalization” section by right-clicking on the desktop.
Go to the “Personalization” section - On the left we see “Lock screen”. We go in and then we see the name “Show on login screen...”. So we turn it off by clicking once on the oval. Disable the option “Show on login screen...”
Read the detailed information in the article - “How to view your computer’s system requirements.”
How to Change the Manufacturer Logo in Windows 10 System Information
If Windows 10 was preinstalled on your computer or laptop by the manufacturer, then by going to the system information (this can be done as described at the beginning of the article or in Control Panel - System) in the “System” section on the right you will see the manufacturer’s logo.
Sometimes, Windows “assemblies” insert their own logos there, and some third-party programs do this “without permission.”
Determining which OEM manufacturer logo is placed in a specified location is determined by certain registry settings that can be changed.
Additionally, this registry section may contain string parameters with the following names, which, if desired, can also be changed:
There are third-party programs that allow you to change this system logo, for example, the free Windows 7, 8 and 10 OEM Info Editor.
In the program, you just need to specify all the necessary information and the path to the bmp file with the logo. There are other programs of this kind - OEM Brander, OEM Info Tool.
Disable the password entry screen
It often happens that you forget your password and try to remember it. But sometimes you can't remember. So, most often, a password is of no use, unless, of course, you hide secret data there.
- Right-click on “Start” and click “Run” (or the standard “Win” + “R”).
Right-click on “Start” and click “Run” - Enter the netplwiz command into the line (you can enter it similarly - control userpasswords2, they will display exactly the same window). Enter the command control userpasswords2 into the line
- If you have several accounts, then select the appropriate one and uncheck the “Require username...” checkbox. Set the settings with the “Apply” button. Set the settings with the “Apply” button
- Now we need to enter the account, then the password twice and click OK. You will return to the current one and click “OK” again. Click "OK"
From this moment on, the password request will not appear, the system will automatically boot.
On a note! You can use this method to reset your password.
Removing the greeting after the update
Often, after updates, unnecessary advertisements or unnecessary windows pop up.
You can easily deal with this problem:
- In the menu, open the “Options” section. In the Start menu, open the Settings section.
- Next, go to the “System” item. Go to “System”
- On the left, open the second item “Notifications and actions”. In this tab, look for “Show welcome screen...” and disable it (with one click, drag the circle to a different position). Disable the option “Show welcome screen...”
Personal safety
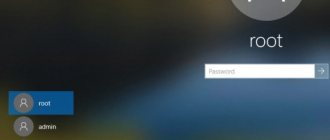
If you often use your device in public places (for example, a cafe), then you run the risk of allowing passers-by to find out your E-mail. After all, on the login screen you enter your data. You can protect yourself by removing your name and email.
Removing email and username
- Again the combination “Win” + “R” and the regedit function in the input line. Next “OK”. Call the “Run” window and enter regedit in the line
- Now we need to access the “System” section: open HLM (HKEY.LOCAL.MACHINE), now go to SOFTWARE, then we need to go to the Microsoft section and then Windows, now CurrentVersion and Policies. Here we see the folder we need. In this window, look for a file called “dontdisplaylastusername” (fourth from the top), double-click it and set the value to 1. “OK” again. In the file “dontdisplaylastusername” we set the value to 1
- Immediately below this the name will be “DontDisplayLockedUserId”, open it. Here the value is 2. And “Ok”. In the file “DontDisplayLockedUserId” set the value to 2
Note! These steps can also be applied to Windows 8/8.1.
Initial layout configuration errors
If the Start Layout setting is not applied as expected, open Event Viewer and go to Applications and Services, History > Microsoft > Windows > **shellcommon-startlayoutpopulation**Online and check for one of the following events. **** >
- Event 22 is logged when the XML format is invalid, which means that the specified file is simply not valid XML. This can happen if the file has extra spaces or unexpected characters, or if the file is not saved in UTF8 format.
- Event 64 is logged when the XML document is valid but contains unexpected values. This can happen if the desired configuration is not recognized, the elements are not in the correct order, or the source is not found (for example, missing or misspelled). lnk.
Finding and changing the background of the welcome screen
Method 1. The simplest
- Launch “Settings” through the menu or “Win” + “l”. Open "Personalization". Launch “Settings” through the “Start” menu and open “Personalization”
- Go to the third item on the left “Lock screen”. Go to “Lock Screen”
- In the “Background” item, select a photo: you can set any picture by clicking on the “Browse” button, or select something from the system parameters. In the “Background” item, select a photo
You can see what your window with a new photo will look like by pressing “Win” + “L”.
Method 2. Use tweaks.com Logon Changer snail
It is not advisable to use third-party snails, this may lead to crashes or various problems. Think carefully before doing the following:
- Install the application and launch it (through the installer window). Install and launch the application
- Select the “Change London Screen” item (it can be either above or below) and look for the picture or photo we need on the device. Select and click “Open”. In the “Change London Screen” item, select the picture and click “Open”
- Using these actions you changed the picture. We confirm the completed actions, click “OK.” If you need to cancel everything, there is a button (second from the top) - “Revert Wallpaper”.
Method 3: Registry Editor
This method allows you to return everything to factory settings.
- Execute the combination “Win” + “R” and enter regedit in the line. Call the “Run” window and enter regedit in the line
- Now we proceed sequentially along the following path: open HKLM, then Software, after which we open Policies and Microsoft, and then Windows. Next, open System and then right-click and click “Create DWORD”. Specify the name - DisableLogonBackgroundImage. Set the value to 1. Go to the specified path, click “Create DWORD”, call DisableLogonBackgroundImage and set the value to 1
Video - How to remove the Welcome screen in Windows 10
Agree, both of these screens are not in demand among all users. Many would prefer to turn them off so that when the computer starts, they can see their desktop much faster and without unnecessary actions. This is quite easy to do.
How to Change OEM Logo in System Information and Boot (UEFI) Windows 10
In Windows 10, many design options can be customized using system tools specifically designed for personalization. But not all: for example, you cannot easily change the OEM logo in the system information (right-click on “This PC” - “Properties”) or the logo in UEFI (logo when loading Windows 10).
However, you can still change (or install if they are missing) these logos, and in this instruction we will talk about ways to change these logos using the registry editor, third-party free programs and, for some motherboards, using UEFI settings.
Disabling the lock screen
The lock screen first appeared in the G8 and successfully migrated to Windows 10. In order to disable it, just do a few simple operations.
Press Win+R on your keyboard. In the Run window that appears, type gpedit.msc and press Enter.
The Local Group Policy Editor window will open in front of you:
Go there along the following path: “Administrative Templates” -> “Control Panel” -> “Personalization”. Once you reach the last folder, a list of available options will appear on the right.
Double-click “Disable Lock Screen” (fourth from the top).
In the window that appears, you will see that by default the option to block the display of the lock screen is not set. You just need to switch the checkbox to the “on” state and click OK.
After this procedure, the lock screen will no longer bother you. To turn it back on, simply disable the display ban.