Popular archiver programs
The following options will help you create an archive in ZIP format.
Table of programs for creating and working with archives in ZIP format.
| The name of the program | Image | Description |
| WinRAR | Supports all formats with the implementation of data encryption and recovery of damaged fragments functions | |
| WinZip | Powerful and lightweight program with the possibility of individual archiving settings | |
| 7-Zip | Convenient utility with performance testing function | |
| PeaZip | A program with extensive data archiving capabilities | |
| ZipGenius | Easily archives and unarchives data, fully integrating into Microsoft Windows. Supports 25 formats and 5 compression levels |
Setting a password for the archive
All archivers offer the ability to set a password for the created ZIP archive.
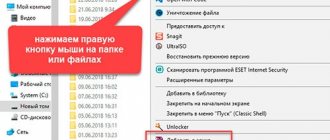
- In Explorer, select the data to be archived, right-click on it and select the archiver icon.
Right-click on the selected files and select “Add to archive”
- Specify the “ZIP” format and click on the “Set Password” button.
Specify the format “ZIP” and click on the “Set password” button - Enter the secret code twice.
Enter the secret code twice and click “OK”
Access to such an archive is provided only after specifying the established password.
ZIP archiving efficiently compresses files and reduces their size to rationally use space on a PC, laptop and flash drive, as well as to facilitate data transfer.
How to create a ZIP archive with multiple volumes
A multi-volume volume is created using 7zip:
- The files are placed in a separate folder on the PC.
- Right-click to open the menu, select “7zip” -> “Add to archive”.
Right-click on the folder, point the mouse at “7-Zip”, click on “Add to archive” - After about click “OK”.
In the “Split into volumes of size in (bytes)” section, select the appropriate value and click “OK”
Created archived volumes
Self-extracting archives
The convenience of archive files with the ability to self-extract is that you do not need to install special software to extract them. They are created in any of the archivers considered. To do this you need:
- Open the folder with the required data in the program window.
Right-click on the selected files and select “Add to archive”
- Then go to the tab labeled “Create SFX Archive”.
Go to the tab labeled “Create SFX archive” - Check that all settings are correct and click OK.
Check the box “Create SFX archive” and click “OK”
The best compression programs. Batch Processing
Paint is always at hand, but it’s too primitive. Photoshop is excessively bulky and clumsy. What programs are best to compress JPG? Good viewers are also image managers! Their advantage is support for batch compression: simultaneous processing of all or several selected files in any folder instead of manually changing pictures one by one.
ACDSee, XnView and IrfanView: just three of the many programs for compressing images en masse. Even the thoroughly commercial ABC has a free but fully functional version. If the program is not Russified, you should remember the word Compress - “Compression”. Let's look at batch compression technology using the XnView graphic browser as an example.
Having opened one of the files in the target folder, double-click on it. A filer window will open with previews of all images.
The XnView viewer and editor says that 9 files take up almost 20 MB. Disorder!
- Having selected all the files at once (Ctrl+A, or with the mouse), select “Batch processing” - the button is highlighted with a green frame.
- In the “Transformations” tab there is a “Resizing” option - let’s go there.
XnView Batch Transformation Tab: Check out dozens of ways to quickly edit pictures at once.
- It is convenient to set a new size as a percentage of the original by clicking on the “Maintain proportions” checkbox. For example, let's use a value of 70% (this is a reduction in area, not a degree of compression).
- The Run button will cause the files to compress. A few seconds and...
...The same 9 photos, whose total size is less than 5 MB. The program was able to reduce the sample file to 800 kilobytes.
Viewers also have the “JPEG Compression” function without reducing resolution.
Compressing an Image in Paint
It’s in vain that this standard graphic editor included with Windows is considered a frivolous tool. Firstly, it is very interesting and useful to teach “dummies” the basics of PC literacy, and secondly, it is available everywhere and always - and when a more powerful program for working with graphics is not installed on the computer, its capabilities will come in handy more than once.
Opening the source in Paint: the number of dots is amazing, but their number does not mean beauty or quality. Scale: 100%.
To open an image in Paint, you need to right-click on the file and select “Edit”.
This editor doesn't allow you to manually adjust the JPG compression level, but it feels like it sets it to around 80%. It is enough to resave the file to get 1.83 MB instead of the original 2.44 MB. By eye, the level of quality remains almost the same.
The image was compressed to 1.83 MB after resaving in Paint in 2-3 clicks and 10 seconds.
Paint has a way to reduce the pixel size of an image. This is the Resize button. When you click it, a dialog box appears asking you to enter new horizontal/vertical dimensions as a percentage of the original number of points.
Let's choose 50 to 50: 2 times less length and width means an area 4 times less. By the way, the resolution must be changed equally in both dimensions, otherwise the picture will be deformed.
The “Change picture resolution” function is standard in most graphic editors, from the primitive Paint to the monstrous Photoshop.
The result is 616 kilobytes. Not enough for a family archive, but great for publishing on websites. Without a magnifying glass, the difference with the source is barely noticeable.
616 kilobytes with a resolution of 1290×960 px.
Note that 0.6 megabytes was obtained not only as a result of changing the resolution, but using a “combined” method - the image size in Paint is also adjusted by reducing the JPG quality by about 85%. It is impossible to change the value of the compress parameter in the desired direction. Paint does this automatically.
Processing drawings in Mac OS
Let's look at the process of working with images on a Mac. For example, pictures can be perfectly compressed by the standard Preview application: there is no need to install additional software, even for batch processing. Preview on your Mac knows how to resize multiple photos at once.
Select one or several images, open them in preview, then select Tools > Adjust Size, and fill in the required values. And save.
We recommend experimenting with image compression yourself, copying them to a test folder first so as not to lose important photos. After 3-4 attempts, you will understand in practice how to reduce the size of an image in an optimal way, with the most suitable compression, width and height parameters.
Our recommendations on how to reduce JPG file size:
- Install and use every day any quality image file manager.
- Forget about Photoshop: it is too powerful and clumsy editor for such simple tasks.
- Use online services only when there are no other methods at hand - and use Paint for single files.
Disclaimer: no dogs were harmed during the artistic or programming experiments. :)
Using 7-Zip
- Go to the developer’s website and click the “Download” button, selecting the version that suits your OS. On the official website, click the “Download” button, downloading the appropriate version for the system
- Launch the downloaded file by double-clicking with the left mouse button.
Double-click the left mouse button to launch the downloaded file - Click the “Install” button.
Click the “Install” button - Wait for the installation process to complete and click the “Close” button.
After installation is complete, click “Close” - Open the 7-Zip program through the Start menu by entering the name in the search field and open the result found.
Through the Start menu, find and open the 7-Zip program - By clicking on the folder icon with an arrow or double-clicking with the left mouse button on the folders, get to the desired directory.
Click on the folder icon with an arrow or double-click with the left mouse button to open the required folder - Select the files with the left mouse button while holding down the “Ctrl” key, click on the plus image.
Hold down the “Ctrl” key and left-click on the files to select them, then click on the “Add” icon - Specify the name of the new folder and replace “7z” with “ZIP”, click “OK”.
Change the name of the folder, in the “Archive format” section change “7z” to “ZIP”, click “OK”
The archived folder will appear among the files
Convert RAR to ZIP
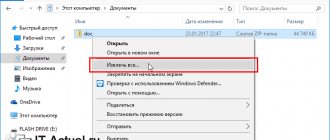
- Extract to a separate folder by clicking on the appropriate button.
Select all files by pressing “Ctrl+A” and click on the “Extract” button - Select all files, right-click to open the context menu and select “Add to archive”. Select files by pressing the “Ctrl” key and clicking the left mouse button. Right-click on the selected files and select “Add to archive”
- In the options window, select ZIP as the archiving format and click OK.
Changing the format from “RAR” to “ZIP”
Click "OK"
Archiving methods
There are two archiving options:
- using the internal program – ZIP Windows (option No. 1)
- using programs from other developers WinRAR and 7-ZIP (option No. 2)
The most popular is the first method , since when sending ZIP archive, all versions of Windows will be able to accept the information in default mode. The disadvantage of this method is the small degree of “compaction” of the files. The second method opens up the possibility of sending a huge number of files, compressed into an archive. Below, we will consider the option of archiving with ZIP Windows .
How to reduce Jpg file size - a little necessary theory
Regarding the JPG format (and its variant JPEG), there are 3 ways to resize files. The size of PNG, BMP, GIF and other graphic formats can be adjusted only by the first method.
- Reducing the image resolution (number of pixels) without losing quality;
- Reduced quality without reducing resolution;
- Simultaneous reduction in both resolution and quality.
Any photograph is a collection of pixels. In modern cameras their number exceeds 2-4 thousand horizontally and vertically. This is a lot, and megabytes “grow” from such a resolution. Does this improve image quality? Almost none, especially for non-professional photographers during everyday shooting. Since changing the resolution of a photo can be almost painless for quality, many people use this method to make the image smaller.
I will definitely tell you about the most convenient methods in a note; all you have to do is choose the one that suits you.
By compressing the image by 2 times (by 50%, in terms of graphic editors), we will reduce its area (and volume!) by 4 times, school geometry in practice.
It is logical to reduce the number of dots in order to reduce the size of the photo - and not notice any changes in quality.
An alternative option for JPG files is to leave the image resolution at its original size, but allow the computer to reduce the quality. Some blurriness, smoothing, or fuzziness is acceptable. We can assume that the compression quality in graphic editors is something like this:
- 100%—no image compression;
- 90% - the default setting in many programs - minimal compression;
- 80% is a deeper level: files are compressed quite strongly;
- 70% is still an acceptable loss of quality, but within reason;
- 50% and below – a dramatic decrease in the appearance of the pattern, noticeable to the naked eye.
What is archiving?
The principle of compressing any code is quite simple. If a long sequence of certain bytes occurs frequently in an information block, it is encoded with a shorter sequence. Not entirely accurate, but an analogy: the number 1000000000 consists of 10 characters (conventionally, a byte), but if we represent it as 10*9, we get only 4 characters. The winnings are 2.5 times.
There are many compression methods and their modifications; many archivers (programs that allow you to compress files and decode them) use a combination of these methods. Some methods allow for lossless data compression, that is, reversible, others with loss (for example, JPG image files, they are compressed using an algorithm that does not allow the original image to be restored).
Almost all non-archived data types are well compressed - texts, photographs, databases, videos, executable files (com, exe, bin), uncompressed audio (wav format). Archiving files that have already been created using a compression algorithm (cab, pdf, jpg, gif, avi, mpg, mp3) is much less effective; the gain here is only a few percent.
There are a huge number of archiver programs, some of them are very specific and designed for certain types of data. But the most famous are archivers that allow you to compress files and folders into rar and zip formats - they are the most common since time immemorial.
The Winrar archiver has an excellent reputation, which uses fast and efficient algorithms that allow you to compress and decompress relatively large files in a short time. The main disadvantage of the program is that it is distributed on a paid basis.
An alternative free archiver is 7 Zip, which is no less effective and versatile than its paid counterpart.
Of course, when archiving the text file becomes unreadable, it must be unzipped with the same or any other program that understands the compression format used. The same can be said about all other file types, with the exception of the already mentioned formats such as mp3 or jpg, the decompression of which is built into all programs that use these formats.
In other words, using archivers to reduce the size of files, as well as folders with all their contents, only makes sense for transporting them (via removable media, over a network). This solution allows you to bypass file transfer limits set by many services and sites (email programs, social networks, cloud storage, etc.). So the relevance of using archivers is still high.
Creating a .zip file in WinRAR
- Through “Explorer”, open the directory where the data is located by double-clicking on the “Computer” (“This Computer”) icon. Double-click with the left mouse button to open the “My Computer” icon
- Double left-click the mouse to open the folders one by one to get to the desired directory.
Double-click with the left mouse button to open the desired drive or folder
Double-click with the left mouse button on the desired folder for archiving - Select all files by pressing the key combination “Ctrl+A”, and call the context menu by right-clicking on the selected area.
Select all files by pressing “Ctrl+A”, right-click on the selected area to call up the context menu - Go to the item with the WinRAR icon.
Left-click on “Add to archive” - In the settings, set the format to “ZIP”.
Check the box next to the “ZIP” format.jpg - By clicking on “Browse”, select the directory to save.
Left-click on the “Browse” option
Click “Save”, it is possible to change the location of the folder before saving - Double-check all settings and click OK.
Check the settings, click on the “OK” button
On a note! You can also do this through the program window.
- Launch WinRAR on the device.
Open “Start”, type “winrar” in the search field, click on the program as a result of the search - Click on the arrow icon to find the data you want to archive.
Click on the arrow until we find the desired directory
Double-click with the left mouse button to open the drive or folder you want
Double-click to open the desired folder - Click on the “Add” button.
Press the “Ctrl+A” keys simultaneously, selecting all files
Click the “Add” button - Select the “ZIP” format and the location to save the folder.
Check the “ZIP” box and click the “Browse” button - Click "OK". Check the settings, click on the “OK” button
Compress files before sending by email
Many people use email as a tool for transferring images, programs, and documents. It is worth considering that when trying to exchange heavy files, a number of problems may arise: it will not be possible to transfer too large a volume due to the limitations of the email client, uploading an acceptable size to the server will take a long time, just like the subsequent download, and the resulting interruptions in the Internet connections can lead to interruption of the injection. Therefore, before sending, it is necessary to create a single file of minimal size.
Method 1: Compress Photos
Most often, high-resolution photographs are sent by email. For fast delivery and easy downloading by the recipient, you need to compress the photo using special utilities. The easiest method is to use the Picture Manager from Microsoft Office.
- Open any application using this software. Then select the "Edit Pictures" option from the top toolbar.
A new section will open with a set of editing functions. Select “Picture Compression”.
On the new tab you need to select the compression destination. Below you will see the original and final volume of the photo after compression. Changes take effect after confirmation with the “OK” button.
If this option does not suit you, you can use alternative software that works on a similar principle and allows you to conveniently reduce the weight of a photo without compromising its quality.
Method 2: Archiving files
Now let's look at the number of files being sent. For comfortable work, it is necessary to create an archive in which the volume of files will be reduced. The most popular archiving program is WinRAR. In our separate article you can read how to create an archive through this application.
If VinRAR is not suitable for you, take a look at the free analogues that we talked about in another article.
To create a ZIP archive, and not a RAR, you can use programs and instructions for working with them using the following article.
Users who don't want to install any software can use online services that offer hassle-free file compression.
Unpacking the archive folder
- Open the archiver. Open “Start”, type “winrar” in the search field, click on the program as a result of the search
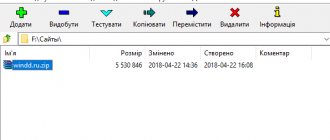
- Select the archived folder with the left mouse click, click on the “File” button, select “Open archive”.
Select the archived folder with the left mouse click, click on the “File” button, select “Open archive” - Left-click on the folder and click “Open”. Left-click on the folder and click “Open”
- When a list of files is displayed, extract. Select all files by pressing “Ctrl+A” and click on the “Extract” button
Select a location to save the file and click “OK”
Extracted files from the archive
How to Back Up Data in Windows
To create an archive, it is not necessary to install additional software on your computer; this can be done using built-in OS tools. But the choice of formats will not be large - only “.ZIP”. To do it, click (right-click) on the required file or folder and point the cursor to the “Send” item, then in the drop-down menu click on the “Compressed ZIP folder” item.
A window will open with the “Compression...” process, after which the archive will be created. The creation time depends on the amount of data you are compressing. Then you can open and use it like a simple folder.
This method is very simple. It will be useful if you do not have the opportunity to resort to third-party software for these purposes. But, unfortunately, it also has disadvantages, such as only one format - “.ZIP”, the inability to specify packaging parameters, i.e. compression method, update, password, etc.