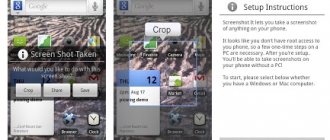
Step-by-step instructions for replacing the display on iPhone 6s
Replacing the iPhone display is one of the most common services provided in any service centers, even those that do not specialize in Apple technology. But you can change the iPhone screen, really cheaply and with high quality, at home. This instruction describes in detail how to replace the screen on an iPhone 6s - anyone can do it.
Opening the case
Analysis of almost all iPhones starts from the bottom. The two star screws are removed using a pentalobe screwdriver.
Starting with the 6S, Apple began equipping its phones with sizing. It securely attaches the module to the metal frame, preventing moisture and dust from entering. If difficulties arise during disassembly, you can warm up the front part to make disassembly easier.
We simply used a flat spatula to lift the display from the bottom and gradually, running the spatula along the edge, peeled off the display.
If necessary and at the request of the client, such an adhesive layer is reapplied.
We “open” the phone in the manner of a car hood - the display is connected to the board in its upper part and we cannot break anything.
iPhone motherboard diagrams
iPhone motherboard diagrams are the main direction of diagnosis when a phone malfunctions. The motherboard of these devices may have a different number of layers, but on average there are usually 10. Elements such as coils, resistors and some others are placed on the topmost and bottommost layers. In this case, tracks pass through each layer.
When a crack forms in any of the inner layers, these tracks are torn. The cause of cracks may be impacts of the board or its bending. Sometimes contact may be intermittent, appearing and disappearing unexpectedly. This is due to the thermal expansion of materials.
When working under heavy load, a phone with a damaged track may randomly shut down or reboot. The reason is expansion of the board due to high temperature. It can move damaged tracks away from each other, causing loss of contact. When the board cools down, the device's operation resumes. Therefore, such a problem cannot be detected during normal operation of the device.
The diagram shows the tracks connecting microcircuits and small elements.
There are special balls located on the back of all microcircuits installed on the motherboard. They are made of solder and are called BGA (Ball Grid Array). This is not always convenient.
The fact is that for the purpose of strengthening, most of the microcircuits are filled with a compound. This is a special resin that strengthens soldering and reduces the likelihood of breakage as a result of mechanical stress on the phone (for example, drops or impacts). The downside is that replacing such microcircuits if necessary is very difficult.
In modern models, starting with the 5S, polymer resin is often used instead of a compound. It is less hard, and replacing the chip has become easier. However, as a result of this replacement, the protection of the microcircuits has decreased, so such models are more susceptible to shocks and falls.
If the phone received a strong blow - for example, fell from a great height, and in addition there is some visible damage on its body - most likely, the soldering of some microcircuits was also damaged. Accordingly, even after repair, some functions may not work.
The state of soldering of microcircuits during bending and subsequent straightening of the board
The chip itself remains straight even if the board is bent. The fact is that microcircuits are made of a special material - crystalline silicon, which does not deform, but immediately crumbles. In this case, the solder and compound can bend along with the board itself. These solder balls, even if deformed, still maintain contact with the motherboard, even though it is bent. Thus, when the board is straightened, the compound will return to its original state. But BGAs do not have elasticity and will remain wrinkled. This causes the contact between the board and the chip to be interrupted. As a result, the function it controls stops working. And if, in addition, the microcircuit is responsible for the processor or controller, you won’t be able to use the phone at all.
Therefore, an experienced technician, before removing the motherboard from the damaged device, always warns about possible risks.
This article will look at the main chips installed in the iPhone and show some signs of malfunction.
Tristar (U2 Tristar)
It is a USB connection controller. It is absent in the iPhone4 and 4S models: there is no USB, but a 30-pin connector.
Power controller
It performs the function of providing all nodes with the necessary voltage.
Disconnecting the battery
First disconnect the battery. It is hidden under a metal cover and two screws.
We unscrew the screws, lift the cover and disconnect the battery.
We fold back the remaining trains
Now let's move on to disconnecting the display from the board. All connectors are hidden under the second cover at the top. Four screws need to be removed.
Attention: the two bottom screws are always the shortest. If you mix up and screw longer screws into the lower holes, there is a possibility of damage to the motherboard conductors and partial or complete failure of the phone. Observe the assembly order and fix the location of the screws.
We disconnect three cables from the connection connectors. We act carefully and do not allow excessive pressure or bending; we work with a plastic tool.
Using a special screwdriver, unscrew the screws located on the bottom end of the device:
For this procedure, a unique Pentaloble screwdriver from the 54 Bit Driver Kit is used, which can be easily ordered in one of the specialized domestic or foreign online stores. The presence of non-standard screws in this case is justified by limiting unauthorized access to the inside of the device. Despite conflicting information, it is not necessary to heat any part of the iPhone 6 or iPhone 6 Plus before disassembling it.
Checking the new module
Now is the time to check out the new part. We connect it in place of the old display, return the battery connector to its place and start the device.
After launch, we test all the main functions of the display module. We are interested in the uniformity and brightness of the backlight, the absence of graphic distortions and artifacts. The touchscreen should work over the entire area, in the corners and along the edges.
Use interface elements to check: pull out the curtain, move application icons across the desktop and scroll through lists.
What you need to replace the display on an iPhone 6S
To replace the display you need to prepare yourself. Keep in mind that for such work, in addition to the new parts (display module) that you are going to change, you will definitely need a specialized tool. This list includes:
- a set of special screwdrivers;
- small aluminum (plastic) spatula;
- tweezers;
- mounting hair dryer;
- rags;
- prepared space 50 by 50 cm;
- up to an hour of free time (depending on preliminary preparation in the form of watching videos with step-by-step instructions for performing work).
Remember, in order for the screen replacement to be successful on your own, do not be lazy to first read the step-by-step instructions on how to do it.
We transfer small parts
The spare part has passed the test, we will transfer components from the old display for installation on the new one, namely: the rear metal base of the display, the home button and the cable with the front camera, speaker and microphone.
Let's start with the top part, where 3 screws and a cap hide the top cable underneath. Unscrew and remember the location of the screws for reassembly.
We remove the cover and take out the earpiece, nothing holds it, it hides under the cable.
Next, we remove the sensors from the grooves, act slowly and carefully, it is very easy to break the thin cable.
Lastly, peel off the microphone. Use a flat spatula or tweezers to pry from below and lift.
The holders of the front camera and the paired sensor should also be moved; if necessary, you can heat the glass on the back side with a hairdryer to facilitate dismantling. We will install them in a new place with a small amount of glue.
Often, spare parts of original quality do not have a speaker mesh backing with a microphone platform. We will also take it from the old display.
Use a suction cup or special tape to open the device:
For this procedure, a specialized iSlack suction cup or the most common non-marking double-sided tape can be used. Since there is a high probability of dropping the phone during disassembly at home, it is better to hold the device above a soft surface.
Remove the HOME button
Now it's the button's turn. Similar design: metal cover, three screws.
Unscrew the screws, set the cover aside and peel off the button. It is glued along the perimeter of the rubber seal and under the cable with electronic components. Use a flat tool to peel off the cable.
Removing the display from the frame
The last thing to dismantle and the first to move is the metal base of the display. There are six side screws and one top screw. Once the screws are removed, the base can be easily detached.
Before installing the metal base, be sure to remove all shipping and protective films from the new display and install the holders for the front camera, sensors, and earpiece grille.