This time I will show you how to install stock firmware on your Samsung Galaxy smartphone or tablet, that is, restore the state of a new device. This method will also allow you to revive your gadget after an unsuccessful installation of custom firmware or get rid of problems with the operation of the device. You can also update your device to the latest software version if you can't wait for the over-the-air update. Everything is completely safe!
This method involves using the convenient Odin utility for Windows. Don't worry if you're not familiar with her. Thanks to the step-by-step instructions below, you will learn everything you need to successfully restore using Odin. It's worth noting that all data stored in the device's internal memory will be erased, so save it to your computer before you begin. You can also backup SMS, contacts, media files and more by checking our guide.
Backup
The most effective way to restore installed applications, system programs, settings and firmware is to roll back from a previously made Backup.
Before making any changes to the software of your Android smartphone or tablet, you should always make backup copies. This will completely protect you from unpleasant consequences. In general, creating backups is the golden rule not only when flashing Android devices, but also in any serious programming. If for some reason you did not follow the recommendations and began to change the firmware or make changes to the operating system without creating a backup copy before these procedures, then there is a way out.
There are many applications that are designed to create backup copies of your Android gadget, all of them have their own advantages and disadvantages. But we will look at the example of one of the first and most universal programs for backup and recovery - Titanium Backup.
Differences from the update
If you have updated Android at least once, you should know that this does not delete the user's personal data. Photos, applications, music and everything else remain in place. But if you decide to roll back Android, it will be the same as resetting to factory settings. Absolutely all information will be deleted.
Another point is the difficulty of rollback. To update the operating system, you often do not need to do anything. The new version arrives over the air, after which you only need to click on the “Download” and “Agree” buttons. There is no universal guide for rollback. You will have to get a special program, install it on your computer, download a custom Recovery menu and perform many other actions. That is why it is recommended to roll back to a previous version of the system only in case of urgent need.
Rollback via hisuite
Resetting the software via Hisuite will require:
- installing the mentioned utility on the computer and then connecting the smartphone (with acquired developer rights and the “USB debugging” mode enabled) to the PC;
- subsequent installation of additional programs for interaction between devices (installed automatically after connection);
- after that you will have to press “EMUI Rom”, “Download Rom” in sequence;
- After starting the download process, you need to follow the instructions of the utility.
Reverting to an older version of Android
You can roll back your smartphone to a previous version using different methods. Each user chooses the appropriate option for themselves, based on the smartphone model, firmware version and availability of a computer. Read each method carefully, and only then proceed with the procedure.
Via computer
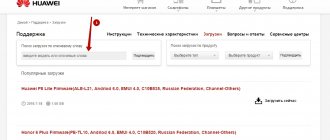
As the name suggests, for this method you will need a computer as well as a USB cable. The first step is to find and download the required firmware, that is, the Android image, to the PC. For these purposes, we recommend using the website 4pda.ru, where there is a huge catalog with different versions of the operating system for different devices. You can also try searching for the firmware on the manufacturer's , if available.
The next step is to download the archive with the ADB Tools program to your computer. There is nothing complicated here - just click on the name of the utility in the text and download the file.
Now unpack the downloaded archive to a convenient location on your PC. It is better to use drive C for these purposes, but another folder is also possible. It is important that the path to the file did not contain Russian letters and numbers . Move the archive to the desired directory, then right-click on it and select “Extract to current folder.” Finally, a folder called “ADB Tools” should appear in the file manager.
Finally, we go to the smartphone and enable USB debugging mode on it. For clarity, here are step-by-step instructions:
- Let's go to settings.
- Go to the “About phone” or “About device” section. Click on the “Build number” or “Firmware version” line several times. As a result, a message should appear on the screen with the text: “You have become a developer.”
- We return to the main settings page and open the “Advanced settings” tab.
- Find the item “For Developers” and click on it.
- On the page that opens, move the slider to the right next to the “USB Debugging” line.
- Click on the “Ok” button in the window that appears.
And now that the desired mode is activated, turn off the phone completely. Make sure your device has an unlocked bootloader and save all your important files, photos, videos, and other information somewhere. If everything is in order, then simultaneously press the power button and the volume down key. A Xiaomi smartphone is used as an example, so a picture with the caption “Fastboot” should appear on the screen. As for other devices, the “Recovery” menu will most likely be displayed on the display. In it you need to go to the items “wipe cache partition” and “wipe date/factory reset”, confirming your choice.
The next step is to connect the device to the computer using a USB cable . This is a regular cord used to charge your phone. Next, the necessary drivers will be automatically loaded onto the PC. Of course, if the operating system version is Windows 7 or higher. By the way, don’t forget to open your phone’s notification shade and change the USB Charging option to File Transfer.”
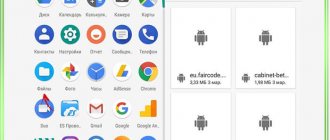
We return to the “ADB Tools” folder and transfer the archive with the firmware to it. Next, unzip it by right-clicking on the file and selecting “Extract to current folder.”
In the current folder we find a file called “flash-all.bat” and double-click it.
Completing the previous action will lead to automatic flashing, after which the device will reboot. If you carefully follow the instructions, the procedure will be completed successfully. However, there is still a certain probability of turning a smartphone into a “brick”.
Via TWRP
TWRP is a custom recovery installed by default on some smartphones. It is with its help that Android will be rolled back to the previous version. Since this Recovery is found only in a small number of devices, you need to download it yourself. The easiest way without root rights is to use ADB and Fastboot .
So, the first step to installing TWRP is to start a computer or laptop running the Windows operating system. Now we load the Minimal ADB and Fastboot package onto it, containing the ADB and Fastboot utilities necessary for operation. Run the downloaded file and follow the installer’s simple instructions.
After installation, go to the selected directory and check for the presence of two applications: ADB and Fastboot.
We return to the phone and turn on the “USB Debugging” . How to do this is described in detail in the previous method. After that, connect the device to the computer using a USB cable.
On the PC, launch the command line as administrator (Start menu - “cmd.exe”). Enter the command cd Path_to_folder_with_ADB into it. For example, the folder with programs is located in the root of drive C, then enter the request cd C:\Minimal ADB and Fastboot and press “Enter”. Next, we check the visibility of the smartphone utility by entering the adb devices .
At the next stage, download the TWRP Recovery image file specifically for your phone to your computer. To do this, go to the official website of the developer, look for the desired device model and complete the download.
Transfer the downloaded file to the folder where the ADB and Fastboot applications are located. For clarity, we recommend changing its name to “twrp.img” .
Open the command line and enter the request adb reboot bootloader . After pressing the “Enter” key, the phone should go into Fastboot mode, which will be indicated by the corresponding picture on the screen.
Now you can proceed directly to installing custom recovery. At the command line, enter the command fastboot flash recovery twrp.img , where twrp.img is the image file with TWRP, which was renamed earlier. Upon successful completion of the procedure, a corresponding message will appear on the PC screen.
Next, reboot the phone in normal mode by entering the command fastboot reboot . After this, you can proceed to flashing the device. First of all, we download the archive with the firmware to the computer, which does not need to be unpacked. Then we transfer the necessary files to the memory card and insert it into the phone. It is important to choose a folder that contains a simple and understandable name in English.
Now go to the “Recovery” menu by simultaneously pressing one of the following pairs of buttons :
- Volume down + Power;
- Volume up + Power;
- Home button + one of the volume keys + power button;
Next, in the “Recovery” menu, perform the following actions :
- Click on the “Wipe” item.
- Move the “Swipe to Factory Reset” slider to the right. This action starts cleaning the phone's file system.
- After completing the procedure, click on the “Back” button.
- Click on the “Install” button.
- Select the storage where the files needed for flashing are located and click “OK”.
- We find the desired archive with the firmware, and then check the “Zip file signature verification” box.
- We start the firmware installation process by moving the “Swipe to Confirm Flash” slider to the right.
If the installation is successfully completed, a corresponding message will appear on the screen. All that remains is to reboot the device by clicking the “Reboot System” .
Via update menu (OTA)
The next method involves using the update menu (OTO). The advantage of this method is that you do not need any cables or wires. Since the update is installed over the air, rolling back to the previous version is done in the same way. First, let's look at the simplest instructions , and then move on to more advanced ones:
- We download the archive with the required firmware to the smartphone.
- Let's go to the phone settings. The Xiaomi smartphone is used as an example, so the procedure may differ on other devices.
- Go to the “About phone” section.
- Go to the “System Update” tab.
- Click on the “three dots” located in the upper right corner of the screen.
- Select the “Select firmware file” option and specify the path to the pre-downloaded archive.
- The system will ask for permission to reboot the device. We provide it and wait for the procedure to complete.
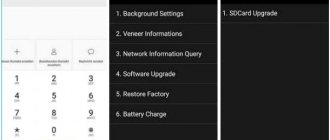
In most cases, the system does not allow you to roll back to a previous version, so we recommend using an alternative method. It requires a computer, as well as the ADB Run utility installed. First, activate the USB debugging mode on the phone and connect the device to the computer. Then turn off the smartphone and go to the “Recovery” menu. From here we go to the section “apply update from ADB” . The firmware file must be moved to the folder with the ADB utility.
Now we launch the ADB Run utility on the PC and enter the command “7”. Press the “Enter” button and enter the number “1” in the input line.
Enter the command “adb sideload archive_name_with_firmware.zip” and press “Enter”. Immediately after this action, the flashing process should begin, upon successful completion of which a corresponding message will appear on the screen.
Via Titanium Backup
Before moving on to the instructions, we note that this method is only suitable for smartphones with root rights. If there are none, then use one of the previous methods. So, first of all, install the Titanium Backup application on your phone. For security reasons, we recommend installing through Google Play and not using third-party sites for this.
We launch the program and go to the “Recovery” tab, and then select “OS recovery with data”.
The rollback will be performed to the firmware originally installed on a specific device.
What is HMS?
HMS or Huawei Mobile Services is a platform owned by the Chinese brand that they have used to replace Google apps and services on their phones. Although not all of them still have these services, although the list of Huawei mobile phones without Google apps continues to grow. At the moment we can find them in the terminals of the entire Huawei P40 family, including pP40 Lite, Huawei Mate 30 and 30 Pro, Huawei Mate Xs, Huawei P Smart S, Huawei Y6p and Huawei Y5p.
And with this enterprise service, external developers get the tools they can use to create their own applications. This means that HMS has become a key element in allowing the brand to create its own ecosystem, leaving aside everything Google does for Android users and developers.
In HMS we will also have our own application store - AppGallery. Moreover, as we already mentioned, these Huawei services have a component for developers , that is, HMS Core. A section created solely for developers to create or improve their applications.
Disable automatic updates in HMS
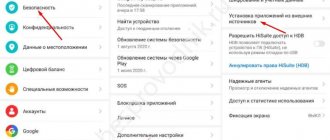
As we already know, not all Huawei mobile phones have these services, since there are still many terminals from this brand that still support GMS. Additionally, these steps, which we explain below, will be slightly different for mobile devices running the Google Play Store. So if you want to ensure that the various application update packages are never downloaded automatically, you must first go to Settings > Applications > Applications > HMS Core and then we will only need to go to Automatic update and turn off "Update automatically over Wi-Fi" .
But if you want to uninstall any type of updates from any of the apps that you have installed on your mobile device, you must go to Settings > Apps > Apps > HMS Core and then click on Uninstall Updates.