Despite the fact that modern Samsung smartphone models have added a lot of different functions that allow you to individually customize the appearance and other functionality, many users still want to expand their capabilities in this regard. Moreover, there are many programs for this on Google Play that are easy to download and convenient to use.
Most of them are suitable not only for the latest models Samsung Galaxy S10, Galaxy M30, M20, M10, Galaxy A10, A20, A30, A40, A50, A60, A70, but will also fit last year’s devices, increasing their functionality.
We have selected ten methods, where we will also offer several Android applications that will help you customize your Samsung smartphone and turn it into a unique device in terms of visual effects and software features.
Manual Internet setup in Samsung
To do this, go to “Settings – Wireless networks – Mobile network – Access points (APN)”, click the plus sign and “New access point”. Depending on the operator, we use the following parameters:
MTS:
- Access point (APN): internet.mts.ru
- Username (Login): mts
- Password: mts
Megaphone:
- Access Point (APN): internet
- Username (Login): gdata
- Password: gdata
Beeline:
- Access point (APN): internet.beeline.ru
- Username (Login): beeline
- Password: beeline
TELE 2:
- Access point (APN): internet.tele2.ru
- Username (Login): no need to fill in
- Password: no need to fill in
Once you have entered the settings, check whether data transfer is enabled in the network settings. If there is no connection, try rebooting the device.
You can also try sending a request for auto Internet setup to the operator.
Here is a short instruction that will only take you a couple of minutes to read, and in the end you will regain the ability to use the Internet on your Samsung phone, whenever and wherever you want. Good luck!
If you failed to set up the Internet on Android, write about it in the comments.
The Internet on Samsung mobile phones, as on any Android device, allows you to get the most useful features from the device by visiting social networks and using various instant messengers. However, for the Internet connection to work correctly, it must first be configured and connected. During this instruction we will describe this procedure in detail.
⇡#Autonomous work
Samsung did not skimp on the battery, despite the AMOLED screen and not the most energy-demanding platform, and installed a 17.1 Wh (4500 mAh, 3.8 V) battery in the A52. As a result, the previously good series in terms of autonomy (both A50 and A51 did not raise any questions) became even better. Even under heavy load, the smartphone does not need to be charged more than once a day. You still shouldn’t count on two days of work without recharging, but at least there shouldn’t be any panic if you forgot to plug the gadget into the socket overnight - you can charge it at work, for example.
In our test with Full HD video playback at maximum brightness, with Wi-Fi and notifications turned on, the Samsung Galaxy A52 lasted 14.5 hours - a good figure for a smartphone with an OLED display, but no more.
The Samsung Galaxy A52 supports chargers up to 25W - but a less powerful charger will be included in the box. Unfortunately, I can’t say which one - we got the A52 without any configuration for testing. Wireless charging is not supported.
Turning on the Internet on Samsung
The process of setting up a network connection is the same on all types of Samsung devices, be it a tablet computer or a smartphone. The only thing that should be taken into account in some cases due to differences in the interface is the version of the Android operating system. You can also read another article on our website on a similar, but more detailed topic.
Method 1: Wi-Fi
Internet via Wi-Fi is currently much more in demand than mobile data transfer. Such a network provides a fast, reliable and generally less expensive network connection. On Samsung smartphones, the procedure for creating such a connection has minimal differences from other devices on the Android platform.
Turning on Wi-Fi
- Open the main system “Settings” and click on the “Wi-Fi” item.
On some devices, you need to open the Settings section and go to the Connections page. Only after this will you be able to open the Wi-Fi settings by selecting the appropriate item.
Regardless of the option, switch the slider to Enabled and wait until available networks are detected. To connect, tap on the desired option.
Sometimes you need to enter a password to establish a connection. If the connection is successful, the message “Connected” will appear.
- Please note that if there are problems with discovery, you may need to add the network manually. This can be done by clicking on the “Add network” button and specifying the required data. This process was described in detail in the article at the previously provided link.
- In addition to connecting to the Wi-Fi network through the settings section, you can use the “Wi-Fi” item on the quick access panel. To do this, open the curtain and tap on the indicated item. You will subsequently be presented with a network selection and will be asked to enter a password.
Access point
In addition to connecting your smartphone to the Internet, it is possible to use the device as an access point (i.e., as a router) for other devices, for example, a laptop or tablet. To do this, it is necessary that the connection is already configured and enabled on the phone in accordance with the instructions from the second method.
- Having figured out your mobile Internet connection, open “Settings” and go to the “Connections” section. From the list of options, select "Hotspot and tethering."
At the next stage, you need to click on the “Mobile hotspot” line and agree to the notification about disabling incoming Wi-Fi connections.
When you open the “Mobile Hotspot” page with general information, you can change the password and view the list of connected devices. There are also instructions for connecting to the created network.
We hope we helped you figure out how to set up and connect Wi-Fi both for Internet distribution and for connecting to the network. If something does not work or the interface differs significantly from what is presented, check out our other article on solving problems, and also contact us in the comments.
Method 2: Mobile Internet
Since any phone requires the use of a SIM card, you can use it to set up and connect to mobile Internet. Moreover, before proceeding with this procedure on a Samsung device, you should familiarize yourself with the operator’s tariffs in advance and connect the appropriate option. Otherwise, when you activate mobile data, you may be charged a significant amount of money.
Data transfer
- If your SIM card is already connected to a suitable tariff plan, first you need to activate the “Data Transfer” function. This can be done on the “Notification Panel” by tapping on the icon labeled “Data Transfer” or “Mobile Data”.
As a result, the specified icon will be highlighted with a blue frame, and the procedure can be completed. If necessary, future shutdowns will be performed in exactly the same way.
Automatic settings
When using a SIM card from any mobile operator, in most cases, Internet setup is not required. For this reason, after enabling “Data Transfer”, try using the Google Play application or any browser.
- If errors occur during connection, it means there are no settings on the device. They can be ordered from the operator by performing a number of specific actions:
- Tele2 – call toll-free number 679;
- MegaFon – send an SMS to number 5049 with the text “internet”;
- MTS – send a message with the text “internet” to number 1234 or call 0876;
- Beeline – call toll-free number 0880.
- Soon you will receive a special SMS on your phone containing automatic Internet settings. Tap on it and on the page that opens, click “Install”.
- After this, you need to restart the smartphone and check the availability of mobile Internet again.
Manual setup
- Sometimes the automatic settings don't install properly, requiring you to add them manually. Go to the “Settings” section, select “Connections” and on the page that opens, click on the “Mobile networks” line.
Find and select the “Access Points” block. In this section you need to click on the “Add” button or on the “+” icon. The element you are looking for is located on the top panel.
Depending on the operator, fill in the available fields. You can find out the necessary data from the previously mentioned article on setting up the Internet or on the official website of the telecom operator.
Expand the list using the button in the uppermost corner and select “Save”. When you return to the Access Points page, be sure to check the box next to Settings.
Finally, you will also need to restart your device. As soon as you turn on the phone, the Internet should start working.
Galaxy A32 Cameras
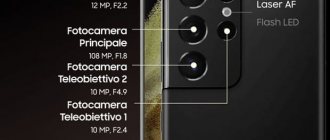
On the back of the Samsung Galaxy A32 you will find a traditional quad-camera setup. As usual, two of them are full-fledged, the other two were added rather for advertising purposes. At least the macro camera and depth sensor are 5MP rather than 2MP.
The main sensor is a 64-megapixel Samsung GW3, which uses the usual pixel binning, so images have a default resolution of 16-megapixel. The ultra-wide-angle 8-megapixel lens is somewhere between the quality of the A12 (5-megapixel) and A52 (13-megapixel) lens. Its viewing angle is 123 degrees, there is no software distortion correction. There is a 20MP front camera on the front for selfies.
The quality of shooting in daylight with the main lens is quite good. 16-megapixel photos retain enough details and there is almost no noise, which is unusual for cameras from Samsung. The colors are not as bright as usual, although they cannot be called pale. You won't find HDR in 64MP mode, nor does detail appear to be enhanced when noise becomes visible. At least with 2x digital zoom, the quality is clearly higher.
The ultra-wide-angle sensor does not have distortion correction. On the one hand, this will create unpleasant effects at the edges of the image, on the other hand, more objects will fit into the frame. Be that as it may, I would like to be able to use correction here, with the help of additional. settings.
Photos taken in low light from the Samsung Galaxy A32 cameras are not impressive. They are too soft and noisy when the dynamic range is low. A lot of detail is lost in the shadows, and the night mode doesn't solve this problem. Also, saving captured images takes too long.
But the 5MP macro camera takes some of the best close-up shots in this segment. This is all thanks to a higher resolution relative to the usual 2 MP, although the sensor does not have autofocus.
Despite the 20MP resolution, the front camera maintains 12MP results. The colors are pleasant, but skin tones are unusually warm, like for Samsung. Yes, we also have a full 20MP mode, but there is no HDR.
Budget Galaxy A series smartphones do not support 4K video shooting - for this you will have to buy at least an A52. The Galaxy A32 has a maximum recording quality of 1080p/30 fps, however, it’s nice that there is electronic stabilization.
The quality of shooting from the main camera at 1080p is practically no different from the Galaxy A12, and this is not a compliment at all. The picture looks too sharp and the detail is low, although the shades look quite natural.
Mobile Internet on Samsung phones
On any phone you can adjust settings regarding:
Note! The parameters must match the mobile operator and the phone itself.
Usually the Internet starts working immediately after a SIM card is inserted into the device. All parameters are set automatically. Therefore, practically no additional actions are required on the part of the user. He will instantly understand how to connect the Internet on a Samsung phone.
Automatic Internet setup (recommended method)
If the Internet does not start working after the initial installation of the SIM card, it is recommended to proceed to the following steps:
- Send a request to the operator asking to send the settings. A message will come from him in the form of an envelope with a gear. This is the usual icon used to indicate such messages.
- Open the sent text.
- Select the item called “Application: Internet”.
- Click on the “Install” button.
- If you need to enter a PIN code, use the numbers 1234 or 0000. If such combinations do not work, it is better to call technical support and clarify the information of interest.
- Confirm with the “Yes” button.
- Enable the "Mobile data" item.
- Reboot your device.
Note! After this, the connection should work without problems. The instructions on how to set up the Internet on a Samsung Galaxy A5 will be approximately the same.
90Hz screen
The Samsung Galaxy A32 smartphone is equipped with an excellent Super-AMOLED matrix with a resolution of 2400x1080 pixels. More importantly, the screen has a 90Hz refresh rate, unlike the 5G version.
This is one of the best displays in the Galaxy A line, as the maximum brightness in Adaptive mode reaches 814 nits. If you move the slider manually, it will rise to 400 nits, which is quite an acceptable figure. Since this is an AMOLED panel, blacks are very deep and contrast is excellent. At the same time, the minimum brightness is a comfortable 1.8 nits.
The color modes on the Galaxy A32 are the same as most other Samsung smartphones. There is a Rich and Natural profile. The first covers the widest possible color range, the second – the sRGB space. At the same time, the shade slider for the Saturated profile allows you to almost completely remove blue colors.
Since the display has a 90Hz refresh rate, you can choose between the maximum frequency and 60Hz. In the mode with a maximum frequency of 90 Hz there will be almost everywhere - except for applications that require it to be reduced, such as the camera or Google Maps.
Manual Internet setup
If the automatic method does not work, the problem can be easily fixed with your own hands. How to set up Internet on Samsung manually:
- Request the configuration data required for the Network to work on smartphones and tablets from your cellular operator. You need to call technical support representatives or study the corresponding section on the official website.
- Open the device menu.
- Select the item dedicated to settings.
- Find the "Connections" tab. If such a section is missing, go to the next step.
- Next, open the item called “Mobile networks”.
- Find the tab with the access point.
- Click on the “Adds” button. Sometimes they use a function with options if there is no other option. To do this, you can select the icon with the image of three buttons on the right.
- A new profile will open, which must be filled out according to the operator’s recommendations.
- Confirm saving the changes made.
- Select the created profile.
- Enable Mobile Data.
- Reboot your device.
Important! At the end, all options need to be checked to ensure they are working.
Photo Recommendations - Help you take amazing photos
The new feature is developed based on advanced intelligent technologies and machine learning. It is activated in the Galaxy S10 camera settings and helps you improve your photography skills over and over again.
With Photo Recommendations, you can create professional-quality photos. The system will analyze the frame and lighting conditions to figure out how to take a better photo. Follow the prompts that appear on the screen, and in just a few seconds you will get the perfect shot.
When shooting with a smartphone, it can be difficult to get great results in complex scenes, such as when you're taking a portrait of a person under multiple light sources. The intelligent Photo Recommendation system offers a variety of composition styles.
When you shoot landscapes or individual natural objects, this function will also come in handy. It will help to level the horizon, select the ideal proportions of the frame and improve the position of objects in it.
How to set up the Internet if your phone has two SIM cards
You can configure your own Internet for each SIM card. To do this, go to settings, then to the “Connections” and “Mobile networks” sections. After this, the user will be able to adjust the following settings:
- Data in roaming. Here you enable or disable data transfer in certain cases. Not all Russian operators allow the use of such services throughout the country. Therefore, sometimes it is recommended to disable the option, otherwise the costs for it will increase significantly. The same applies to international roaming, which is recommended to be turned off completely.
- VoLTE calls. The quality of voice calls improves when this option is enabled. At least when it comes to 4G networks.
- Network mode. In most cases, the LTE option is preferred. You can select the default scheme. For calls and the Internet, in many cases it is allowed to use up to three standards simultaneously. In the case of 2G, the Internet will not work; only calls and SMS are supported here.
- Access points. Usually no changes to this point are required. Settings for the Internet access point are sent and automatically installed by the operator. If by mistake the user changes something, it is enough to restore the option that was previously the default.
- Network operators. The required cellular connection is selected automatically or manually. Even in international roaming, everything is usually installed without user intervention. But you can also select the network manually if the owner of the gadget knows better what indicators are optimal for him, as well as how to turn on the Internet on a Samsung phone.
Component Performance
The MediaTek Helio G80 processor is responsible for the performance of the Samsung Galaxy A32. It is not bad, but noticeably inferior to many competitors, even in the price segment. This octa-core chipset is aided by a Mali-G52 MC2 GPU, 4/6/8GB of RAM with 64/128GB of internal storage.
Dual 2.0 GHz Cortex-A75 cores are designed to handle the heaviest tasks. But, most smartphones in this segment have newer A76 cores, which are faster.
Benchmark tests show dismal results, with the A32 scoring just 1,277 in GeekBench 5 multi-core mode. That's no match for the Snapdragon 720 or Dimensity 800 competitors.
The graphics core doesn't do its job very well here either. In the GFX Manhattan ES 3.1 test (offscreen 1080p), the Samsung device produces only 15 fps, which is two times worse than some competitors.
In general, hardware is the weak side of the Galaxy A32, however, this phone cannot be called slow; in many situations, the 90 Hz frequency helps out. The device is a bit sluggish at times, especially during unlocking, and with a more powerful processor, the A32 would be a much more attractive choice.
How to enable 3G or 4G
Activation of the service requires the fulfillment of a number of conditions:
- The smartphone itself supports modern technologies. This item is easy to check in the settings section. If there is a corresponding line, then everything is in order, if it is not there, it is recommended to update the gadget;
- location in a region where 4G and 3G coverage is available. It is better to visit the operator’s official website on the Internet. The required address is searched on the coverage map. The option is especially relevant in the case of 4G;
- Availability of a SIM card that supports 3G and 4G.
If the device has a regular Android operating system without additional shells, the instructions will be as simple as possible.
- In the smartphone menu, go to settings and select “More”.
- Go to the “Mobile networks” section.
- In the window that opens, select the connection type that is most suitable for the user at the moment. Interested in an item with 4G or 3G.
Note! Phones differ from others in that they have an additional interface.
To turn on the Internet you will need to follow a few simple steps:
- In the settings section, select “Other networks”.
- In the menu, go to the “Mobile networks” item.
- Select “Network mode”.
- Click on the option required to work specifically on 4G, after which you can connect to the Internet automatically without rebooting.
Often problems may arise when switching to other modes. But they are also easy to deal with:
- Repeated attempts to reconnect. Reboot the device and repeat the action.
- Forced closure of the Network. The appropriate settings must be re-set.
- Sometimes blocks occur due to the fact that there is no money on the phone. It will help to check the SIM card balance and, if necessary, top it up.
Battery autonomy
Inside the Samsung Galaxy A32 there is a 5000 mAh battery. This is already quite a common figure for the middle segment, and 5000 mAh is necessary here - a Full HD screen with 90 Hz requires more energy.
However, the A32 shows excellent results in autonomy tests. With 90 Hz, the smartphone has enough energy for 16 hours of web surfing or 18 hours of watching videos. In 60 Hz mode you will have an additional hour or two of work. But it’s hardly worth sacrificing the smoothness of animations and interface for this.
Included with the Galaxy A32 we get a legacy 15W adapter with Samsung's adaptive charging. Why outdated? Because this technology is already 6-7 years old, and it takes 2 hours and 20 minutes to completely restore the battery’s energy.
Access is limited for the current user profile
Connecting to the Internet on modern phones requires fine-tuning the profiles for which access is granted. There are some that are preinstalled by operators. But you can always add your own.
The instructions look like this:
- In the menu, go to the following items: “Settings” - “Network” - “Connections” - “Yes”.
- Next, select the line that prompts you to create a profile.
- Configure parameters specific to a particular Internet connection. The MMC profile and its dimensions are displayed separately.
- Go to the menu again through the following items: “Settings” - “Network” - “Application profiles” - “Internet”.
- Select a specific profile for the current connection. The main thing is to make sure that the signal is not bad, but strong.
Smart photo editor and a huge selection of styles
The “Style” function was introduced for the first time on the Galaxy S10. It is based on deep machine learning and neural network algorithms.
The function allows you to analyze photos and apply various artistic effects to them: for example, imitate a drawing with colored pencils, pastels, watercolors, or stylize the photo as a comic book. By applying “Style” to your photos, you can achieve very original effects.
Style is now part of the Gallery app on the Galaxy S10. This way, it will be easy for you to apply new effects to your photos, and you won’t have to install anything additional.
To take advantage of the new feature, select “Style” from the “More options” menu in the upper right corner of your smartphone screen. The neural network will determine which effect best matches your image and apply it.
Setting up profiles on Samsung phones
Creating multiple profiles on a device is useful if more than one person uses the features. Adding new profiles is available on Android operating systems from version 4.4 and higher. Tablets also support this functionality, but in limited quantities.
To add a new profile, you need to do the following:
- Pull down the notification panel and press the gear button.
- Scroll down the screen and find the item dedicated to users. After this step there are no significant differences between the models.
- Click on the “Add User” button to increase the number of available accounts.
- A window will appear asking you to confirm your previous decision. This completes the setup.
Note! You can set up a new profile immediately or later. In newer elements, text messages and calls are often disabled initially. To enable them, you need to go to the administrator account. Next to the new user’s name, you need to click on the gear icon, and then select “Enable calls and SMS.”
Switching between profiles, if necessary, is done through the standard control panel. Deleting information is also not difficult.
Sound quality
Like most non-flagships from Samsung, the Galaxy A32 only has a single downward-firing speaker on the bottom edge.
It's pretty quiet, almost all competitors put out higher decibels, and some even have stereo speakers. The quality is mediocre, although not terrible overall and is sufficient for watching videos.
I'm glad that Samsung didn't forget about the 3.5 mm jack in the new Galaxy A32. The sound quality of connected wired headphones is noticeably better than that of a speaker, so I advise you to use this method.
Turning on and setting up Wi-Fi
Using the shortcut menu is the easiest way to connect to the Network. Just swipe your finger across the screen from top to bottom, a menu will appear in which you should find the Wi-Fi icon and click on the icon. If another icon appears at the top of the screen, it means the function has been successfully enabled.
There is a second way. You need to go to the settings sections, go to the “Connections” section and select Wi-Fi in it. After some time, an icon will appear next to the clock on the phone confirming the correct connection.
Note! The device always automatically searches for nearby networks.
It is possible to add networks manually, but this method is more suitable for advanced users. To do this, you should understand the following parameters:
- network name;
- password;
- connection type;
- IP parameters;
- proxy if this function is used.
Note! Typically, several encryption options are used - FT PSK, WPA/WPA2, WEP. The necessary information is displayed in the security-related tabs. For the average user, any of the above modes is suitable. You should not choose only WEP, since it is considered an outdated standard. The security of transmitted data when using it is not guaranteed.
Using a third-party proxy server solves the problem with additional protection. The proxy host name is entered manually if the automatic settings do not work for one reason or another.
"Grid" to improve composition
When you take a photo from a height, even if you lift your smartphone above a dish on the table, you need to keep it perfectly level. Otherwise, the photo will not be so appetizing and impressive.
The Galaxy S10 camera settings now have a Grid feature. It will help improve your composition and make it possible to take interesting shots from any angle.
If you enable Grid in the Galaxy S10's camera settings, an alignment guide will appear in the center of the screen. It will help you achieve the ideal location of your smartphone.
To create the perfect shot, simply line up the circle in the center of the screen with the guide. Even a beginner in the world of mobile photography can cope with this task.
For people who make vlogs, the new mode is also useful. It will make it possible to stabilize video shot from a monopod or other similar device.
The “grid” makes it easy to achieve clear centering of the object. As a result, everything you need will be in the frame, and at the right angle.