Phones have long become indispensable assistants for creating beautiful photos that can be shared with friends on social networks. Taking into account the needs of users, developers are trying to introduce more features to achieve better quality photography. This is facilitated by various camera settings, shooting modes, additional effects and editors. To achieve a blurred photo background on an iPhone, you need to be able to use some tricks and know what programs you can use to achieve the result.
How Portrait Mode Works on iPhone
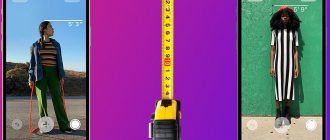
Portrait mode is a great tool for creating incredible portraits on iPhone. You can take photos using the camera app, which uses software to create a blurred background.
This mode allows you to take not just a photo, but a professional portrait, since the person’s face in the photo acquires clear features, and the background becomes beautifully blurred.
The device simulates the bokeh effect, or, in other words, fills the out-of-focus part of the photo with blur. But you won’t be able to achieve this effect entirely using the phone’s lens, despite the fact that top iPhone models have lenses with a wide aperture. They are too small, so this effect becomes noticeable when the subject is close to the camera. If you move the phone a little further, the natural bokeh will immediately disappear and absolutely everything will fall into the lens.
The effect is not always perfect. The focus may be too sharp and the edges of the subject will become distorted and blurred if the phone does not recognize them correctly.
Facetune
Facetune is an editor that helps blur the background of a photo. Facetune 2 is also suitable. It has a similar function.
How to blur the background:
- Open Facetune .
- Upload the desired photo.
- On the bottom tab, select “Blur” .
- Gently use your fingers to blur out all unnecessary space. You can use an eraser to erase anything unnecessary.
- Save the photo to the Gallery.
Which iPhones have Portrait Mode available?
The mode in question is not available on all iPhone models. Owners of gadgets 7 Plus, 8 Plus and iPhone X can use it. This is due to the fact that the mode works on phones with a dual main camera.
Thus, if you want to purchase the same iPhone 8, you must take into account that it will not have a blurred portrait mode.
Which app blurs the background better?
If you look at the photo above, the answer is obvious. Focos did it evenly and did not touch the main object in any way. The desired effect is achieved, it seems that they were filmed in portrait mode. However, when I tried to upload another photo, where in addition to the main subject there was a prominent object in the background, the result was not so impressive.
Here Focos for some reason didn't want to blur the background on the left side of the photo. Apparently he believed that the circle with flowers on the wall was also the main object and should be left alone. No matter how I tried to change the settings, the part to the left of the cat remained clear. However, I’m also not happy with the result that Blur Photo produced, everything looks rough and uneven. It turns out that none of the applications did the job, but at least Focos didn’t take up much time.
Applications perform worst when the main subject color and the background color are similar.
Blur Photo still has the same problems, everything is sloppy and uneven, and Focos blurred the dog’s head along with the background. None of these photos can be used further; the original looks much more presentable.
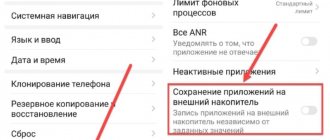
How to Enable Portrait Mode on iPhone
How to start using portrait mode:
- open the camera application on the device;
- Swipe down the screen to select portrait mode.
What you should pay attention to when using the “portrait” function:
- the mode does not work well in low light; On a note! If there is not enough light, the gadget itself will notify the user by showing a small warning on the screen.
- the subject must be between 70 cm and 2 meters from the camera; if it is too close or far away, an inscription will appear on the screen indicating that you should come closer or, conversely, move further away;
- at the correct distance, yellow text will appear on the screen - “natural light” or “depth effect”, this means that the camera has successfully identified the background and object;
- The camera automatically focuses on the face and blurs the background;
- As soon as the shot is taken, you should press the shutter button.
By following all the recommendations, you can get beautiful photos with an eye-catching blurred background.
After the photo is taken, the user can change the blur strength, add different effects, or remove the blur, if necessary.
Snapseed
A multifunctional tool for iPhone, capable of semi-automatically, with maximum time savings, both blurring the background and some details in the frame, and working with the intensity of other effects available in the “Essentials” section.
Snapseed works with both classic JPG and PNG formats, and with RAW - sources that have not undergone quality optimization and are ready to change once and for all: a new texture, additional colors, “Retro” effects and other wonders that until recently seemed like something unreal.
How to set background blur on iPhone
Procedure for setting the blur mode:
- open the camera application;
- select the desired mode - “portrait”;
- click on the “f” icon in the upper right corner;
- set the required background blur level using the “depth” slider located at the bottom of the screen.
The camera will automatically remember the selected aperture values and will use it in the future for the next shooting.
AirBrush
A camera application for iPhone, diluted with the functionality of a graphic editor that can correct any photos that come to hand. However, as the developers from Meitu Technology suggest, it is not at all necessary to click the shutter and then move on to changes: the road to success can be taken in a different way.
Immediately add effects (filters, new colors, additional artificial lighting, getting rid of noise), apply teeth whitening technology and a corrector that can add brightness to the eyes and expressiveness of emotions. And then all you have to do is click on the only button and you can enjoy likes on social networks.
Additional photo options
To further change the degree of background blur on a finished photo, you can take the following steps in the application:
- open the photo you want to edit and click on the “edit” button;
- in the bottom menu there is a “depth” slide, by moving the slider of which you can change the sharpness of the photo.
Those who work with professional cameras know that the larger the aperture value, the shallower the depth of field and the more blurred the background. The same rule applies in reverse. This is precisely the feature of professional equipment that Apple was able to reproduce using the “Depth” function.
The Depth function only works with photos taken in portrait mode, since in order to adjust the blur effect, the blur effect must already be present in the photo.
Facetune2
Selfie editor for blurring the background, familiar first-hand with “bokeh”, background blur and other “improvements” of photographs (especially those taken with the front camera).
One of the advantages over competitors is clarity and information content. The developers did not fill the interface and quick access menu with buttons, tools and items that would force you to spend two hours sorting through different options.
Quite the opposite - the necessary buttons are always at hand, and if problems with the search nevertheless begin, the developers will definitely tell you where to move next and how.
How to take photos with background blur
In portrait mode, it's quite easy to create a photo with a blurred background.
To do this, just open the camera application on your phone and select the desired mode at the bottom of the screen. The subject to be photographed must be at the correct distance from the camera. It is better if there is a lot of light in the shooting location, since this mode does not always work in low light conditions.
After focusing the frame, you need to wait until the words “natural light” or “depth” turn yellow. This is a sign that the effect is working and the camera can take a photo. The result is a clear outline of the subject and a blurred background.
Fabby
And again, a combination of a camera and a graphics editor from the little-known but quickly gaining fans studio AIMATTER.
Background blur is available right away, but some additional effects can be unlocked for money. So, for example, no one allows you to work on the background for free (change the environment in full) or put up stickers in places you like.
But Fabby's main problem is not the paid limitations - and the free version does a great job - but the technical implementation. There are more errors, crashes and strange problems with drawing effects than we would like.
Edit or remove background blur in portrait photos
Photos taken in portrait mode don't always turn out well. The camera may not have correctly detected the background and foreground area. For example, part of the foreground may be blurred, or part of the background may remain in focus.
In any case, you can always make changes after the photo has already been taken. How to do it:
- In the “photos” application, open the desired photo and click “edit”;
- in the upper left corner select the “f/number” icon;
- move the depth slider to the left or right, thereby increasing or decreasing the size of the blur;
- on older iPhone models there is no way to adjust the blur strength, but you can completely turn off the depth effect, returning the photo back to the original;
- To remove blur, you need to touch the yellow portrait icon located at the top of the editor screen.
Another interesting feature of the mode is “portrait lighting”, which allows you to apply the effect of studio lighting to your photos. To experiment with it, you should tap the Portrait Lighting icon in the top left corner of the editor screen and drag your finger across the Portrait Lighting icons.
TADAA
The iPhone application is a new product designed to change opinions about cameras available on smartphones or tablets. The TADAA tool dreams of turning an iPhone, iPad or iPod Touch into something between a professional camera and a photo studio, where effects are added, photo details are corrected, and important nuances are refined that distinguish beginners from professionals.
There are a lot of available tools - here you can find point-by-point modification of photographs, working with RAW, and even tips for those who have never encountered such things.
DSLR Camera Blur Effects
This program can also replace the standard Camera application. But, unlike Fabby, DSLR Camera Blur Effects works with both the main and front cameras. The application is designed to blur the background, as evidenced by its name. Moreover, the option is implemented using several tools:
- Circular Blur Effect – manually adjust the focus area using a virtual circle.
- Linear Blur Effect – creating focus for a linear area with adjustable size.
- Focus Effect – automatic focusing on an object by tapping on it.
In addition, DSLR Camera Blur Effects comes with a magic brush, a tool familiar to those who actively use Adobe Photoshop software. Finally, the application has a simple and intuitive interface, which is fully translated into Russian, so you will not experience any difficulties when setting up effects.
Mobile photography lessons from Mimigram
We offer several methods that will allow you to create a bokeh effect or blur the background on your smartphone:
The best applications for setting up your camera and processing pictures allow you to expand the original capabilities of your gadgets. Using programs, you can adjust various shooting parameters before taking a photo and carry out subsequent editing. And in the Mimigram mobile manager, you can create interesting photo gifts based on images from your smartphone’s library and order them online with delivery to any city in Russia.
"Mimigram": photo printing and making original souvenirs
In some cases, printed versions of mobile photographs may be required - for an exhibition, interior decoration or creating a family album. You can order printing of photo cards in different formats in the Mimigram mobile application. The program also contains a large collection of templates for original gifts for any occasion: a mug with a photo, magnets, a calendar, a bright poster, a collage on a large canvas and others. All items are easy to design and order directly from your mobile phone. High-quality professional materials are used to make products, so the best photographs have the opportunity to find a worthy tangible embodiment.
Information
Provider Connects Info Technology Co., Ltd. Size 73.4 MB
iPhone Compatibility Requires iOS 12.0 or later. iPad Requires iPadOS 12.0 or later. iPod touch Requires iOS 12.0 or later. Mac Requires macOS 11 or later and a Mac with the Apple M1 chip.
Languages Russian, English, Spanish, Korean, Portuguese, Traditional Chinese, Ukrainian, Simplified Chinese, French, Japanese
Age 4+ Copyright © Connects Price Free
In-App Purchases One Month Blur Photo Pro RUB 399.00 Remove Watermark RUB 99.00
- Developer's website
- Application support
- Privacy Policy
Focus #3 – Imitating Legendary Lenses
Those who consider options with stars and hearts to be child's play can use ready-made presets that imitate famous lenses. For example, the Helios 44 with its unique swirling design or the sharp Otus from one of the most respected manufacturers of high-quality lenses, CarlZeiss.
Each of the preset objects makes its own recognizable design.
We talked with an experienced photographer, according to him, the application really produces bokeh close to what you can get when shooting on a DSLR with a similar lens.
In other words, by purchasing the application, the consumer receives as many as 11 legendary lenses for his iPhone.
Blur Photo and Focos app interface
The first one has poorer functionality, which means it’s easier to understand. Additional features available only in the professional version of the application include portrait mode and several background blur effects. Focos has many more additional professional functions. For free, you can blur the background with the desired intensity, change the brightness and play with the direction of the blur. The rest is in the pro version. It’s nice that there are no intrusive advertising in it.
The main difference between these applications is that in Blur Photo you need to blur the background manually, while Focos does everything automatically. Working with the background yourself is a long and tedious task. Near the edges of the main object and the background you have to tinker, enlarge the photo, reduce the brush size. In the end, I’ll be honest, it turns out clumsily. The result is not satisfactory, and it takes a lot of time.
Trick #2 – Changing the appearance of bokeh
The second tab of the program is to change the shape of the “blur” effect. You can choose a variety of stylistic shapes: rhombuses, squares, ovals, drops.
Photos are given maximum individuality.
How about heart-shaped lights? Instagram followers will appreciate it.
Application privacy
The developer (Connects Ltd) has indicated that the application's privacy policies may include data processing as described below. Detailed information is available in the developer's privacy policy.
Data used to track information
The following data may be used to track user information across apps and websites owned by other companies.
- Diagnostics
Non-user data
The following data may be collected that is not linked to the user's identity.
- Diagnostics
Sensitive data may be used differently depending on your age, capabilities used, or other factors. More details