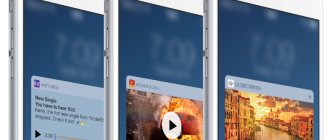
One of the biggest updates coming to iOS 14 (review) is the all-new home screen interface. Perhaps this change in the user interface for iOS can be considered the most significant since the inception of the system. Particular attention was drawn to the widgets that can be placed on the iPhone home screen in iOS 14.
♥ ON TOPIC: iPhone Demo (display iPhone): what is it, can you buy it and how is it different from a regular one?
Video:
Gone are the days when the iOS home screen was built around a grid of square app icons and their folders. iOS 14 brings a completely new look to the interface with home screen widgets. They can be customized in size and shape, thus offering excellent functionality. This isn't a new idea, as Microsoft used a similar custom grid style with its Windows Phone a long time ago, but Apple has created a well-thought-out clean look for iOS with home screen widgets, including a neat Smart Stacks option.
♥ ON TOPIC: How to set a separate ringtone and vibration for a contact on iPhone.
Method 5: Apple Watch
Apple's branded watch can also be used as an alarm clock. In this case, it is enough to either use the first method from this article, after which a sound signal will sound on the accessory at a given time, or resort to a separate setting, which will be discussed further.
- Launch the Alarm Clock app on your watch.
- Tap on the words “Add”.
- Use the Digital Crown to select the wake-up time you want, then press Set.
- To subsequently enable/disable the set wake-up tone and define the options for repeating it, tap the created entry and make the necessary changes.
- To make sure you don't oversleep, check if the snooze function is active. To do this, tap the alarm clock in the list and pay attention to the “Later” option - the switch opposite it should be active. If it's not, turn it on.
Tip: If you want to set an alarm on your Apple Watch that doesn't beep and is triggered by tapping your wrist, turn on silent mode by opening Control Center by tapping the bottom edge of the accessory's screen, holding your finger briefly, then swiping up and tapping Click the button with a bell icon. A similar action can be performed on an iPhone, in the Apple Watch application along the following path: “My Watch” - “Sounds, tactile signals” - “Silent mode”.
Using Apple Watch as a Desk Alarm Clock Apple Watch can also be used as a standalone alarm watch by placing it on your bedside table at night. For this:
- Open Settings on your watch.
- Go along the path “Basic” - “Night mode” and activate it.
- After completing these steps, if you connect your Apple Watch to a power source, its screen will display not only the charge status, current time and date, but also the time the wake-up signal is triggered (provided that it was previously set). In order to see this information on the accessory screen, touch its display and push it slightly (sometimes it is enough to push the table slightly).
- If the alarm clock was set according to the instructions from the first method, that is, in the section of the same name in the Clock application on your phone, Apple Watch will wake you up with a delicate sound signal.
- When an alarm on your watch goes off, tap the Digital Crown to snooze the wake-up call for 9 minutes, or press the side button to turn it off completely.
How to Add Home Screen Widgets on iPhone with iOS 14
1. Tap and hold your finger on an empty area of the Home screen until the app icons start to wiggle (or tap and hold any app icon → Change Home screen).
2. Click the + icon in the top left corner.
3. Now you will see the available widgets.
4. Tap one of them, select the size you want, then tap Add Widget to place it on your home screen. For each widget you can choose from several sizes.
5. You can change the location of the widget by dragging it across the desktop.
6. Click "Done" in the top right corner to install the widget.
The new widgets are available on iPad with iPadOS 14, but they're limited to the sidebar of the Today page, whereas with iPhone you can use them on your home screen, as well as on your second, third, and so on desktops with apps.
♥ BY TOPIC: .
Space for additional widgets
Apple's iOS 15 quietly adds a ton of new widgets, most of which come with a ton of options and features. There's something else that can make widgets a key part of your iPhone's screen.
One is still that editable text in the widget would be great. But secondly, sometimes you need an even larger widget than Apple gives you.
But for, say, a full-screen widget there is simply no possibility. You'll just have to sigh dramatically and accidentally slide your phone across the table when you want people to know you're covering the exercise ring.
Tags:
What are Smart Stacks?
Smart stacks are neat widgets that will automatically switch between different widgets throughout the day, showing information that is relevant to the user. At the same time, in Smart Stacks you can manually scroll through the various available options at any time.
iOS 14 brings Apple's new weather app, and widgets offer real-time precipitation and severe weather tracking for a great visual experience.
♥ ON TOPIC: How to teach your iPhone to pronounce the name of the person calling you.
Method 3: Sleep Mode (Alarm and Health apps)
In addition to the standard alarm clock, you can set up a sleep mode on your iPhone - a time interval before which a rest reminder will appear, and after the end - a wake-up signal, similar to that in the first method we discussed.
- Launch the “Clock” application, go to the “Alarm Clock” tab in it and, if you have not previously set the sleep mode, activate the switch of the same name or tap the “Change” button indicated in the image below.
- In the window with a notification that the “Sleep” function is turned off, tap “Enable”.
- Then, next to the first entry, click “Edit”.
- Set your schedule on your watch face by first setting your bedtime and then your wake-up time.
- Next, define additional parameters:
- “Sounds and tactile signals”;
“Volume” of the signal;
- “Later” (opportunity to postpone the signal).
How to create Smart Stacks yourself?
It is possible to create your own Smart Stacks; to do this, just place the necessary widgets one above the other.
♥ ON TOPIC: iPhone tracks all your movements (places visited): where to watch it and how to turn it off.
Method 6: Smart watches and fitness bracelets
If you own a smart watch or fitness bracelet from third-party manufacturers, you can set a wake-up signal on your iPhone in the proprietary application that provides operation of such accessories. The most popular among these are solutions from Xiaomi, the use of which we previously described in a separate article. In the case of gadgets from other brands, you will need to act by analogy.
Read more: How to set an alarm on Mi Band
We are glad that we were able to help you solve the problem. In addition to this article, there are 12,719 more instructions on the site. Add the Lumpics.ru website to your bookmarks (CTRL+D) and we will definitely be useful to you. Thank the author and share the article on social networks.
Describe what didn't work for you. Our specialists will try to answer as quickly as possible.
How to Delete Widgets (Smart Stacks) on iPhone and iPad
1. Press and hold your finger on an empty area of the Home screen until the application icons begin to wiggle.
2. Click on “–” in the upper left corner of the widget.
3. In the pop-up window that appears, click “Delete”.
You can also remove a widget by pressing and holding your finger on the widget itself. In this case, in the pop-up menu that appears, you must select Delete widget.
Third-party widget developers will make this big update even more useful in the coming months, as it will give users the ability to more precisely customize their home screens in iOS.
What do you think about home screen widgets on iPhone? Are you excited about this major UI update? Tell us your thoughts in the comments!
♥ ON TOPIC: Unload unused ones, or how to set up automatic removal of unnecessary applications on iPhone and iPad.
Method 1: Alarm Clock (Clock app)
The optimal and simplest solution to the problem stated in the title of the article would be to use the Clock application preinstalled on all iPhones.
- Launch the “Clock” application and go to the “Alarm Clock” tab on its bottom panel.
- Tap the “+” button located in the upper right corner.
- Specify the time at which the wake-up signal should occur.
- Define additional parameters:
- "Repeat";
"Name";
- "Melody";
- "Repeat signal."
Note: As a sound signal, you can select either one of the standard ringtones or ringtones and music purchased from iTunes, if available.
Managing widgets on iPhone with iOS 10 – iOS 13
Widgets allow you to quickly get the information you need and perform simple actions without opening the application. Widgets can be accessed from the lock screen, home screen, or Notification Center. Whether you just want to check the weather or turn off the lights in your home, widgets are versatile and easy to use.
♥ ON TOPIC: How to connect a regular USB flash drive to an iPhone or iPad.
Option 2: Yandex.Weather
Among the many Yandex services and applications, there is one that solves our problem - Ya.Weather, which we will configure next.
- Using the link provided above, install the application on your iPhone and launch it.
- Grant permission to access the location by selecting the "When used" option in the request window.
- Next, if you want to receive notifications, “Allow” their sending in the next window.
- Your location will be automatically determined and the corresponding information will appear in the main Ya.Weather window.
- As with Apple's Weather, it displays data horizontally by hour and vertically by day.
Additionally, there is the ability to “Open a precipitation map”, “Show a place on the map” and “Report” about other weather if it is very different from what you see outside the window.
- If the geolocation was determined incorrectly or you simply want to see information about another locality in the application:
- To add it, call the menu and use the search.
- Enter the city name and then select it from the search results.
- The found location will be immediately added to the main Ya.Weather window.
- If desired, you can add a city to your favorites by tapping on the star,
after which it will be placed in the corresponding list in the menu.
Sorting, editing and deleting are also available there.
- In the application settings, which are called up by clicking on the gear in the main window, you can specify the units of measurement for temperature, wind force and pressure, allow or disable notifications,
specify the location for which weather information is displayed, and also determine for which place and in which the form will display the data on the widget. - Adding a widget is carried out according to the algorithm discussed in point No. 4 of the previous part of the article.
It can be deployed and customized.
How to open widgets on iPhone and iPad
You can access your widgets from the Lock screen and Home screen on your iPhone or iPad. After activating your iPhone or iPad's display or unlocking your device, simply swipe right to view widgets.
In addition, they can be accessed through the Notification Center. You can do this as follows:
1. Swipe down on the iPhone or iPad screen.
2. Swipe right to access widgets.
♥ ON THE TOPIC: “Saving data”, or how to enable mobile traffic saving on iPhone.
Organize apps alphabetically.
You can do this manually. But this will take a lot of time. So, an easier way is to follow these steps and organize apps on iPhone automatically.
- Open your iPhone's Settings and tap General.
- Scroll down and click Reset.
- Tap Reset Home Screen Layout.
The first home screen will then have Apple apps built into it. And from the second home screen, you will have all third-party applications in alphabetical order.
How to use widgets on iPhone and iPad
Some widgets only offer quick views of information, while others, like Workflow and Hue, are more interactive and allow you to perform actions in apps without opening them.
1. Swipe right to view the widgets screen.
2. Scroll down to find the widget you want to use.
3. Click on the action you want to perform. Some widgets may take you to their app to continue the action, but most will allow you to complete the task while remaining on the widget screen.
Many widgets come in multiple sizes, and some can expand to add more options or allow you to view more information.
1. Swipe right on the Home or Lock screen to view your widgets.
2. Scroll to the widget you want to expand.
3. Click the right arrow.
4. Click the down arrow to return the widget to a smaller size.
♥ ON TOPIC: How to teach your iPhone to pronounce the name of the person calling you.
Option 1: Apple Weather
The iPhone has a standard Weather application, and it can safely be called the optimal solution to our problem. Of course, with the right setup.
If you accidentally or, conversely, deliberately deleted this application, install it using the link below.
- Launch the application and allow it to use your location. It is best to select the "When in use" option.
- Immediately after this, the location will be determined and you will see the weather corresponding to it. In the horizontal list it is presented by hour, in the vertical list - by day.
Note: If the Weather application was installed previously and now it has incorrectly determined your geolocation or has not requested the appropriate permission, read the article provided at the link below and follow the recommendations therein.
Read more: How to enable geolocation on iPhone
Important information such as sunrise and sunset times, probability of precipitation, air humidity, wind speed, pressure, etc. are indicated below.
- If the location was determined incorrectly, you want to specify it yourself or simply add another locality to the list displayed by the application, do the following:
- Tap on the list button located in the lower right corner.
Then tap the icon marked in the image below. - Use the search and find the locality for which you want to see the weather in the application interface.
Start typing its name, and then select the appropriate option from the prompts, after which it will immediately be added to the general list and available for viewing. - If necessary, add one or more places in the same way. Direct switching between them is carried out by horizontal swipes on the main screen
- If necessary, the order of their arrangement in the list, and therefore on the main screen of the application, can be changed by simple dragging (press and drag).
- In order not to launch the application every time you need to look at the weather, you can add its widget. This is done as follows:
- From the Home screen (the first screen), swipe from left to right to open the widgets page.
Scroll down the list of elements presented on it and tap “Edit”. - Now scroll down the list of applications that have widgets and find Weather among them. Tap the plus sign located to the left of the name.
- The widget will be added to the end of the list, but if necessary, it can be moved to any convenient place - to do this, just hold down the right edge and pull in the desired direction. To save your changes, click Done.
Note! Here, under the list, you can select temperature measurement units – C° or F°. By default, they are determined in accordance with those generally accepted for the region.
Now the weather for the main settlement (the first in the list added to the application) will be displayed on the screen with widgets. It can be collapsed and expanded, and when touched, it opens the main application.
How to add new widgets on iPhone or iPad
In addition to Apple's built-in options, you can add widgets from third-party developers. There are several ways to do this.
1. Swipe right on the Home or Lock screen, or open Action Center to view your widgets.
2. Scroll down to the bottom of the list of widgets.
3. Click "Edit".
4. Scroll down to find the widget you want to add.
5. Click the green “+” button next to the desired widget.
6. Click "Done".
The method described above is used in older versions of iOS, but starting with iOS 10, an additional option is available, which some developers are already actively using.
1. Find the app whose widget you want to add to your home screen.
2. Touch and hold an application icon to activate the pop-up menu.
3. Click “Add Widget” if this option is available.
♥ ON TOPIC: How to set a ringtone on any iPhone without a computer?
Organize apps by color.
There are millions of colors, but most often developers use a combination of popular ones. If you want, you can organize apps by the color of their icons, which will eventually help you know where the app is, allowing you to find/find it quickly.
For example, you may have the App Store, Mail, Weather, Twitter, Facebook together. These apps have blue app icons. Or you can use FaceTime, Messages, Phone, WhatsApp and Numbers app together. They all have green app icons.
How to move (reorder) widgets in iOS and iPadOS
Once you add a new widget to the list, you can place it however you want.
1. Swipe right on the screen.
2. Scroll down to the bottom of the list of widgets.
3. Click "Edit".
4. Touch and hold the button with three lines to the right of the widget whose location you want to change.
5. Drag the widget up or down.
♥ ON TOPIC: How to check whether you bought a new iPhone (activated or not)?
Method 2: Siri
In addition to directly using the Clock app, you can ask Siri to set a wake-up tone. For this:
- Call the voice assistant in any convenient way, for example, by saying the command “Hey Siri,” using the button on the iPhone case, or by pressing the AirPods.
- Say “Set an alarm.”
- Voice the desired time and, if necessary, change the additional parameters discussed in the fourth paragraph of the previous instructions.
Themes for iPhone.
You can go to the AppStore and find many programs with different sets of widgets for iPhone. In them you can choose different dials, blocks and even themes for your smartphone. Before installing them, read the reviews for the application. This way you can quickly choose the program that suits you. Some apps are leaving the AppStore, so try to find the best option for yourself.
This article uses several applications from the AppStore as examples so that you can understand how you can easily and easily customize themes for your device. Many developers have already created full-fledged desktop themes so that you can quickly customize your iPhone.
In applications you can find various widgets, customize their size, color, font, background and install them on your desktop. There are various watch faces, calendars, battery display, reminders and more. You can select widgets in the same theme to make your desktop in the same style. Select widgets and then transfer them to your iPhone screen. It is also possible to configure the parameters yourself. You can set the theme to change so that it changes at different times. For example, during the day the icon will be light, and in the evening it will be dark.
There are programs in which the desktop is already completely ready. There are icons, wallpapers and widgets that have already been created in one theme. Most often, such applications immediately require a paid subscription. If you haven’t found a free option, you can make a shortcut yourself for free.
Working with the built-in application
The Weather program on iPhone and iPad is a standard application built into iOS. If necessary, the user can track the weather not only in his area, but also in any corner of the world. Of course, this is useful, especially for those who travel frequently.
Weather app for iPhone
Working with the Weather application on both iPhone and iPad is quite simple. By opening the program, you can see the hourly forecast for the next day. Below is information for the week. If necessary, you can find data about other cities in the settings.
Important! Temperature information can be viewed in both Fahrenheit and Celsius, switchable manually.
The information displayed in the application comes from the official weather service The Weather Channel. If suddenly your iPhone shows an incorrect forecast, you can go to the official website and clarify the information.