The work of Microsoft employees on a large-scale update of the Windows OS led to the fact that in 2015 its tenth generation was presented to the world. The developers tried to make the system architecture more user-friendly and easier to use. The changes also affected connections to printer devices; it was assumed that now the process of adding printing equipment would be automated. However, it turned out that this setting does not always work and not with all models of devices, which means that connection often still requires user intervention and the use of alternative options. It is quite difficult to deal with such a task on your own, so this issue requires detailed consideration.
How to add a printer to Windows 10
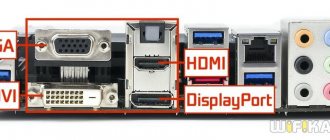
Adding a printer and installing the required set of drivers automatically occurs due to the Plug-and-Play function, which is available in many modern devices. If this technology is available, to install the printer, you just need to ensure a high-quality connection of the devices - prepare a special cable and connect its ends to the appropriate connectors.
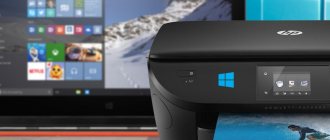
Printer operation with a laptop running Windows 10
Note! It is not recommended to connect the wire to the inputs of the front panel of the computer unit, since they may function unstable.
All you need to do next is just a few clicks:
- Click on the “Start” button.
- Go to the “Parameters” block.
- Open the “Devices” section and the “Printers and Scanners” subsection.
- Click on the line “Add a printer or scanner”.
- Wait until the system finishes searching for the connected printing device and detects it.
- Select the desired device and click on the add button.
- Complete the installation by following the onscreen instructions.
Upon completion of the process, you should make sure that it was carried out correctly and perform a test print - right-click on the name of the printer and go to the “Management” section, and then click on the “Print test page” line. If the setup was successful, the machine will print a page containing information about the hardware, software version, and other technical data.
Important! Before you start printing, you need to make sure that the machine has ink and paper.
As a rule, the procedure for connecting a printer in Windows 10 ends here, but if it was unsuccessful or the equipment could not be detected at all, you will need to perform a manual installation.
Connecting equipment via cable in Mac OS X
Apple's rules for connecting equipment differ from Windows, but are also simple. All principles are initially carried out along the same path: click on the corresponding symbol on the panel and go to the desired subsection, and in it there is the desired option. The general algorithm looks like this:
- connect the printer and MAC via cable;
- On the Dock panel, click on the picture with gears;
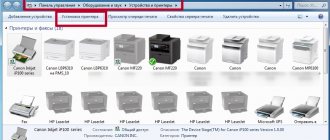
- go to the printing equipment subsection, as in the photo;
Click on the “Printers and Scanners” icon - for a new device, click on the “+” sign;
Click on the “+” icon - The Mac will proceed to download the software. Once connected, you can use the printing device for its intended purpose.
Click “Add”
How to install a printer on Windows 10 manually
How to print from your phone to a printer with Wifi
This addition option is available in all versions of the Windows 10 operating system and will not cause difficulties even for inexperienced users.
Selecting parameters for searching for equipment
To manually connect a printing device you must:
- In the peripheral devices search window, click on the line “The printer you need is not in the list.”
- Among the proposed options, select “Add a local or network printer with parameters specified manually,” since this is the one intended for connecting via a USB port. If you try to connect an old device to your laptop, you can also select “My printer is quite old. I need help finding him."
- Click on the “Next” button.
- From the list located on the left side of the window, select the manufacturer of the device, and from the list on the right, select its exact model.
- Click on “Next”.
- Specify the printer name in the appropriate field or leave the default combination. Go further. The name specified in this column will be displayed when remote users search for devices on the network.
- So that all network subscribers can detect the device and use it, in Windows 10 you can make the printer a network one - activate the sharing option and enter the name of the shared resource in the field of the same name. If this is not necessary, you need to select the appropriate option.
- If desired, you can specify a location and comments, then click “Next” again.
- On the last page, click on the test print option.
- To complete the process, click “Finish”.
Let's sum it up
From our article we can conclude that the developers from Microsoft did their best and made the operating system very friendly . Judge for yourself, from the examples discussed, it is clear that almost any user can handle installing a wireless printer, and you won’t have to bother with the setup via the USB interface at all.
In addition, the new operating system has its own virtual printer, which can be very useful in some situations. After reading this material, our reader will understand that installing and setting up a printer in Windows 10 is not a difficult task at all.
How to connect a printer to a Windows 10 laptop using a driver disk
How to print from an iPhone to a printer - description of the AirPrint function
Searching for and installing drivers through Windows Update can only be done when the laptop or computer is connected to the Internet. If the device does not have access to the Network, you need to use the installation disk that came with the printer. This method can also be useful when working with older equipment or in other cases when the system cannot find the right software.
Installing drivers for a Canon printer from a disk
How to add a printer to a Windows 10 computer from the installation disk:
- Insert the disc into the DVD drive and wait for the installation wizard to autostart. If this does not happen, start it manually.
- After opening the start window, proceed to settings.
- Accept the license agreement and give the installer permission to perform all actions.
- Select the installation type recommended by the wizard and proceed further.
- If the disk contains several driver packages for different devices, select the name of your model from the list provided.
- Select USB as the connection type to be used.
- Wait until the driver installation finishes.
- Restart the computer and check the functionality of the equipment.
Note! If you cannot find the required software through the update center, and there is no installation disk, you can download the driver package from the official website of the device manufacturer: find the section with the software, select the device model, version and bitness of the operating system, and then download and install the suggested files.
Installation Features
Let's consider the main features of installing popular brands used at home.
Canon printer
The OS independently finds the hardware and installs drivers. For newer devices, you will need to perform print head alignment. To do this, print a test page after installation.
HP printer
Perform installation with the device turned off. Connect it to your PC, but don't turn it on. Enable after installing the driver.
Samsung
Devices are automatically recognized by the OS. On older models, you may have to manually enter the path to the driver.
Epson
Before installation, remove old drivers and the printer itself. Then the OS will automatically search for the necessary drivers.
How to add a printer wirelessly
How to connect a printer via a Wi-Fi router: setup features
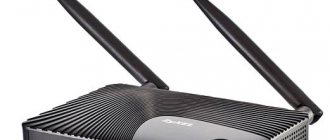
You can connect printing equipment to a laptop or PC not only via a USB cable, but also via a shared Wi-Fi network. Since this method requires WPS technology in the router, it is not suitable for all devices, since only relatively new models support this function.
Enabling Wi-Fi on printing equipment
How to connect a printer to Windows 10 via Wi-Fi:
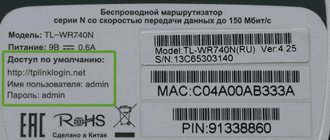
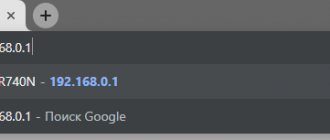
- Activate WPS in the router. On some devices there is a special button on the case for this. Depending on the equipment model, you need to press it once or hold it for several seconds (until the indicator lights up continuously). If there is no button, you will need to go to the equipment’s web interface and make changes to its configuration. To get to the virtual menu, you need to find the IP address of the router on its case, enter the combination in the address bar of the browser and enter your personal account by entering the word “admin” in the login and password fields.
- Turn on the printer.
- Press and hold the “Wi-Fi” button on its body until the indicator starts flashing or changes color.
- Go to your computer. Click on “Start” and enter the “Settings” section.
- Open the “Devices” item, the “Printers and Scanners” subsection and click on the add button.
- Click on the line “The printer you require is not in the list”, which will appear after the search is complete.
- Put o.
- Start searching for available equipment.
- Select the desired device and let the wizard install drivers for it.
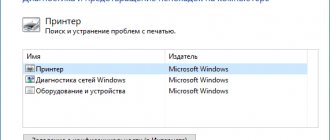
If you're having trouble connecting, you can use the built-in troubleshooting tool:
- Open the “Printers and Scanners” section.
- Find the name of the desired device and right-click on it.
- Select “Troubleshooting”.
Note! The utility will detect the problem and offer options to fix it.
How to set the default printer on Windows 10
This procedure is necessary to ensure that any document for printing is always automatically sent to one specific equipment. It can be done in two ways.
Through system parameters
Instructions for Windows 10 on how to make the default printer in the settings:
- Click on “Start”, go to the “Settings” section or simultaneously hold down the “Win + I” combination.
- Open the “Devices” block and go to “Printers and Scanners”.
- In the “Allow Windows to manage the printer” item, disable access by moving the slider to the appropriate position.
- Select the desired device and click on the “Manage” button.
- Click on “Set as default”, then close the window.
Via command line
Assigning a printer using commands is possible as follows:
- Open the Start menu.
- Enter “command line” in the search bar and select the suggested utility.
- In the window that opens, type “wmic printer get name, default” and press “Enter”.
- Enter the second command “wmic printer where name=”PrinterName” call setdefaultptinter“, where instead of “PrinterName” set the name of the required equipment. Press “Enter” again.
Showing a list of devices on the command line
Note! When the task is completed, a system message will appear on the screen indicating that the method was successfully called.
Setting up an ink jet (laser) for printing
To configure the device, you need to go to “Devices and Printers”, right-click on the desired equipment and select “Printer Properties”. To check the functionality of the machine, click on “Test Print”.
By clicking the “Print Settings” button, you can select the paper size and determine the page orientation, as well as the print quality.
Removing old printers and drivers
If your computer or laptop previously worked with other printing equipment, it is recommended to erase all the old drivers remaining from them. This can also be done in several ways.
Important! This procedure is not mandatory, but having multiple driver packages for different devices may cause software conflicts. This will manifest itself in the form of failures the next time you turn on the device or directly during printing.
Removal via Device Manager
This option helps to erase only the driver package itself:
- Click on “Start” and go to “Device Manager” or call the “Run” menu using the combination “Win + R”, and then enter the command “devmgmt.msc”.
- Click on the “Print Queue” line.
- In the branch that opens, find icons of old devices.
- Right-click on them, select “Delete” and confirm the action.
Uninstall via system settings
Step-by-step instruction:
- Click on the “Start” button and go to the control panel.
- Open the “Devices” section and the “Printers and Scanners” subsection.
- Click on the icon of unnecessary equipment and click on the delete button.
Then you need to completely clean the system of old software packages:
- Click on “Start” and enter “command line” in the search bar.
- Right-click on the proposed option and select “Run as administrator.”
- Enter the command “printui.exe /dl /n “PrinterName””, instead of “PrinterName”, specifying the name of the equipment to be removed in quotes, press “Enter”.
- Wait for the operation to complete and then close the window.
A printer is an external device that allows you to print any electronic information in a few clicks: from announcements and schedules to dissertations and family photographs. The Windows 10 operating system provides an automatic installation function for connecting and setting up printers. However, in some cases, for example, when working with rather old or rare equipment, to add it you will have to use alternative options - connecting manually or installing drivers from disk. Their implementation also will not require any specific knowledge from the user, but the setup process itself will take a little more time.
If you strictly follow the instructions, problems with installing printing equipment, as a rule, do not arise, but if the connection cannot be completed in any way, you should look for a problem in the hardware of one of the devices or a faulty cable.