This article describes in detail all the ways to set the default printer in Windows 10 and for earlier versions of OS such as 7 or 8. The algorithm is given point by point for each operating system separately. These recommendations will help even inexperienced users cope with the task quickly and without much difficulty.
Do not forget that you must first install the printer on your computer, if this has not been done correctly before.
Set the default printer in Windows 10
The Windows 10 operating system has three controls that control the use of printing equipment.
Using each of them, following a certain procedure, you can select one of the main printers. Next, we will show you how to complete this task using all available methods. Options
Windows 10 has an options menu that also changes peripherals. The default device can be assigned via Settings as follows:
- Open Start and go to Settings by clicking the gear icon.
- In the list of sections, find and select “Devices”.
- In the menu on the left, click “Printers and Scanners” and find the equipment you need. Select it and click the “Check” button.
- Set the default device by clicking the appropriate button.
Control Panel
Previous versions of Windows did not have a Settings menu, and all configuration was done primarily through Control Panel items, including Printers. This classic application is still in the top ten, and the actions covered in this article are performed using it as follows:
- Expand the Start menu, where in the input field, type “Control Panel” and click the application icon.
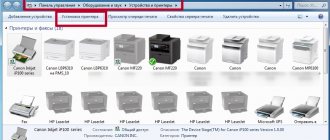
- Find the "Devices and Printers" category and go to it.
- In the list of equipment that appears, right-click the required one and activate the “Set as default” option. A green check mark should appear next to the primary device icon.
More information: Open Control Panel on Windows 10 PC
Command line
You can ignore all these applications and windows using the Command Prompt. As the name suggests, in this utility all actions are performed using commands. We want to talk about who is responsible for the default device assignment. The whole procedure is carried out literally in several stages:
- As in previous options, you need to open Start and launch the classic Command Prompt application through it.
- Type the first command, wmic printer get name, default, and press Enter. It is responsible for displaying the names of all installed printers.
- Now enter a line like this: wmic printer where name = "PrinterName" call setdefaultprinter where PrinterName is the name of the device you want to set as default.
- The appropriate method will be called and you will be notified that it completed successfully. If the content of the notification matches what you see in the screenshot below, the task has completed successfully.
Adding equipment manually
When the OS failed to detect the device, you need to know how to connect the printer to a Windows 10 laptop. To do this, select the line “The required printer is not in the list.”
In the window that appears, the last radio button is activated. For clarity, see the screenshot below. The “Next” button is pressed.
The port selection window opens. No adjustments are made here, and everything is left as default. Click “Next”.
Now you select a specific manufacturer and model of the printing device that is connected to the PC. This procedure allows you to install the correct driver so that everything works stably.
The following step by step helps you learn how to connect a printer to a computer without a disk on Windows 10 and additional utilities. The next step involves entering the equipment name. The entered data will also be displayed to other users who want to print over the network.
Important!
To successfully add, you must select shared access if you intend to use office equipment on several computers.
How to set the default printer using Options
To set your default printer yourself, open the Settings app by clicking the Start button on the taskbar
and then select Options or press the keyboard shortcut + I.
In the “Settings” window that opens, select the “Devices” category.
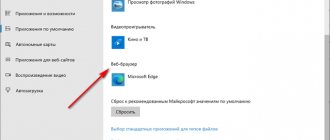
Then select the "Printers and Scanners" tab and on the right side of the window, uncheck "Let Windows manage my default printer"
Then select the printer you want to set as your default printer and click the Manage button.
In the next window, click the Set as default button
If the "Let Windows manage the default printer" option is enabled, the "Set as default" button will not appear.
The printer will now be set as the default printer.
Set default printer in settings
1. Open the Start menu, go to Settings.
2. Go to “Devices”, on the left side select “Printers and scanners”, on the right side uncheck “Allow Windows to manage the default printer”. "Click on the printer you want to set as your default and select Manage from the menu that appears."
3. Click Default.
The selected printer is set as default, close the settings window.
Allow Windows to manage the default printer
If you enable this feature, Windows will default to the last used printer on the current network. That is, even if you constantly use the printer, you send a one-time print to another printer - it is immediately set as the default, and to return to the previous one you need to select it from the list the next time you print.
1. Open the Start menu, go to Settings.
2. Go to “Devices”, on the left side select “Printers and scanners”, on the right side check the “Allow Windows to manage the default printer” checkbox.
Restarting the Print Service
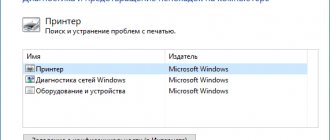
But it may also happen that everything is fine with the printer itself, but the service responsible for printing has turned off or failed for some reason.
In this case, you need to call the services section using the services.msc command entered in the Run console (Win + R), find the corresponding service there (Print Manager or Printer Spooler), stop it, disconnect the printer from the power supply approximately for 60 seconds, then start the service again and turn on the device itself.
Disabling automatic change of primary printer
Windows 10 has a system feature that automatically changes the default printer. Based on the algorithm of the tool, the device that was used last is selected. Sometimes this interferes with the normal operation of your printing equipment, so we decided to demonstrate how to disable this feature yourself:
- Through Start, go to the Settings menu.
In the window that opens, select the “Devices” category.
Pay attention to the panel on the left, in it you need to go to the “Printers and Scanners” section.
Find the feature you're interested in called "Let Windows manage the default printer" and uncheck the box.
Setting up in Windows 7, 8
- For all operating systems, the windowed “Run” method works to quickly launch the program.”
- In Windows 8, move the mouse pointer to the right edge of the monitor. The search bar will appear. Start Printing Equipment and Printers. Open the window, right-click on the printer and select the default checkbox in the same way.
- In Windows 7, the methods are the same: quickly launch printer management or through the control panel “Hardware and Sound”, “Devices and Printers” (also opened by right-clicking on “Start”).
Nuances
- If the right-click menu does not open, double-click on the printer. The print queue viewing window will open. You can check the box in the Printer menu.
- The instructions may not work if the device is disconnected from the computer during the operation.
- You can check the “default” box when installing a driver from a CD or downloaded from the developer’s official website.
- If the operating system displays many unused and unnecessary devices, you can delete them.
5 / 5 ( 2 voices)
Using the Control Panel
The next way is to work through the built-in control unit. You can configure the required functions as follows:
- click on the “Search” line in the application panel, enter the name of the folder you are looking for, select the item at the top of the list;
- at the top right, select the “Small Icons” view mode, go to the “Devices and Printers” folder;
- in the “Printers” subsection, right-click the device name to open the object’s context menu;
- Select the “Use as default” mode setting from the list provided.
If “Allow Windows printer management” is enabled, a separate window will appear on the PC monitor in which you must confirm the installation of the device. If the restriction is not removed, the confirmation panel will not appear on the screen.
Fixing driver problems
Also, problems with the appearance of a system message about the disabled status of the printer can often be observed in the event of problems with drivers (obsolescence, malfunctions, file corruption, etc.).
In this situation, you will have to completely remove the drivers from the system, at least from the same “Device Manager”. If they are displayed among installed programs, it is better to uninstall them from the programs and components section. After this, the best solution is to download the latest driver from the hardware manufacturer's website and then install it.
You can do it simpler. If the driver is truly outdated or simply not appropriate for the device type, you can use automated driver update programs like Driver Booster.
Instructions for Windows 10
You can set the necessary settings for such an operating system in several ways:
- Using the "Options" section;
- Using the classic control panel;
- Via the command line.
Removing management permission in the OS
To proceed directly to installing the main device, you must complete several mandatory steps. This can be done through the same “Options”. To open this app, you need to click the Start button on the taskbar and select the Settings app from the list. Alternatively, you can simply press the Windows key + I shortcut.
- After these steps, a window will open in which you need to select the “Devices” section;
- Open the "Printers and Scanners" tab, then uncheck "Allow Windows to manage the printer";
Ways to make the printer the main one in Win10
Via "Options"
Via "Control Panel"
To use the classic Control Panel, you need to open it in any way convenient for you. Next, you need to select the Small Icons option in the top right corner of the list, then find and click on Devices and Printers. Now you must mark your model, right-click and select the desired item from the context menu.
During installation, a window may appear confirming the above steps, which means that a command is enabled to allow the operating system to manage the device by default. This problem occurs more often when multiple printing devices are connected to the workstation.
Via command line
you can use the command line to configure. First, disable the default scan option. This can be done in the settings interface or by typing the following line as an administrator.
Next, you need to look through the list of devices to see which one is set as the default. To complete these steps, enter the command.
It should be in the Default column, to the left of its name, and will be set to TRUE. To install your equipment without highlighting it, you must run this type of command every time you print text.
Here you need to put your hardware model in quotes. And it will work by default.
Possible problems
Before making a decision to resolve the problem, you need to understand the essence of the problem.
Among all the things that can cause such malfunctions in the operation of the device, we can separately highlight the following:
- lack of physical connection to a computer or electrical network;
- activated autonomous operation mode;
- dirty or empty cartridges;
- stopped print service;
- problems with device drivers.
Status: "Printer is disabled." How to turn on the device in the simplest way?
At the first stage, it is worth applying the simplest and, as many may think, completely banal solution. When the system displays a message like “Printer status: disabled,” you can try to turn on an HP device or any other printer or MFP by first disconnecting it from the power supply, and after a couple of seconds turning it on again.
In this case, as a rule, in all modern devices a self-diagnosis will be performed (the LED will blink at this time), after which the printer will go into the ready state (the LED should be constantly on).
But in some cases this does not help, and the system again issues a warning that the status of the device is set to “Printer disabled”. How to turn on the device? You need to check the physical connection via the USB cable. It turns out that the device driver is installed in the system (it seems to “see” it), but in fact the printer is simply missing.
On the other hand, if the LED blinks constantly when turned on, the problem may be that the cartridge is out of powder or ink. Therefore, it needs to be replaced with a new one. It also happens that for some reason the cartridge has surface contamination. In this case, it will be enough to wipe it and completely restart the computer and restart the printer.
Set default printer on command line
1. Open Command Prompt: One way is to right-click the Start menu and select “Command Prompt (Admin).”
2. Type wmic printer get name, default and press Enter. Remember the name of the printer you want to set as your default.
3. Enter the command wmic printer, where name = "printer name" calls setdefaultprinter (replace the one highlighted in red with the name you learned in step two). For example, if I want to set the default printer for Canon 4400, I need to type wmic printer where name = "Canon 4400" call setdefaultprinter and press Enter.
Default installation on Windows 10
The simplest option is the printer's context menu.
First, go to the "Devices and Printers" section.
Press the Win + R key combination and insert the “Check Printers” command into the “Run” window. The method works on Windows 7, 8 and 10.
In the window that opens, find the printer you need, right-click it and set “Set as default.”
A check mark with a green background should appear on the device image.
You won't be able to uncheck this box in the same way. The only way is to assign another device as the main one.
You can also access the section through the control panel. In Windows 10, in the search box next to Start, start typing "panel..." and launch it.
Depending on the sorting, go to the desired item:
- “Hardware and Sound”, then - to the list of devices (if “Category” is set);
- directly to Devices and Printers if you're set to display large or small icons.
The second way is through the Settings menu in Windows 10. It is located in Start and is indicated by a gear icon.
In the settings window, go to Devices, Printers and Scanners. On the right, select the desired device, click on it and go to “Management”, where there will be a similar function.
The third method is the command line.
- Win + R - Run - cmd (or search).
- To view the names of all devices, copy and paste the line "wmic printer get name, default".
- The current printer that is set as the primary printer will have “True” in front of it. From here we rewrite the name of the desired device for further configuration.
- Execute the following command "wmic printer where name ="!!!!!!!!!!!!!!!!!!!!!!!!!!!! "call setdefaultprinter". Replace the red highlight with the name of the new technology and press “Enter”.
- You can check the result of your work by writing the command from the second point. If the assignment was successful, you will see the word "True" next to the desired name.
Possible problems
Sometimes it is not possible to set the default printer on some computers. At the same time, when trying, the technique itself produces an error 0x00000709, which is incomprehensible to the user.
- Converting the trial (evaluation) version of Windows Server 2022 / 2016 into the full version
Accordingly, printing is not output to this printer.
You can solve this problem in a few simple steps.
- Through the “Start” button you need to go to the “Run” tab.
- Next you need to enter the Regedit command. Windows Editor will be launched.
- In the window that opens, you will need to find the so-called Hkey current user branch, which is located in the panel on the left side.
- After that, you need to click on the tab called Software, then Microsoft and then Windows NT.
After these steps, you need to go to the CurrentVersion tab, and then find Windows there.
Now you need to turn your attention to the windows that have opened on the right. There you need to find a parameter called Device. It should contain the name of the printer that is currently selected as the default. This parameter must be deleted using the Delete key.
After this, the computer will require a standard reboot. It updates the registry settings. Next, the user needs to go to the “Devices and Printers” tab and, using one of the well-known methods, select the default computer.
This is far from the only reason why a computer may refuse to install the selected device as the main one. So, problems can also arise due to other features.
- No drivers are installed on the selected computer. In this case, the computer may simply not include the device in the list of available ones. The solution to the problem is simple: you need to install drivers. The device will be displayed in the list of available ones. All that remains is to check the “Default” checkbox.
- The printing device is not connected to the network or is not working properly. Sometimes the reason for unavailability lies not in the computer, but in the device itself. To correct the situation, you need to check that the printing equipment is connected correctly, then try to make another attempt to install the printer as the main one.
- The printer is connected correctly but is faulty. It is possible that in this case the user will be able to set it as default, but printing will still not be displayed on it. Here you should already understand the reasons for the inoperability of the printing device.
If you cannot identify and eliminate the cause of the problem yourself, it is recommended to contact a specialist in this field. Sometimes it happens that technology is simply incompatible with each other.
By following these simple steps, you can get rid of the unnecessary steps of constantly selecting a printer when you need to print some information. This will significantly reduce the time spent on printing documents, and all information will be output to the same printing device.
For more information on how to set the default printer, see the video below.
Regardless of what printing device is used, very often users are faced with the problem that when sending a document for printing, instead of the result, the system displays a message stating that the device currently has the status “Printer off.” Read on to find out how to enable it and fix this problem using several effective methods.