Today we will talk about what to do if the touchpad on a laptop does not work and we will try to sort out all the options for solving the problem. Problems can be associated with both software and hardware violations. Fortunately, most of them can be eliminated on your own.
- How to enable the touchpad manually?
- Built-in utility and system tools
- Checking the “correctness” of drivers
- Troubleshooting touchscreen devices
- What to do in case of hardware failure?
- Temporary alternative to a non-working touchpad
Early modifications of the touch panel on PCs were introduced back in the 80s, but they did not achieve the desired popularity, since all attempts to promote the new product ended in unfavorable reviews from experts, and using such an “upgrade” was very inconvenient. Only a few years later, the famous company Apple was able to radically correct the situation and set the fashion for a new trend.
Currently, the most famous TouchPad developer is Synaptics, whose products are installed on a huge variety of laptops from different manufacturers. Many owners of laptops and netbooks choose them for their mobility and beautiful appearance. Thousands of ultrabooks have been created especially for gamers, featuring powerful hardware on board that can handle virtually any modern toy.
And yet, not everyone loves that very device called a touchpad. For example, accidental touches while playing a game, filling out an office document, or while working in a graphics editor can disrupt the gaming, work, or creative process. Often, users deliberately disable the function in order to replace the sensor by connecting a regular computer mouse.
Manually enabling the touchpad
So, there are many reasons why the touchpad on a laptop does not work, but the most common of them lies in the user accidentally turning off the sensor. Absolutely all manufacturers implement an option in their products that allows you to enable or disable the touchpad. Often, this is a simultaneous press of the Fn + F1-F12 key combination (the specific button depends on different laptop models and manufacturers). Let's look at the main combinations:
- On brand laptops HP press a combination of buttons Fn+F4;
- ASUS — Fn+F9;
- Acer — Fn+F7;
- Lenovo — Fn+F6 (there are also hotkeys Fn+F5 And Fn+F8);
- Toshiba Satellite and Dell - Fn+F5 ;
- Samsung - Fn+F6 ;
- Sony Vaio - Fn + F1 ;
- On some modifications of Lenovo, Asus and Acer Aspire, Fn+F2 can be used.
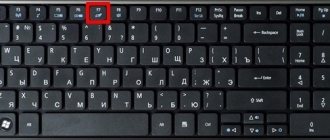
By the way, on the button you need in the F1-F12 row there will be a picture with a touch panel icon on it.
One more nuance is worth noting here. Not all manufacturers prefer the methods described above. Some devices have a separate key built in . It can be located directly on the surface of the panel with the sensor, usually in the upper left corner of the touchpad, as in the screenshot below (it happens that it is hidden under the panel in the same place).
You can also find a function key next to the touch panel or in the area of the USB, power and motherboard connectors. In any case, tap the button or hold it for a couple of seconds and check whether the option you are looking for is turned on or off.
The history and functions of the touchpad
Despite the fact that many already know what the mentioned device is, it is worth taking a little time and remembering the history of the creation and development process of this controversial component of laptops.
So, a touchpad (translated as “touch the pad”), or in other words, a touchpad, is a device that was developed in 1988 by George Gerfeide (the first working prototypes dated back to 1982) for controlling a computer without using the technology already included at that time fashion, computer mouse. At the first stages of testing and attempts to launch it to the masses, the device was met with quite skepticism.
The touch panel for controlling a PC gained deserved or undeserved popularity only in 1994 thanks to the “everyone’s favorite” company Apple.
Currently, all laptops come with just such an input/output device, which has undergone many functional changes over the past 25 years, and with certain skills it can completely replace the usual and most convenient computer mouse.
The device in question has a fairly long functional range, which is activated using various gestures, for example (a standardized set without taking into account individual combinations from the developers):
- “Clicking with one/two fingers” is analogous to clicking the left/right mouse button;
- “Three-finger tap”—click with the mouse wheel;
- “Slide down/up” - vertical scrolling with the mouse wheel, respectively, horizontal scrolling is carried out by sliding to the side;
- “Simultaneous sliding of two fingers from different sides of the panel towards each other” - enlargement of the object (page), reduction is achieved by the reverse action.
The most popular TouchPad developer is, whose products are installed on most of the most famous laptops (HP).
Based on the specifics of the operation of this device, as well as taking into account the functionality it performs, it is worth highlighting three main problems that users face, namely:
- The touchpad doesn't work;
- The touchpad does not respond to touch;
- The touchpad turns on/off on its own.
It should be understood that despite the fact that the errors are divided into three options, the recommended actions are the same for all, since the very scope of the information input/output device in question is quite limited.
Using operating system software and tools
The instructions are relevant for all modern versions of Windows 10, 8.1, 7, etc.
- Select the Start menu and go to Settings and then to Devices;
- In the window that appears on the left, go to the “Mouse/Touchpad” subsection;
- In the window on the right, click on the line “Advanced mouse options”;
- “Mouse Properties” will open, we need a section with device parameters (marked with a red icon);
- This is where the touch sensor is turned on and off;
- All that remains is to click “Enable (E)” and save the settings;
- After that, try tapping or swiping your finger to see if the cursor reacts.
Asus owners can use the proprietary Asus Smart Gesture application. Just open the software, go to the “Mouse Detection” section and find the item Disable touch-pad when mouse is plugged-in. If there is a checkmark next to it and a regular mouse is connected to the PC, then the touchscreen is turned off. Uncheck the box, click OK and see if the required component works.
You can also check the functionality of the Touchpad in the BIOS settings
Let's figure out how to properly implement our plans.
- Restart the computer; during startup you will need to press F2 or Delete several times (this can also be the F10, Esc buttons);
- When the BIOS menu is displayed in front of you, go to Advanced and press Enter;
- You need to look at the Internal Pointing Device feature;
- Make sure that Enabled is set opposite it, otherwise the touch module is deactivated and needs to be activated;
- After setting the Enabled value, press F10 to save the changes and wait for the computer to restart.
It is noteworthy that viruses can lead to incorrect configurations and a lot of inconvenience in the operation of equipment. Clean the system with an antivirus utility.
Connecting touchpad via BIOS
BIOS
The BIOS system is a set of programs that are responsible for the operating state of the laptop. If at least one setting is messed up or set incorrectly, the touchpad, and at the same time many other actions, become deactivated.
Entering the BIOS does not pose any threat to the operation of the laptop. The only thing you need to take care of is not to violate the already preset settings.
The BIOS menu is loaded before installing Windows, and changes are made extremely carefully. If the user does not have experience, he should write down the existing settings or take a photo of them to make corrections if an error occurs. The touchpad is connected via BIOS only if all previous methods did not work and the touchpad is not disabled at the request of the customer.
The operating algorithm is as follows:
- While starting the laptop, hold down the F2 or Del key. Try the combination until the desktop opens. If you are unable to immediately enter the BIOS, repeat the procedure of turning off/on the laptop.
- As soon as the BIOS is open, go to the Advanceted section. This is easy to do with the arrow buttons. The mouse may not be working when entering the BIOS, so find the “up”, “down”, “right”, “left” button pointers on the keyboard in advance.
- In the section look for a parameter called Internal Pointing Device. Look at the values. If it is Disabled, change the arrow to Enabled. This allows the user to enable the disabled touchpad.
- Then go back to the main BIOS menu. To do this, click the arrow at the top of the screen. When switching, the program will ask you to confirm the changes; press the Exit with Saving or Save & Exit buttons.
After completing the steps, the laptop is rebooted and the results of their work are evaluated. Connecting the panel via BIOS is an opportunity to get a working element if it was disabled at the request of the user.
Diagnostics of correctly installed drivers
If the above options did not help, your laptop may have a driver failure, or the necessary software is out of date or has not been updated for a long time. Appropriate driver software is required for any equipment connected to the computer, including video adapter, sound, network card, printers, gamepads, etc.
- Open “Start”, go to “Control Panel” and select “Device Manager”;
- Click on the “Mice and other pointing devices” tab and expand it;
- In the list that opens, find the name of the touchpad (for example, Synaptics SMBus TouchPad), right-click on it and select “Properties” from the context menu;
- The next step is to click the “Driver” tab and look at the lines with the development date and version;
In the same section, updating and rolling back the Touchpad Driver is available. Modern operating systems, starting from Windows 7, can automatically try to roll back or update the touchpad driver. If you are unable to cope with systemic means, move on.
- Visit the official website of the laptop manufacturer, find the equipment search line and enter the name of your laptop there, then open the “Support” item;
- Click on the “Drivers/Utilities” section, specify the OS version and click OK;
- The list that appears will contain the required driver; you will need to download the assembly file to your hard drive;
- After downloading the file, run the installer and start installing the update;
- We wait for the drivers to be reinstalled and reboot the PC.
It sometimes happens that errors with equipment arise precisely because of automatic updates; Windows replaces software without the appropriate settings. You can see the exclamation mark at the bottom right, near the tray. In such cases, you should also roll back the driver version to the previous one.
Connecting the tauchpad through the virus checking system
Avast antivirus program
In some cases, the touchpad is disabled due to malware on the laptop. Moreover, the program itself may not reveal any other violations. To launch the panel, you must identify and remove the virus. There are several ways to do this:
- They launch the antivirus program and run all the software. The system scanning section is always located on the “home” page of the interface. There are no difficulties navigating through the antivirus program; even a beginner can figure it out.
- Avast antivirus launches a tray. It's located at the bottom of the taskbar screen and is called the Notification Area. Click on the tray button, open a window and go through it to the Protection section.
- Open the general scanning unit and launch the malware search and detection software.
Each antivirus program is configured so that it does not remove viruses, but asks the user for a course of action. As soon as harmful software is detected, the program places it in the suspicious section and, after a complete scan of the laptop, awaits further action.
The user can give the command to quarantine or delete the virus. The last point means that the entire file (software) considered malicious will be destroyed.
Often, antivirus programs are not particularly well versed with the necessary programs, so it is worth previewing what exactly has been quarantined and is being removed.
FAQ
How to set up scrolling through the touchpad with one finger?
This is done in the settings, Scrolling section. There they set the slider to the parameters for scrolling the page with one or two fingers.
Problems with laptops with TouchPad and touch screen
Conflicts can occur on hybrid devices when both sensor-enabled input and output devices (mouse/screen) are built into your computer.
First method
- Hold down the Win + R combination, enter the command services.msc in the “Run” window and click Enter;
- Find the Tablet PC Input Service touchscreen in the list of services, right-click on it and disable the input service.
Second method
- Press Win + R, specify msconfig;
- Go to the services tab and uncheck the box next to a similar item to disable one function that interferes with the operation of the second.
Please note that the touch display will stop functioning and become a regular monitor. Tablet options, gestures, pinch scrolling, stylus support, etc. will be deactivated. On the other hand, the desired sensor panel is activated. If you need both hybrid properties, we recommend updating or rolling back the driver, as mentioned in the third paragraph of our article. Disabling the touchpad is the last step.
Physical malfunctions and solutions
If the TouchPad does not work well on your laptop, the panel may be dirty. Take a cloth and wipe the surface with it, then try to see if the sensitivity sensor works.
Main problems requiring repair:
- Liquid penetration;
- Physical damage from impact, sensor cracking;
- Oxidation of the loop contact due to sudden temperature changes;
- The south bridge breaks down (the microcircuit is not responsible for the operation of peripheral devices).
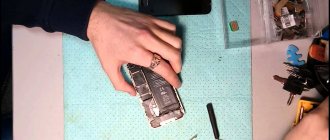
Without having the appropriate knowledge, you should not try to repair a laptop yourself. When disassembling the case, there is a high risk of aggravating the situation until the entire computer fails. It is better to contact a service center; experienced specialists will be able to quickly and effectively help resolve the problem.
Reasons why the mouse may not work
Software
Software problems include:
- Problems associated with the harmful operation of viruses,
- driver failures or damage, as well as in the event of opening damaged files or archives.
Hardware
Hardware problems are problems caused by damage to the mouse itself. These include:
The mouse, if you don't do anything to it, will turn off and won't work until you press a button. This is a great way to improve battery life and extend battery life. But sometimes there are times when you go from the computer for a long time, come back and immediately go back to the computer for work or other things and the mouse does not work even though you do it. And then, remember that you need to press the button for it to work again. Of course, this is a small number of parts and is easily redeemed by this clever energy saving.
- Wire deformation;
- Contacts are damaged or clogged with debris.
It often happens that a user, while working at a computer, drinks tea, coffee or some other drink and spills the liquid. This often results in the mouse being disabled. When purchasing a new mouse with a USB input and finding that the cursor refuses to move after connecting the device to the computer, do not rush to sound the alarm. Most likely, the installed operating system does not have the necessary drivers.
With this mouse we can easily change its sensitivity. The larger the counter, the more the computer screen cursor will move at the same distance as the mouse. Laptops have received very serious competition. They cost $189 and $199 respectively. One downside is that all the storage is in the cloud, so you will need an Internet connection to access it. True, this will be done on a virtual basis.
What's new for other manufacturers? At one time they were of a very high level and quite expensive, so in Lithuania they always paid attention. They were pretty rare so we just thought they were small. They say that mice with a special button can appear, but all this is only at the auditory level.
Emergency way out of a situation when the touch panel is not working
Remember, there are no hopeless situations! If you are unable to restore the functionality of the function and there is no way to deal with repairs, you can purchase a regular wired or wireless mouse , connect it to a laptop and use it like a desktop computer.
If the touchpad on a laptop stops working, any self-respecting manufacturer provides a backup control option . To activate the virtual switch, do the following:
- Simultaneously hold down three keys LeftAlt + LeftShift + NumLock;
- In the window that appears, confirm changing the control option by pressing Enter;
- As a result, a tool for emulating a mouse cursor from the keyboard will be launched.
The right block of the numeric keypad will help you manage useful functionality . It may not be as convenient as a touchpad, but it will definitely help out for a while. Let's look at what actions specific keys are responsible for:
- “NumLock” - start or turn off the emulator;
- “5/double click on 5” - click (select an object) or double click;
- “Buttons 1 to 9” (except 5) - move the cursor to different parts of the display;
- “0” — holds the button pressed;
- The symbol “/” — switch to LMB mode;
- The “-” sign means switching to PCM mode.