The iPhone has always been top notch (or so) when it comes to the camera department. But with the release of the iPhone 11 Series, Apple has taken the game even higher - leaving the job to competitors like the Pixel 4. The dual camera on the budget iPhone 11 and the triple-lens camera on the 11 Pro and 11 Pro Max in many ways herald a new era in photography/videography on smartphones. Since the 2022 iPhones landed on Beebom, I've been testing the camera on both the standard and pro models. And I can't help but share some of the best iPhone 11, 11 Pro, and 11 Pro Max camera tips and tricks that can make a big difference in taking amazing photos and videos.
Experimenting with the new ultra-wide-angle camera
iPhone 11 and iPhone 11 Pro received a new ultra-wide-angle camera. It can accommodate more objects or people in the frame than the main camera. Thanks to this camera, you can take great pictures of landscapes. You can get closer to your subject and still fit enough.
Tap on the 0.5x option to switch to the ultra-wide camera inside the camera app.
How to take a slofy
- Open Camera on your iPhone.
- Click perspective flip button to activate the front camera.
- mode dial to the right until you land on Slo-mo.
- Will you accept yours? Slofi.
Record video while taking photos
If you've been taking photos and think it might be a good idea to take a video, hold down the shutter button. As a result, the camera switches to video mode. You can then swipe up or right to unlock video mode.
This can come in handy when you're photographing children, animals, or sporting events. The camera app records video before you even switch to video mode.
How to make a quick video
- Open Camera on your iPhone.
- Press and hold the shutter button with the camera in photo mode. Your video recording will now begin, and if you lift your finger at this point, the video recording will stop.
- Swipe record button To castle icon on right. This will continue recording even if you remove your finger from your iPhone.
Record more than you see
You can activate a new mode that will record areas outside the frame when photographing with a standard camera. When you record with a wide-angle camera, the ultra-wide-angle camera expands the image or video to include something or someone in the frame. If you do not edit or use additional images, they will be deleted after 30 days.
How to Switch Between Close and Wide Angle Selfies
- Open Camera on your iPhone.
- Click perspective flip button to activate the front camera.
- Tap the arrow button to manually switch between close and wide-angle selfies.
- Turn yours iPhone one way to automatically switch to wide-angle selfies.
Use night mode
In low light, night mode is automatically activated. The shutter speed increases to increase image detail. You will see a small yellow moon icon next to the flash.
You can click on this icon and set the night photography parameters. Below in the photo you can see an example of shooting in normal mode and in night mode. As you can see, in night mode the photo is brighter.
Best Camera Tips for iPhone 11, 11 Pro and 11 Pro Max
Apple has improved the Camera app for a more simplified and intuitive experience. And in typical iPhone style, the tech giant has also thrown some cool tweaks into the mix to boost performance. While the arrival of Slofie looks set to start a new trend, the introduction of Night Mode has put the iPhone back in the spotlight—at least for now. In addition to these large highlights, there are several adjustments hidden under the film. With that said, let's get to know them all!
Portrait photographs of animals and non-living objects
iPhone 11 and iPhone 11 Pro support portrait photography of inanimate objects and animals. On older smartphones, you can force portraiture of animals to be enabled, but now more serious optimization is offered. This allows you to get better quality pictures. Launch portrait mode and point the camera at the desired subject. It is possible to apply various portrait effects.
How to take burst photos
- Open Camera on your iPhone.
- Press and swipe the shutter button to the left. This must be done quickly so as not to start fast video recording.
- Remove your finger from shutter button to stop taking burst photography.
Incredibly vibrant display
Apple calls this the best display in iPhone history. The Super Retina XDR display fully lives up to the “super” in its name. Judge for yourself - resolution 2688x1242, HDR support, contrast ratio 2,000,000: 1, maximum brightness 800 cd/m² and 1200 cd/m² for HDR, wide P3 color gamut, oleophobic coating resistant to fingerprints.
© Andrey Bezukladnikov / Photographer.ru
On this display you literally fall into the image, it is so natural, the colors are so pure and radiant, it seems that just a little more and the picture will come to life. Oh yes, if the picture is saved in Live mode, then this will happen, the image will come to life, just hold your finger on it.
Each (!) display is individually calibrated at the factory to ensure natural, vibrant color.
The display received the highest rating from experts at DisplayMate, a company specializing in display testing and calibration. The guys noted the absolute accuracy of color rendering, lower reflectivity and increased energy efficiency, which is discussed below.
The main difference between an OLED display and an LCD is that in the case of an LCD, the pixels are illuminated from below, while in an OLED they emit their own light. At the same time, the brightness of the OLED display can be controlled pixel by pixel, resulting in deep blacks and saving battery power, especially if you installed the dark theme that came with iOS 13.
The display completely eliminates flicker, so reading from it is a pleasure and your eyes don’t get tired at all.
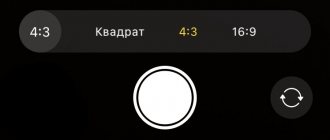
Easily change aspect ratio to 16.9
Previously, we had the option to choose from two aspect ratios, such as 4:3 (rectangle) and 1:1 (square), and each of them had their own shooting modes. Now, with the arrival of the iPhone 11, 11 Pro and 11 Pro Max, the camera app has grouped aspect ratio settings into one mode. Plus, it also adds a new 16:9 aspect ratio. You can simply swipe up on the screen to open a new row of camera settings and then select your preferred aspect ratio.
What is studio light on iPhone
Lighting settings on iPhone 8 Plus.
iPhone 8 Plus and older models have another cool feature: portrait lighting. With its help, you can apply different effects that play with light to the photos you take. I usually ignore them, because I prefer post processing, but many users really like the feature. As soon as you enter portrait mode in the Camera, the application will show the name of the lighting effect (Natural Light), highlighting it in yellow.
Apparently, Apple understands that users don’t want to worry about settings, so they offer different scenarios for using portrait lighting:
- Studio light to brighten facial features.
- Contour light for more dramatic directional lighting.
- Stage light for highlighting the subject in the spotlight.
- Stage light - b/w for stage lighting in classic black and white.
- Light tone - B/W to display an object in shades of gray on a white background.
The different portrait lighting settings on the iPhone are clear.
Try taking several shots with different effects, find personal scenarios for using the feature and use it. I am sure that everyone will discover a lot of new things, because very few users think about the built-in camera tools.
Subscribe to us on Yandex.Zen, where you will find a lot of useful and interesting information from the world of Apple.
Take the best selfies
Many may find it strange that the 12MP front camera does not always deliver 12MP for every selfie. For example, when you hold the device vertically, the image sensor will zoom in to take a 7MP selfie. You will then need to click on the expand button on the screen to zoom out to make a 12 megapixel image. It's quite simple, but it's worth paying attention to, especially if you want your selfie to look outstanding or are sending an instant blitzkrieg on social media!
When you hold your smartphone in landscape mode, the camera automatically zooms out to take 12-megapixel cool selfies so you can capture more people or backgrounds. But if you want to take a 7MP selfie, just zoom in.
Taking advantage of computational software, Night mode draws in as much light as possible to brighten photos taken in dark conditions. But unlike Samsung or Google's Night mode, which brightens it all up and also compromises detail, Apple's offering puts more of an emphasis on capturing natural footage with plenty of detail.
So, how to enable Night mode on iPhone 11 series devices? Well, it automatically kicks into action whenever the Camera app detects low light. So you can't enable it at will. Keep in mind, it doesn't work with the ultra-wide sensor.
Based on the light around you, Night mode automatically adjusts the effect needed to capture the photo. However, you have the option to manually change the night mode effect level. To do this, simply tap on the night mode icon (looks like a crescent moon) in the top left corner of the screen (when it appears in dimly lit environments) and then swipe the timer to the right or left to choose between Auto and Max . While 5 seconds is Auto (default option), 28/30 seconds is the maximum. When you take a photo in Night mode, the slider automatically turns into a timer that counts down to the end of the exposure. And you must hold your iPhone until the photo is taken.
Also, if you have a tripod, the iPhone 11 has another trick up its sleeve. You can use long exposures, up to 30 seconds, for astrophotography. This means you can take beautiful pictures of stars and celestial objects in the night sky.
Capture ultra-wide panoramas
I have always loved panoramic photography because it is one of a kind. By stitching multiple frames together, it captures wide-angle photos. This is the main reason why it is the best choice for landscape, architecture and wildlife photography. So, I'm very happy to know that even the ultra-wide camera on the iPhone 11 Series devices supports panorama. From what I can tell, this will be very useful for landscape and architecture photographers who always prefer to have an ultra-wide perspective. To use ultra-wide panoramic shots, first select Pano mode and then press the lens selection button (the one that says "0.5") and press it.
How to activate and use Deep Fusion
Thanks to Deep Fusion, Apple iPhone 11, iPhone 11 Pro and iPhone 11 Pro Max, when paired with iOS 13.2 and above, have camera technology that delivers more detailed images in mid-light conditions. Behind the marketing term Deep Fusion is the so-called computer photography. And behind this technical term in this case there are complex algorithms and programs that use several images, analyze the relevant objects and structures and combine everything into one photo. The resulting image is higher resolution and shows more detail than a photo taken without Deep Fusion.
Regular photo mode compared to night mode and Deep Fusion.
Deep Fusion is not a special mode that can be activated or deactivated. This feature is activated automatically when lighting conditions are too good for Night mode, but too bad for Smart HDR. Apart from a more detailed photo, you don't notice that Deep Fusion is active or active, and that's exactly what Apple wanted. Also missing is the compact icon and EXIF information to indicate that the photo was taken with Deep Fusion active.
These screenshots from Metapho show examples of three phototypes.
However, there are a few things to consider about Deep Fusion:
- Deep Fusion only works with tele and wide-angle lenses, not the ultra-wide camera. The latter does not have the necessary focusing pixels.
- In iOS Settings, under Camera, you'll need to turn off the Out of Frame composition options to take advantage of Deep Fusion. These two features are unfortunately mutually exclusive, so you must choose one.
- Currently, there is only one way to reliably identify a Deep Fusion photograph as such. The Metapho app integrates such a feature and also marks the Deep Fusion photo as “Deeply Fused” in the corresponding metadata view.
Capture photos outside the frame
When you take a photo with the telephoto or wide-angle camera on the iPhone 11 Pro or the wide-angle lens on the iPhone 11, there's an interesting feature you can use. Using one of the other lenses, it automatically captures what is outside the viewfinder frame. This is very useful in case you accidentally cut something you need.
You can enable this feature in the Camera section of the Settings app and use it when editing an image in the Photos app.
Any photograph limited by rectangular frames actually has a larger area. This can be used when changing the framing of a photo.
This feature may be considered niche, but it can be useful for group shots, landscape images, architectural photos, and other situations in which you may want to change the cropping of the image after shooting.
On the other hand, the user most likely does not want to leave the “Capture photos outside the frame” function permanently turned on. The fact is that this feature, while active, disables another useful feature - Deep Fusion.
♥ ON TOPIC: Comparison of photos from the iPhone 11 Pro camera and the Canon 1DX Mark II SLR camera for 500,000 rubles.
How to take a series of photos
- open camera on your iPhone.
- Press and swipe the shutter button to the left. This must be done quickly so that you don't start recording video quickly.
- Lift your finger from release button to stop taking pictures
Read: How to Hear Your Corrections with Automatic Texting for Visual Accessibility on iPhone and iPad |