If you're using Windows 10 or Windows 7 and all you can get is stuttering, static, or distorted sound coming from your speakers and headphones, you're not alone. You may not be able to listen to music, watch online videos, or play games without poor sound quality.
As annoying as this is, it can be fixed. Here are 4 fixes you can try. You may not have to try them all, just keep working until you find the one that suits you.
- Disable sound enhancement
- Change audio formats
- Reinstall the audio driver
- Update audio driver
These are screenshots from Windows 10, but all fixes apply to Windows 7 as well.
Solving the problem with sound stuttering in Windows 10
Intermittent playback, the appearance of noise, crackling is sometimes caused by the failure of some elements of the speaker, speakers or headphones. Speakers and headphones are checked by connecting them to other equipment, and if a problem is found, they are replaced and further diagnosed manually or in a service center. It’s not that easy to test a laptop’s speakers, so you’ll first have to make sure that the problem is not systemic. Today we will look at the main software methods for solving this problem.
Method 1: Changing the Audio Configuration
A common cause of stuttering is most often the incorrect operation of some functions in the Windows 10 OS. You can check and change them in just a couple of simple steps. Please note the following recommendations:
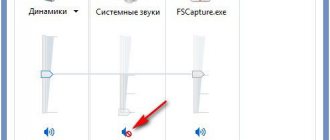
- First, you go directly to the playback settings menu itself. At the bottom of the screen you see the “Taskbar”, right-click on the sound icon and select “Playback Devices”.
In the “Playback” tab, click LMB once on the active device and click on “Properties”.
Navigate to the "Enhancements" section, where you will need to disable all audio effects. Be sure to apply the changes before exiting. Launch any music or video and check if the sound quality has changed; if not, proceed further.
In the same menu there is a function called “Allow applications to use the device in exclusive mode.” Uncheck this item and save the changes, then test the playback.
Finally, let’s touch on one more setting related to audio playback. Exit the speaker properties menu to return to the Sound window, where you go to the Communications tab.
Mark the “No action required” item with a marker and apply it. This way, you not only avoid muting sounds or lowering the volume during calls, but you can also avoid noise and stuttering during normal computer use.
This completes the method for configuring playback options. As you can see, just seven simple steps can help you solve the problem. However, they are not always effective and the problem lies precisely in them, so we recommend that you familiarize yourself with alternative methods.
Method 2: Reducing the load on your computer
If you observe a decrease in the performance of your computer as a whole, for example, video slows down, windows and programs take a long time to open, or the entire system freezes, then this may be the cause of problems with sound. In this case, you need to increase the performance of your PC - get rid of overheating, scan for viruses, remove unnecessary programs. You will find a detailed guide on this topic in our other article at the link below.
Method 3: Reinstalling the sound card driver
A sound card, like most computer components, requires a suitable driver installed on the computer to operate correctly. If it is missing or installed incorrectly, playback problems may occur. Therefore, if the previous two methods did not bring any effect, try the following steps:
- Open Start and search for Control Panel. Launch this classic app.
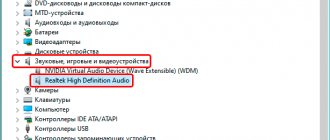
In the list of items, find "Device Manager".
Expand the "Sound, Game and Video Devices" section and uninstall the sound drivers.
If you are using an external audio card, we recommend that you go to the manufacturer's official website and download the latest software for your model from there. Or use special driver search programs, for example, DriverPack Solution.
When the sound card is on the motherboard, there are several methods for loading drivers. First you need to find out the model of the motherboard. Our other article at the link below will help you with this.
Then the necessary files are searched and downloaded. When using the official website or special software, simply find the sound drivers and install them. Read more about this process in our next article.
The problem with sound stuttering in Windows 10 is solved quite simply, it is only important to choose the right method. We hope our article helped you deal with this issue and solve the problem without any problems.
Source
Programs for improving and adjusting sound
On the one hand, Windows has enough tools for adjusting sound, at least all the basics are there. On the other hand, if you come across something non-standard, beyond the range of the most basic, then you are unlikely to find the necessary options among the standard software (and you will not always find the necessary options in the audio driver settings). This is why you have to resort to third-party software...
In this subsection of the article, I want to present several interesting programs that help “finely” adjust and configure the sound on a computer/laptop.
2.1. DFX Audio Enhancer / improving sound quality in players
Website: https://www.fxsound.com/
This is a special plugin that can significantly improve the sound in applications such as: AIMP3, Winamp, Windows Media Player, VLC, Skype, etc. The sound quality will be improved due to improved frequency characteristics.
DFX Audio Enhancer is able to eliminate 2 main shortcomings (which Windows itself and its default drivers usually cannot solve):
- surround sound and super bass modes are added;
- High frequency cutoff and stereo separation are eliminated.
After installing DFX Audio Enhancer, as a rule, the sound becomes better (cleaner, no grinding, clicking, stuttering), music begins to be played back with the highest quality (as much as your equipment allows :)).
DFX - settings window
The following modules are built into the DFX software (which improve sound quality):
- Harmonic Fidelity Restoration - a module for compensating high frequencies that are often cut off when encoding files;
- Ambience Processing - creates an “ambience” effect when playing music and films;
- Dynamic Gain Boosting - module for enhancing sound intensity;
- HyperBass Boost - a module that compensates for low frequencies (when playing songs it can add deep bass);
- Headphones Output Optimization - a module for optimizing sound in headphones.
Overall, DFX deserves a very high rating. I recommend it as a must-read for anyone who has problems setting up sound.
2.2. Hear: hundreds of sound effects and settings
Official website: https://www.prosofteng.com/hear-audio-enhancer/
The Hear program significantly improves the sound quality in various games, players, video and audio programs. In its arsenal, the program has dozens (if not hundreds :)) of settings, filters, effects that can adapt to the best sound on almost any equipment! The number of settings and options is amazing; it may take you a long time to test them all, but it's worth it!
Modules and features:
- 3D Sound is a surround effect, especially valuable when watching movies. It will seem that you yourself are the center of attention, and the sound is approaching you from the front, behind, and from the sides;
- Equalizer - complete and total control over sound frequencies;
- Speaker Correction - helps increase the frequency range and enhance the sound;
- Virtual subwoofer - if you do not have a subwoofer, the program can try to replace it;
- Atmosphere - helps create the desired “atmosphere” of sound. Do you want an echo as if you were listening to music in a large concert hall? Please! (there are quite a lot of effects);
- Fidelity control is an attempt to eliminate interference and restore the “color” of the sound to the extent that it was in the real sound before it was recorded on the media.
2.3. Sound Booster - volume amplifier
Developer website: https://www.letasoft.com/ru/
A small but extremely useful program. Its main task is to enhance sound in various applications, for example, Skype, audio player, video players, games, etc.
It has a Russian interface, you can configure hotkeys, and there is also the ability to autoload. The volume can be increased up to 500%!
Setting up Sound Booster
Remark! By the way, if your sound is too quiet (and you want to increase its volume), then I also recommend using the tips from this article:
2.4. Razer Surround - improved sound in headphones (games, music)
Developer website: https://www.razerzone.ru/product/software/surround
This program is designed to change the sound quality of headphones. Thanks to revolutionary new technology, Razer Surround allows you to change the surround sound settings of any stereo headphones! Perhaps the program is one of the best of its kind, the surround sound effect that is achieved in it cannot be achieved in other analogues...
Key Features:
- 1. Supports all popular Windows OS: XP, 7, 8, 10;
- 2. Individual configuration of the application, the ability to conduct a series of tests to fine-tune the sound;
- 3. Voice Level - adjust the volume of your interlocutor’s sound;
- 4. Voice clarity - adjusting the sound during negotiations: helps to achieve crystal clear sound;
- 5. Sound normalization - sound normalization (helps to avoid “scatter” in volume);
- 6. Bass boost - module for increasing/decreasing bass;
- 7. Support for any headsets, headphones;
- 8. There are ready-made settings profiles (for those who want to quickly configure a PC for work).
Razer Surround is the main window of the program.
Sound hisses and wheezes in Windows 10 - how to fix it
One of the common problems of users is sound distortion in Windows 10: the sound on a laptop or computer is hissing, wheezing, crackling, or very quiet.
As a rule, this can occur after reinstalling the OS or updating it, although other options are not excluded (for example, after installing some programs for working with sound). This instruction contains ways to fix Windows 10 sound problems related to its incorrect playback: extraneous noise, wheezing, squeaking and similar things.
Possible solutions to the problem, discussed step by step in the manual:
Note: before you begin, do not neglect to check the connection of the playback device - if you have a PC or laptop with a separate audio system (speakers), try disconnecting the speakers from the sound card connector and connecting them again, and if the audio cables from the speakers are also connected and disconnected, reconnect them too. If possible, check the playback from another source (for example, from a phone) - if the sound from it continues to wheeze and hiss, the problem, apparently, is in the cables or the speakers themselves.
Another cause of wheezing sound
Another reason, known to many, why the sound can wheeze is increased sound volume, especially when playing music with a significant low frequency (LF) component, in this case available in the form of a frequency of less than 100 Hz.
Basically, the source of sound with such frequencies are drums. Most regular desktop and laptop speakers are mid- and high-frequency devices and are not designed to reproduce low frequencies at high volumes.
There are three methods to overcome wheezing in this situation:
- The easiest way is to reduce the sound volume.
- Reduce the proportion of low frequencies using the system equalizer or the player's equalizer.
- If you are a fan of the sound of drums and other low-frequency musical instruments, then of course we recommend purchasing more powerful playback equipment, including a subwoofer designed for high-quality playback of low-frequency sounds.
To call the Windows 10 system equalizer, you need to work with the previously mentioned Sound system utility:
Sound → Playback tab → Speakers → → Enhancements → Equalizer → Bottom right of the “Settings” label, click
- No sound on laptop: solutions to the problem
Then reduce the volume of the low-frequency components of the sound, which are controlled by the left sliders. You can learn more about the process of calling the equalizer by watching the video at the end of this article.
Disabling audio effects and additional audio features
The first thing you should try to do when the described problems with sound appear in Windows 10 is to try disabling all “improvements” and effects for the played audio, they are the ones that can lead to distortion.
- Open the list of Windows 10 audio recording and playback devices. Different versions of Windows 10 do this slightly differently. All relevant methods are in the material: How to open recording and playback devices in Windows 10.
- Select your default playback device. And at the same time, make sure that the desired device is selected as it (for example, speakers or headphones), and not some other (for example, a software-created virtual audio device, which in itself can lead to distortion. In this case, just click right-click on the desired device and select the “Set as default” menu item - perhaps this will already solve the problem).
- Click the Properties button.
- On the “Advanced” tab, disable the “Enable additional audio tools” option (if there is such an option). Also, if you have (may not have) an “Advanced Features” tab, go there and apply the settings.
After this, you can check whether audio playback on your laptop or computer has returned to normal, or whether the sound still hisses and wheezes.
The problem is not with the drivers
If the software update does not lead to success, then the problem does not lie in crookedly written drivers, and it is worth looking for it in the sound configuration parameters, Windows 10 itself, or BIOS settings.
Problem with system settings
There are practically no articles on the Internet on the topic of sound problems in the “top ten”, and only a few forums provide solutions to the problem if its source is incorrect settings.
- We reboot the system and go into the BIOS (in Windows 10 this is done using many methods).
- Disable options C1E and EIST.
- We find the HPET parameter and set its value to “Enabled”, select the bit depth, as in the Windows 10 we are using.
Note. This option may not be available in all motherboard BIOSes, so you shouldn’t get hung up on searching for the option.
- We launch the command interpreter with the privileges of the administrator account through the program’s context menu in Start.
- Enter the command: “bcdedit /set {default} disabledynamictick yes” and execute it by pressing “Enter”.
See also: The computer does not start correctly in Windows 10
- Then insert “bcdedit /set {default} useplatformclock true” into the command line and press “Enter”.
- Reboot the computer.
Sound should work fine in Windows 10.
Additional audio tools
It happens that the sound begins to play with jerks, stutters and noise due to the activated “Additional audio tools” option. To disable it, perform the following steps.
- Call the context menu of the speaker icon in the tray.
- Click “Open mixer...”.
- Click on the icon of the device that reproduces sound in the system.
- Activate the “Advanced” tab and uncheck the box next to the “Enable additional tools...” option.
- Click “OK”.
The last thing we can recommend if artifacts occur when playing audio in Windows 7 is to check the load on the CPU. Perhaps, due to the load, the processor simply cannot cope with audio decoding. To do this, launch the “Task Manager” and look for the most gluttonous processes in the tab of the same name.
(Visited 40,498 times, 7 visits today) Published in Windows 10 Sources used:
- https://ustanovkaos.ru/reshenie-problem/nastrojka-zvuka-v-windows-10.html
- https://lumpics.ru/why-audio-is-stutters-in-windows-10/
- https://windowsprofi.ru/win10/zaikaetsya-zvuk-na-kompyutere-windows-10.html
Audio playback format
If the previous option did not help, then try the next one: in the same way as in steps 1-3 of the previous method, go to the properties of the Windows 10 playback device, and then open the “Advanced” tab.
Pay attention to the "Default Format" section. Try setting 16 bit, 44100 Hz and applying the settings: this format is supported by almost all sound cards (except maybe those that are more than 10-15 years old) and, if the problem is an unsupported playback format, then changing this option can help fix the problem with sound playback.
Audio format changes
The sound may be distorted if the wrong audio output format is used. It can be changed using Windows 10 and through Realtek Manager :
- We call the properties of the device, which is used by default in the system.
- In the "Additionally» select studio sound quality, for example, 24 bits with a sampling frequency of 48 kHz.
- Save the settings using the and buttons.
Or we do the same thing through the Task Manager . In the “ Standard Format ” tab, select also studio quality or click on the button.
Disabling exclusive mode for a sound card in Windows 10
Sometimes in Windows 10, even with “native” drivers for the sound card, sound may not play correctly when exclusive mode is enabled (it is turned on and off there, on the “Advanced” tab in the properties of the playback device).
Try disabling the exclusive mode options for the playback device, apply the settings and check again to see if the sound quality is restored, or if it still plays with extraneous noise or other defects.
Windows 10 communication settings that may be causing audio problems
In Windows 10, by default, options are enabled that mute sounds played on a computer or laptop when talking on the phone, in instant messengers, etc.
Sometimes these settings don't work correctly, which can result in the volume always being low or you hearing poor sound when playing audio.
Try disabling call volume reduction by setting it to "No action required" and apply the settings. This can be done on the “Communication” tab in the sound settings window (which can be accessed by right-clicking on the speaker icon in the notification area or through “Control Panel” - “Sound”).
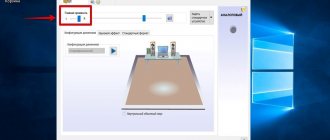
Playback Device Settings
If you select your default device in the list of playback devices and click the “setup” button in the lower left, a wizard will open for setting up playback settings, the parameters of which may differ depending on the sound card of your computer.
Try to make the settings based on what equipment (speakers) you have, if possible choosing two-channel sound and no additional processing tools. You can try the setting several times with different parameters - sometimes this helps to bring the reproduced sound to the state it was before the problem occurred.
Installing Windows 10 sound card drivers
Very often, incorrect sound, wheezing and hissing, and many other audio problems are caused by incorrect sound card drivers for Windows 10.
At the same time, in my experience, most users in such situations are sure that everything is in order with the drivers, because:
- Device Manager writes that the driver does not need to be updated (which only means that Windows 10 cannot offer another driver, and not that everything is fine).
- The latest driver was successfully installed using a driver pack or some driver update program (the same as in the previous case).
In both cases, the user is often wrong, and a simple manual installation of the official driver from the laptop manufacturer’s website (even if there are drivers only for Windows 7 and or the motherboard (if you have a PC) allows you to fix everything.
More details on all aspects of installing the required sound card driver in Windows 10 in a separate article: The sound disappeared in Windows 10 (it is also suitable for the situation considered here, when it is not lost, but is not played back as needed).
Additional Information
In conclusion, here are a few additional, not common, but possible scenarios for problems with sound reproduction, most often expressed in the fact that it wheezes or is played intermittently:
- If Windows 10 not only plays sound incorrectly, but also slows down, the mouse pointer freezes, and other similar things happen - it could be due to viruses, malfunctioning programs (for example, two antiviruses can cause this), incorrect device drivers (not just sound) , faulty equipment. Perhaps the instructions “Windows 10 is slowing down - what to do?” will be useful here.
- If the sound is interrupted when working in a virtual machine, Android emulator (or other), as a rule, nothing can be done about it - it’s just a feature of working in virtual environments on specific hardware and using specific virtual machines.
I conclude with this. If you have additional solutions or situations not covered above, your comments below may be helpful.
Source
Why does the sound stutter and freeze on a computer in Windows 10?
A very common problem with sound, after its absence, is distortion: hissing, whistling, crackling, etc. It arises, naturally, as a result of updating the operating system or drivers for the sound card. Less commonly, the culprit is a virtual audio device. Today we’ll look at what to do if the sound on your computer stutters in Windows 10.
Checking the health of the audio playback device is the first step towards finding the cause of the problem. If the sound reproduction is unusual, speakers, headphones or an audio system should be disconnected from the computer/laptop and then reconnected.
It is also strongly recommended to check the functionality of the device on another computer or phone. If crackling and other distortions occur in this case, the problem lies in the hardware. Otherwise, the proposed article will become a reliable assistant in correcting the situation.
Checking the power mode in the OS settings
Laptops based on the Windows operating system offer owners a choice of power modes. It can be economical, balanced or productive. When choosing the first type, the sound often lags in games and is interrupted during music and video playback.
On a note. Economy mode allows the laptop to work longer without connecting to a power outlet, but at the same time, it significantly reduces the performance and stability of other operations.
To fix the problem with the speakers, it is recommended to switch to a different power type:
- Hover your mouse over the battery icon located in the system tray.
- Right-click.
- Select "Power Options".
- Check a different power mode (balanced or performance), and then save the settings.
After changing the settings, the problem should go away. If this does not happen, or sound glitches appear not on the laptop, but on the personal computer, you should turn to other troubleshooting methods.
Turn off sound effects
1. Open the context menu of the “Speakers” icon located in the tray (through which we adjust the volume).
2. Select “Playback devices”.
3. Select speakers or an audio system, during playback on which the sound is interrupted or otherwise distorted.
4. Open the properties window by clicking on the button of the same name at the bottom of the window.
5. Go to the “Advanced” tab.
6. Uncheck the box next to the “Enable additional audio” option.
7. Go to “Advanced Features” and check the “Disable all effects” option.
The same is done through the “Realtek HD Manager” if you are using a Realtek sound card and this utility is installed.
2. Click on the “Sound Manager” item.
3. In the “Sound Effect” tab, be sure to remove the checkboxes next to the “Loudness” and “Voice Suppression” options.
This will help if the sound on Windows 10 wheezes and hisses, or the quality of human voice reproduction has decreased significantly.
4. In the last tab “Standard format”, select “DVD format”, corresponding to studio quality: 24-bit audio with a sampling frequency of 48,000 Hz.
If there is no Realtek Manager or a different sound card is used, the audio format can be changed in the properties of the device used as a device for audio playback. In the “Advanced” tab, select studio recording with the parameters 24 bit and 48 kHz.
If the sound continues to be interrupted, hissing and distorted, try selecting other parameters.
Audio effects
Software filters can cause noticeable audio distortion, which can make the user feel like the sound on a Windows 10 computer is wheezing. You can get rid of this distortion in the output signal by deactivating audio filters:
- Open “ Playback devices ” through the context menu Speakers in the tray.
- We indicate the problematic equipment and call it.
- Activate the “ Advanced ” tab.
- Uncheck the box next to “Enable additional audio».
- On the “Additional Features” tab, uncheck the “Loudness compensation" You can turn off all effects.
In a similar way, setting up sound in Windows 10 is done through the Realtek HD Manager when using an audio card from Realtek and having the “ Sound Manager ” utility:
- How to turn on sound on a computer? Lost sound on computer: how to restore
- We call the application, for example, through the context menu Speakers.
- Go to the “ Sound Effect ” tab.
- Uncheck the boxes next to the voice suppression options and “Loudness compensation».
Other settings that may affect audio playback
There is a function in Windows 10 that mutes all sounds when making audio and video calls through a browser or instant messengers. If the function is active, the volume will be reduced during conversations, and as a result, poor-quality sound may be heard.
In the speaker properties, go to the “Communication” tab and move the trigger to the “No action required” position.
Reinstalling sound card drivers
If none of the above methods help resolve the cause of the problem, there are still several methods to do so. One of them is reinstalling the drivers for the sound card.
If you don’t know it, get this information in the “Sound, gaming, video devices” branch.
1. Go to the driver developer’s resource and download its latest version (for Realtek, follow the link https://www.realtek.com/zh-tw/downloads).
2. Launch the installer and follow all instructions.
3. Once the installation is complete, reboot the computer.
Driver and hardware developers recommend using the above software update method. Microsoft insists on its own.
1. Call Device Manager via Win→X.
2. We expand the branch with sound and other gaming devices.
3. Using the device’s context menu, call the command to update its driver.
4. Specify the automatic type of search for the latest software versions on the Internet.
5. Upon completion of downloading, copying files and registering them, be sure to restart the computer
The second method, despite Microsoft's strong recommendation, is not recommended. Windows 10 loads drivers from the software giant's resources, and often such software is, if not outdated, then less suitable for the device than created by its developer. And using such software can bring a lot of problems.
Updating drivers
If sound plays on your PC, but its quality is far from what it was before installing Windows 10, it means that the sound device drivers are installed. The problem may lie in the fact that one of the first versions of the software is used, which, as a rule, are crude and do not have many flaws. Therefore, the first thing you need to do if the sound starts to act up is updating the audio card driver.
This is done automatically or manually.
Manual update
- Launch "Device Manager".
- We are expanding the category of audio, gaming and video devices.
- We select our sound device and call up its context menu, where in the drop-down list we select “Update drivers...”.
- Select the drivers located on this PC.
- Select an application from the list of already installed ones if the problem appeared as a result of updating the sound driver.
- In the case of devices from Realtek, select the option shown in the screenshot and click “Next”.
- Reboot the computer.
If the problem is not solved, go to the sound device support site and download the latest version of the software in the form of an installer corresponding to the Windows 10 bit installed on your computer.
See also: Getting my computer back to the Windows 10 desktop
Next, run the downloaded file and follow the installer’s recommendations.
After restarting the PC, check if the sound stutters.
Automatic installation of new drivers
There is an easier way to fix the problem with audio playback on your computer after installing “ten”. To do this, you need to download an application, the purpose of which is to search, download and install the latest software versions for Windows hardware components. One of them is Driver Booster. Despite the paid distribution, the trial version will be enough to solve the problem.
- We launch the utility and wait for the program to complete the scan.
- If there are new versions of software for the sound card, check this box and click “Next”.
- We wait a couple of minutes until all the necessary files downloaded from the Iobit server are unpacked, copied to the required system directories and registered.
- Be sure to restart Windows 10.
additional information
Let's look at a couple of important aspects regarding sound problems in Windows 10.
- An installed program for capturing streaming audio or applying effects to sound can cause problems. If they appear after installing such applications, remove them from startup, or better yet, remove them altogether.
- Along with incorrect sound playback and slowdown, is Windows 10 itself buggy? Check the system for viruses, and through the Task Manager, make sure that no process is loading the CPU at 70 percent or more, and that the processor has free resources for normal audio decoding and OS operation.
- If the audio is distorted on a virtual machine or emulator, it is unlikely that the problem will be corrected. Like all software, emulators and virtualization tools are imperfect.
Source