Updating Android to the sixth version did not bring major changes, but still new interesting features were added to the OS: Doze, Android Pay, advanced permissions for applications; although, of course, there was a “fly in the ointment” - unpleasant changes on the lock screen. However, Google, unlike other companies, cares not only about ordinary users, but also about developers - the System UI Tuner was introduced especially for them.
The best Telegram channel about technology (possibly)
The best Telegram channel about technology (possibly)
For “unenlightened” users, I’ll note that SystemUI is a system application located in system/app and is responsible for some interface elements, in particular the status bar, notification panel and quick settings panel - roughly speaking, the “curtain”. Android users have long been interested in this interface idea: they installed custom firmware, various modifications like the Xposed Framework, and ultimately “stitched” *.apk from parallel interface shells. Now the search giant has met halfway and added a piece of functionality to its system, with some unique features, which we will tell you about today.
How to open?
First you need to understand how to activate the hidden function. There are two simple ways.
- Swipe down from top to bottom to bring up the quick settings panel and hold down the gear icon until the message “System Tuner UI function has been added to the settings menu” appears.
- Go to “Settings” - “About phone”. Find the “Build Version” item and click on it several times in a row. This activates both the System Tuner UI and the developer mode.
Now the new section is available at the very bottom of the settings. It allows you to perform interesting operations and personalize your device, but once activated, it says that "this experimental feature may change, stop working, or disappear in the future."
The new menu is represented by four items, each of which will be discussed in detail.
How to enable System UI Tuner on Android
How to enable System UI Tuner on Android . One of the key advantages of the Android operating system has always been the possibility of deep customization. It was often implemented through a large number of developers and smartphone manufacturers’ own shells. However, the Good Corporation itself did not always keep up with software development trends. Starting with Android 6.0, the corporation decided to introduce into its branded devices the ability to change the order of icons, add and remove them in the quick settings panel. This function called System UI Tuner has been introduced. In this article, we'll look at how to enable and use it using a Google Nexus 5 running Android 6.0.1 Marshm as an example.
What is System UI Tuner?
System UI Tuner is an additional menu section located in the device settings, with which you can change the contents of the quick settings panel. The function itself is not new; it could already be seen from various manufacturers several years ago. This feature is still popular among smartphone manufacturers. It has long been no surprise to come across a phone in which, without unnecessary actions, you can drag the icons of the status bar and quick access panel, or delete them. However, it was with the release of Android 6 that the developers introduced this function to the delight of users.
How to enable System UI Tuner
In order to enable System UI Tuner, you must follow the following instructions.
- Lower the notification shade by pulling it down twice (or once with two fingers)
- Settings button for 5 seconds (gear in the upper right corner of the screen)
- Confirm your desire to enable this function if you enable it for the first time (all subsequent times a notification will be displayed that System UI Tuner is enabled, without confirmation)
- A wrench should appear near the gear
Ready! It remains to figure out what functionality can be used after enabling this function.
Quick Access Toolbar Customization and Demonstration
In order to get to the quick access panel settings menu, you need to go to the smartphone settings and scroll to the very bottom of the list. Under “ About phone ” you will see “ System UI Tuner ”. By clicking on a line, you will see 4 settings that allow you to change the contents of the control panel. Let's look at them in order.
Quick settings contain an image of an already expanded quick settings menu with icons, each of which can be deleted, replaced with another, and swapped with another. If you didn't change the panel the way you wanted, don't worry. You can return the original order of the icons; to do this, click on the 3 dots in the upper right corner of the screen and select “ Reset ” from the drop-down menu.
Status bar . This menu includes a list of icons that appear in the status bar. Opposite each icon name there is a toggle switch with which you can enable or disable the display of the settings icon.
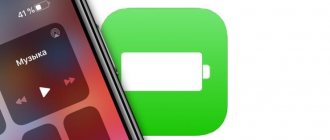
Show battery level is a very important setting for those who are used to seeing the remaining battery charge in the status bar in a minimized form. If in the settings of some mobile phone manufacturers it is possible to configure the display of the remaining battery charge (using a percentage, graphically, in a diagram), then in Nexus devices the average user was deprived of this opportunity. By clicking on the button, you will activate the display of the remaining charge as a percentage right inside the battery icon in the status bar. Now you don’t need to lower the curtain to find out how long the battery charge will last.
Sharing is an indispensable feature for screen sharers. Whether it's capturing video from the screen, sharing screen content in front of a large audience, or just taking a screenshot, nothing will distract you from what's happening on the screen. When the toggle switches “ Enable demo mode ” and “ Go to demo mode ” are activated, a minimum of icons will remain in the status bar, displaying indicators such as full battery charge, maximum Wi-Fi signal reception and cellular networks. As for applications, they will not distract you with their notifications.
How to disable System UI Tuner
In order to disable System UI Tuner, you must use one of two methods:
- Lower the notification shade and press the “ Settings ” button in the upper right corner for 5 seconds - the notification “ System UI Tuner ” is disabled
- Directly in the System UI Tuner menu, click on the three dots in the upper right corner and click “ Remove from settings ”
Thus, System UI Tuner is an indispensable feature for those who like to keep full control of their devices, getting the most comfortable user experience.
Answers on questions
I did everything according to the instructions, but System UI Tuner does not turn on. What to do?
In this case, enter developer mode. When this mode is activated, the System UI Tuner menu will be located inside the developer settings. How to enable developer mode - read our article.
Source: androidmir.org
Quick Settings
A very useful “feature” that allows you to manually adjust the location of the elements of the quick menu, called up by swiping from the top bar. A similar feature has long been available in MIUI and other proprietary firmware, but it was not available on “pure” Android. All you need to do is move the icons at your discretion, remove unnecessary ones and add necessary ones.
Installation with root
If you have root rights on Android, then after installing the application from the Play Store, enable System UI Tuner. The Welcome screen appears, select Continue. You will then be asked if your device is rooted.
If the phone is rooted, then select “I am rooted”. The application will ask for root rights, so a KingRoot or SuperSU program window will appear on the screen asking if you want to allow System UI Tuner root rights. Select the Allow option and that's it. The application will receive rights and complete installation automatically.
Quick Access Toolbar Customization and Demonstration
In order to get to the quick access panel settings menu, you need to go to the smartphone settings and scroll to the very bottom of the list. Under “About phone” you will see “System UI Tuner”. By clicking on a line, you will see 4 settings that allow you to change the contents of the control panel. Let's look at them in order.
Quick Settings contain an image of an already expanded quick settings menu with icons, each of which can be deleted, replaced with another, and swapped with another. If you changed the panel not the way you wanted, don't worry. You can return the icons to their original order; to do this, click on the 3 dots in the upper right corner of the screen and select “Reset” from the drop-down menu.Status bar. This menu includes a list of icons that appear in the status bar. Opposite each icon name there is a toggle switch with which you can enable or disable the display of the settings icon.
Show battery level is a very important setting for those who are used to seeing the remaining battery charge in the status bar in a minimized form. If in the settings of some mobile phone manufacturers it is possible to configure the display of the remaining battery charge (using a percentage, graphically, in a diagram), then in Nexus devices the average user was deprived of this opportunity. By clicking on the button, you will activate the display of the remaining charge as a percentage right inside the battery icon in the status bar. Now you don’t need to lower the curtain to find out how long the battery charge will last.
Sharing is an indispensable feature for screen sharers. Whether it's capturing video from the screen, sharing screen content in front of a large audience, or just taking a screenshot, nothing will distract you from what's happening on the screen. When the toggle switches “Enable demo mode” and “Go to demo mode” are activated, a minimum of icons will remain in the status bar, displaying indicators such as full battery charge, maximum Wi-Fi signal reception and cellular networks. As for applications, they will not distract you with their notifications.
How does the error manifest itself?
This system bug is mostly noticed by owners of Samsung gadgets. A pop-up message appears on the device screen with the following content: “The com.android.systemui process has been suspended.” When might it occur?
You pressed the “Home” button, turned on the camera, launched the game, application, and went to the Play Market.
What is this Android system UI? The phrase com.android.systemui denotes a service that is responsible for the correct settings of the user graphical interface in Android. It is one of the main ones, which is why it is highly undesirable to disable it.
Purpose of the function
System UI Tuner affects different settings for the status bar and notification shade. To make it more clear, let's first understand all the terminology:
The status bar is that line at the top of your display that shows your network, battery percentage, time, etc. And if you make a gesture down this line, a full-fledged window will open, or, as it is correctly called, the notification curtain.
The notification curtain is an already open status bar. Here you will find quick switches, time and date, as well as other necessary information and functions.
You can configure a lot of different things.
For the status bar (line at the top) this is what it is:
- Hide the position of the gadget. That is, remove the icon indicating whether auto-rotate is enabled or not.
- Hide information about the connected headset, that is, the headphone icon when they are connected.
- Hide the display of the enabled broadcast and work profile.
- Hide the display of access point distribution, or Wi-Fi.
- Hide display of enabled Bluetooth.
- Hide the display of Do Not Disturb or Vibrate mode being turned on.
- Hide the outdoor mode icon.
- Hide the Wi-Fi turned on icon.
- Hide mobile phone bar.
- Hide display of enabled Flight mode.
- Enable or disable display of battery percentage in numbers.
- Hide alarm display.
For the notification shade, you can do the following:
- Enable support for multiple notification priorities. Now you can set the priority of each notification yourself. There will be 5 priorities, and each of them can be manually set for each program that issues notifications.
- Enable the Do Not Disturb, Vibrate, and Outdoor buttons in the volume menu.
- Add a volume button to the volume menu.
These are pretty handy features. For the most part, the settings for the status bar are for the sake of decoration, that is, removing unnecessary icons, but for the notification curtain there is a truly useful feature in the form of manually setting the priority. And yes, all this is for advanced users, but there is one feature that will be useful to everyone without exception. We are talking about including the battery percentage in the status bar, since initially, without System UI Tuner, only a pentagram with the charge is displayed, and there are no numbers with the exact percentage.