Mobile phone users are constantly increasing the volume of their photos, videos and other data in the device's memory. Especially for this, developers create cloud storage so that a person can upload all the information there, free up space on his device and not be afraid that all photos will be lost if the gadget breaks down. iCloud was first created especially for users of Apple products, and then with the version of iOS 8 and “iCloud Photo Library”. Not every person knows how to work with it. This material will explain what a media library is on an iPhone, what it means to unload objects on an iPhone, and how to turn off the iCloud media library on an iPhone.
Minuses:
- You'll have to pay . The free gigabytes are definitely not enough for full interaction with the service. You need a subscription for at least 59 rubles per month, which provides an additional 50 GB of free space. Not a great loss, of course, but Apple’s machinations are immediately visible;
- It's not always convenient . Storing “exclusive” photos on your iPhone is normal. But immediately distributing all the secrets to all devices is a dangerous business. Sometimes such a synchronization scheme can lead to unexpected consequences.
Update and recovery
If you've tried all the methods and iTunes still can't read your iPhone content, try updating your device's firmware. You can update over-the-air or through iTunes. In this case, it is better to use iTunes, since it does not sync content.
- Connect your iPhone to your computer. Launch iTunes and select your device. It will be named after its model - 4S, 5, 6 Plus, etc.
- Go to the Review tab. Click Update.
- Click "Download and Update". iTunes will download the update files and flash the device firmware.
The only limitation for updating is jailbreaking the iPhone. If you try to update a jailbroken device in this way, it will lead to an “eternal apple” - the operating system will no longer start.
downloading/updating program files
Instead of updating, you can restore your iPhone to factory settings. This procedure is performed only through iTunes.
Before restoring your device, create a backup copy. Back up your device. If you can't sync all your content on your computer, not just music, then save a backup to iCloud.
data recovery
After creating a backup, connect any iPhone model to your computer, launch iTunes and on the “Browse” tab, click “Restore.”
As a result of the reset, you will get a clean device, as if you just bought it from the store. Restore music and other music from the backup to it and try syncing with iTunes again.
Published by ProfiAppler
Back up photos & videos
sh: 1: --format=html: not found
Search
Clear search
Close search
Google apps
Main menu
Save photos from your device, camera, or storage card to your Google Photos library.
About back up and sync
Back up and sync is a storage service that automatically saves your photos and videos to your Google Account. These photos and videos will be accessible from any device where you are logged into your account.
Benefits
- Never lose a memory: Any photos you take from a device with backup enabled will be saved to your Google Account.
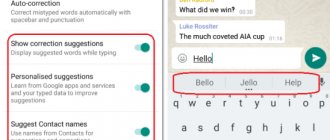
- Automatic sync: Any edits you make or photos you take will be accessible across any device that you sign in to. If you edit and save a photo on your phone, the photo will look the same on Google Photos.
- Fast and powerful search: You can search your photos by the people (when enable face grouping), places, and things in them. No tagging is required.
- Automatic creations: Bring photos to life with automatically created movies, collages, animations, and panoramas.
Before you get started
What do you need to back up photos & videos
- Good internet connection.
- File sizes that can be backed up . Your files won't be backed up if they are: Photos larger than 200 MB or 150 MP
- Videos larger than 10 GB.
- Items smaller than 256 x 256.
- Photos: .jpg, .png, .webp, .gif, and some RAW files.
Note : If you try to back up a file type not listed here, it may not work with Google Photos.
Learn more about the types of RAW files you can back up.Types of RAW files you can back up Canon EOS-1D X Mark III, EOS-1D X Mark II, EOS-1D X, EOS-1Ds Mark III, EOS-1Ds Mark II, EOS-1D Mark IV, EOS-1D Mark III, EOS-1D Mark II, EOS-1D C, EOS-1D Mark II N, EOS 5D Mark IV, EOS 5D Mark III, EOS 5D Mark II, EOS 5D , EOS 5Ds, EOS 5Ds R, EOS R5, EOS 6D Mark II, EOS 6D, EOS R6, EOS R, EOS Ra, EOS RP, EOS 7D Mark II, EOS 7D, EOS 90D, EOS 80D, EOS 70D, EOS 60D , EOS 60Da, EOS 50D, EOS 40D, EOS 30D, EOS 20D, EOS 20Da, EOS 9000D (EOS 77D), EOS 8000D (EOS REBEL T6S/EOS 760D), EOS Kiss X10i (EOS REBEL T8i/EOS 850D), EOS Kiss X9i (EOS REBEL T7i/EOS 800D), EOS Kiss X8i (EOS REBEL T6i/EOS 750D), EOS Kiss X7i (EOS REBEL T5i/EOS 700D), EOS Kiss X6i (EOS REBEL T4i/EOS 650D), EOS Kiss X10 (EOS REBEL SL3/EOS 250D/EOS 200D II), EOS Kiss X9 (EOS REBEL SL2/EOS 200D), EOS Kiss X7 (EOS REBEL SL1/EOS 100D), EOS Kiss X5 (EOS REBEL T3i/EOS 600D), EOS Kiss X4 (EOS REBEL T2i/EOS 550D), EOS Kiss X3 (EOS REBEL T1i/EOS 500D), EOS Kiss X2 (EOS DIGITAL REBEL XSi/EOS 450D), EOS Kiss X90 (EOS REBEL T7/EOS 2000D/EOS 1500D) , EOS Kiss X80 (EOS REBEL T6/EOS 1300D), EOS Kiss X70 (EOS REBEL T5/EOS 1200D), EOS Kiss X50 (EOS REBEL T3/EOS 1100D), EOS Kiss F (EOS DIGTAL REBEL XS/EOS 1000D), EOS Kiss Digital X (EOS DIGITAL REBEL XTi/EOS 400D DIGITAL), EOS Kiss Digital N (EOS DIGITAL REBEL XT/EOS 350D DIGITAL), EOS Kiss M (EOS M50), EOS M6 Mark II, EOS M6, EOS M5, EOS M3, EOS M2, EOS M, EOS M10, EOS M200, EOS M100, PowerShot G9 X Mark II, PowerShot G9 X, PowerShot G7 X Mark III, PowerShot G7 X Mark II, PowerShot G7 X, PowerShot G5 X Mark II, PowerShot G5 X, PowerShot G3 X, PowerShot G1 X Mark III, PowerShot G1 X Mark II, PowerShot G1 X, PowerShot G16, PowerShot G15, PowerShot G12, PowerShot G11, PowerShot G10, PowerShot S120, PowerShot S110, PowerShot S100, PowerShot S95, PowerShot S90, PowerShot SX70 HS, PowerShot SX60 HS, PowerShot SX50 HS, PowerShot SX1 IS Nikon 1AW1, 1J1, 1J2, 1J3, 1J4, 1S1, 1S2, 1V1, 1V2, 1V3, D3, D3X, D4, D4S, D40, D40X , D50, D60, D70, D70s, D80, D90, D200, D300, D300s, D600, D610, D700, D750, D800, D800E, D810, D3000, D3100, D3200, D3300, D5000, D5100, D5200, D53 00, D5500 , D7000, D7100, D7200, Df
Coolpix: A, P7800
Olympus E-M1, E-M5, E-M10, E-P1, E-P2, E-P3, E-P5, E-PL3, E-PL5, E-PL7, OM-D E-M5 Mark II Panasonic CM1, FZ300, G70, GF1, GF3, GF5, GF7, GH3, GH4, GM1, GM5, GX1, GX8, LX5, LX7, LX100 Sony A7, A7R, A7S, A7 Mark II, A55, A58, A65, A77, A77 Mark II, A99, A700, A3000, A5000, A5100, A6000, QX1, NEX-5, NEX-5N, NEX-5R, NEX-6, NEX-7, NEX-C3, NEX-F3, RX1, RX1R, RX10, RX10 Mark II, RX100, RX100 Mark II, RX100 Mark III, RX100 Mark IV
Turn on iCloud Photo Library
The program can be switched to sleep or active mode in the settings, and this is done quite simply. Before downloading iCloud, you need to update your operating system to the latest version. This is necessary for the application to work stably and without failures. To authorize, perform the following steps:
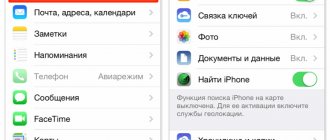
- Go to menu "iCloud".
- At the very bottom, opposite the point "Photo" move the slider to active mode.
On Mac devices, entering the vault is just as easy:
- Open the settings and the “System” tab.
- In chapter "Photo" put a tick next to the item iCloud Photo Library.
Now you know how to enable the media library. By downloading files from one device, they will immediately become available on other devices
Please note that all devices must be logged in with the same Apple ID. Otherwise, synchronization will fail.
Media storage
The service is convenient because it allows you to clear the memory on your phone or other device. Once you take pictures on your smartphone, they will automatically be uploaded to iCloud . For those who love photography, an editor is available in the cloud. The program allows you to improve saturation, as well as cut out unnecessary objects from the photo. You can access the photo editor from any device.
The media library allows you to save not only photos, but also videos. If necessary, the video can be reformatted, trimmed, edited. Directly from iCloud, any content can be uploaded to any social network.
Adding a video
Before we figure out why the video isn’t being added, let’s look at ways to transfer files to iTunes. The simplest method is to simply “throw” a video into the program window.
- Launch iTunes.
- Open the folder on your computer where the movies are stored.
- Select the video you want to transfer. Grab it with the left button and drop it into the iTunes window.
If nothing happens and you can’t transfer the movie to iTunes, try another method:
- Launch iTunes. Press Ctrl+B to display the system menu.
- Expand the “Settings” menu, go to the “Sources” section.
- In the “Sources” field and click “OK”.
- Press Ctrl+S to make the side menu visible.
- Select the “Movies” section in the side menu. Drag the video you want to add to iTunes into the program window.
If you can't add a movie by simply dragging and dropping, expand the "File" menu and select "Add to Library." An explorer window will open, through which you can select and add a video.
Once the movie is transferred to iTunes, you can connect your mobile device and start syncing. As a result of synchronization, the video downloaded to iTunes is added to the phone/tablet memory.
Problems when adding videos The video may not be added to the “Movies” section, but, for example, to the “TV Shows” directory. Be sure to check it before sounding the alarm.
The main reason why a movie cannot be added is the inappropriate video format.
This can be corrected using any converter that supports the MPEG-4 standard. For example, use the FormatFactory converter:
- Launch the program, add a movie to it.
- To configure conversion settings, open the "Mobile" section.
video format conversion - Expand the “Apple iPhone & iPad” item and specify the desired video quality.
- Start conversion. Transfer the resulting file in MPEG-4 format to iTunes.
If the video is saved in the correct format, but you still cannot add it to iTunes, check the following points:
- Do you have QuickTime Player installed on your computer? Without it, films are not added to the library.
- What is the name of the video file? If the file name is written in Cyrillic, rename it using Latin letters. Some versions of iTunes cannot add files with names in Russian.
- Without Cyrillic characters there must be a path to the file on the computer. That is, all folders must be designated in Latin letters: User, Video, etc.
Published by ProfiAppler
Users may experience iTunes not syncing new music to iPhone. The problem may arise unexpectedly: until recently there were no errors, and now the audio recordings are not transferred to the computer or phone. Let's figure out why iTunes can't read iPhone content and how to fix it.
Problems creating a backup
If iTunes failed to back up your iPhone and syncing is not working correctly, try the following troubleshooting methods:
- Make sure you have the latest version of iTunes installed. Even if you are connecting an iPhone 4S, the software must be up to date.
- Restart your computer and mobile device, then try connecting and syncing or backing up again.
- Change the connection type: if your iPhone 4S or other model connects to iTunes via USB, use Wi-Fi and vice versa.
On Windows computers, temporarily disabling your antivirus and firewall may help. After successful synchronization or backup, the security software can be turned back on.
Disable iCloud Photo Library
Deactivating the function is as easy as enabling it. To do this, in the iCloud settings you need to move the slider in the opposite direction, next to the “Photos” item. Overall, the application is useful and allows you to store a lot of information. If you don’t know how to use it, don’t rush to disable the option, but first study all the requirements.
Many users are wondering how to disable iCloud Music Library in iTunes. There is no point in synchronizing your music collection with cloud storage. Apple Music has a huge music library that allows you to find any music track.
- On the iPhone, open the “Music” menu.
- Next to iCloud Photo Library, switch the slider to sleep mode.
Apple Music skips songs
Most often, Apple Music skips some songs due to an unstable internet connection. The fact is that when you launch music from the Songs section, the playlist includes not only downloaded tracks, but also those that are played online.
Apple Music skipping songs? It happens.
An absolutely standard situation: you forgot to pay for your cellular tariff and were listening to music via Wi-Fi, and when you left the house, instead of the lights going out in all the windows, you discovered a random switching of tracks. Pay attention to the Airplane mode . You might have activated it by mistake.
Checking synchronization settings
Before you try to figure out why you can't sync your music, check your sync settings. Let's consider the simplest method - automatic synchronization when you connect the device to the computer and launch iTunes.
- Connect your iPhone 4S, 5S, 6S, 7 or other model to your computer and open iTunes.
- Click the device button in the left corner.
- Select the type of content you want to sync (in this case, music).
- Check the “Sync music” checkbox and choose what materials will be processed each time your phone is connected.
Iphone storage
If the settings are set correctly, but you cannot automatically synchronize music with an iPhone 4S or another smartphone model, try starting synchronization manually by going to File - Devices - Sync.