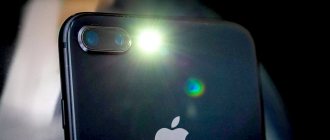
It's just a light on the back of your iPhone, but this flashlight is surprisingly flexible—and there are plenty of ways to quickly turn it on or off.
Apple first added LED lighting to the back of its iPhone 4 in 2010. Before this, you could get apps that made your iPhone screen brighter. And after that, you could have apps that make the LED glow instead of just blinking when you take photos.
It wasn't until iOS 7 in 2013 that Apple built flashlight controls into the system. But since then, your iPhone has a fully functional and surprisingly versatile flashlight.
The flashlight is versatile enough that you probably accidentally turned it on from the lock screen. But it's also hidden enough that you might not see how to change it or how it might match both shortcuts and accessibility settings.
Change the brightness
To change the brightness of the flashlight:
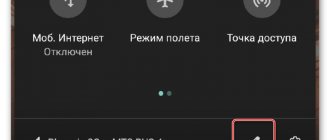
- On an iPhone X or later, swipe down from the upper-right corner to open Control Center. Or on an iPhone 8 or earlier, iPad, or iPod touch, swipe up from the bottom edge of the screen to open Control Center.
- Firmly press the Flashlight button.
- Drag the slider up or down.
If the flashlight isn't working on your device, learn what to do.
The flashlight is available on these devices: iPhone, iPod touch (5th generation and later), iPad Pro 12.9-inch (2nd generation and later), iPad Pro 11-inch, iPad Pro (10.5-inch), and iPad Pro (9.7 -inch).
Published Date: September 19, 2019
- https://setphone.ru/rukovodstva/kak-vklyuchit-fonarik-na-telefone/
- https://appsetter.ru/kak-vklyuchit-fonarik-na-androide.html
- https://kakoperator.ru/os/kak-vklyuchit-i-otklyuchit-fonarik-na-iphone
- https://tehnotech.com/kak-ispolzovat-fonarik-na-ajfone/
- https://support.apple.com/ht207281
Which iPhone models support flash notifications?
Flash notifications support absolutely all iPhone models that were released after the iPhone 4s. It was there that the function was first introduced, which is now used by almost all owners of Apple smartphones.
Indicator light on iPhone
They tried to introduce a flashing light before, but the creator was unable to implement it. He was unable to place the indicator inside the device. So he made a mini-gadget called iFlash, which was designed to turn on the flashing lights when there was a phone call. In addition, iFlash could significantly improve the quality of photos and videos on a smartphone; it helped the camera capture more light and thus increased the detail of the picture, so it was often used for filming in the dark. It is thanks to this that the device has gained huge demand.
Important! If the user’s smartphone is version xr or 7 plus, then it definitely has the ability to turn on the backlight when making a call. iFlash was not included with the smartphone. Users had to purchase it separately, which increased costs and caused inconvenience, since not every electronics store could find this device. Fortunately, the creator of Apple was able to implement a flash that would go off during an incoming call.
S. Jobs planned to ensure the ease of use of his technology specifically for people with disabilities. That's why it was important for him to implement blinking in his new device, and he succeeded. Now absolutely everyone could fully use an Apple smartphone.
Where is the flashlight on iPhone 11?
The iPhone does not have a flashlight as such; its functions are fully handled by the LED flash located near the camera lens on the back of the device. May 13, 2020
How to fix the problem
When the flashlight does not work, you can use one of the tips from experienced craftsmen:
How to turn off the flashlight on your phone
- Check the operation of the cameras, front and rear. The LED module is tied to these parts and will not start without them.
- Reboot your iPhone.
- Switch to different cameras until the black screen (if there is one) disappears.
- Force stop camera apps through settings.
- Perform a forced reboot of the device LINK.
- Reset the settings to factory settings (read here).
- Restore the device via DFU - emergency mode.
If the malfunction is caused by a software glitch, you need to go to Settings and do a reset, having first created a system backup and copied all the necessary files (videos, photos), otherwise they will be erased and it will be problematic to restore them.
A hard reset can also be done through iTunes, but this will require a connection to a PC via a cable, as well as having the program installed on the computer.
The situation is worse if resetting through settings and/or Hard Reset in other ways does not help. In this case, you will have to contact the service and probably replace the non-working iPhone parts.
If a software failure is not the cause of the module's inoperability, it is a matter of mechanical damage to the spare parts. They must be replaced to restore functionality.
Looking for a reason
An incorrectly working flash brings a lot of inconvenience when using an iPhone. Determine one of the reasons for the failure:
- Moisture gets into the camera mechanism - in this case you need to work with the hardware;
- OS update. Many users complain about limitations in the flash or its complete lack of operation after updating to iOS 10. You can return to using the previous version of the operating system or wait for a newer firmware from the developer;
- Performing Jailbreak. Working with this operation may limit the functionality of the phone. The only solution is to roll back to factory settings;
- Phone overheating. Due to the increase in temperature in the iPhone case, the flash may not work. Turn off the device and wait until it cools down completely;
- Flash hardware failure (after dropping or hitting the phone), which requires a complete replacement of the component.
Method No. 1 - Changing settings
If there is a protective film on the back cover of your iPhone, remove it - most likely it does not allow the flash to work properly.
Test the flash in different programs. Install a third-party Flashlight app. If the flash works in it, but not in the “Camera”, you need to update the standard Camera application or use another shooting program.
If the flashlight functionality does not work either in other programs or in standard ones, check your smartphone settings. In the phone settings, click on “Do not disturb” and turn on the Manual function and after a few seconds turn it off again. Also check if the camera is included in the list of allowed applications.
Method No. 2 – Emergency reboot
Press and hold the power key until the slider shown in the figure appears. Move the pointer to the right to turn off your phone. This method allows you to solve temporary software problems.
Method number 3 - Installing updates
A new firmware version usually contains an improved security system and support for phone functionality. If a new version of the system is available to you, install it:
- Connect your phone to a power source;
- Connect to the router;
- Click on Settings-General-Software Update;
- Click "Download and Install".
Method number 4 - Replacing the camera
If the problem cannot be solved using the first three methods, the reason is a partial malfunction of the camera module. Since the flash is a component of the module and it will not be possible to replace it as a separate part, the only way out is to completely replace the main camera.
How to turn on the flashlight on iPhone?
The rear camera part is sold as a separate component of iPhones. It is individual for each smartphone model
It is important to note that only original parts must be used during repairs. A unique serial number must be printed on the camera cable. The figure below shows the rear camera, which we will replace next
The picture below shows the rear camera, which we will replace next.
Unclip the back cover from the display using a pentagonal screwdriver, picks, and a spudger to remove the motherboard cables. Then remove the board. In its upper part, find the installed camera module and unfasten the screws of its plug. Disconnect the cable using a spudger and replace the component. Collect your phone.
You can find any instructions for self-repairing an iPhone on our website, or arrange a call to a specialist at any place convenient for you.
Active users of various social networks, in particular Instagram, often use the built-in flash on their phone. It is needed to create a powerful and mobile light source and improves daylight. With its help, you can shoot at night and experiment with shadows in the photo. But what to do if suddenly the flash on your phone doesn’t work?
How to turn off the flashlight
Here, in principle, you need to go “in reverse” and perform almost the same actions as with activating the flashlight:
- In the control center, you just need to click on the icon to turn off the flash. This will be evidenced by the changing picture;
- With Siri, you just need to say the phrase “Siri, turn off the flashlight,” and it will turn off automatically within a split second;
- If you swipe left to bring up the camera, but the flash is activated, it will automatically turn off. It's unclear whether this is a bug or a special Apple feature, but at the moment it works that way;
- On iPhone X, you just need to click on the flashlight icon on the lock screen, and it will turn off if it was previously activated.
Changing notification settings
In most cases, you can set your own notification settings for each application. You can turn app notifications on or off, turn on notification sounds, choose how and where notifications appear for each app when your device is unlocked, and customize other settings.
- Go to Settings > Notifications.
- To choose when notification thumbnails appear on the screen, tap Show thumbnails, then choose an option: Always, Never block, or Never. (Certain applications can be configured to ignore this setting.)
Thumbnails can display text (from Messages or Mail) and invitation details (from Calendar).
- Tap Back, then select an app under Notification Style and turn Allow Notifications on or off.
If Allow Notifications is turned on, choose where and how to display notifications for this app (for example, on the Lock screen or in Action Center).
For many apps, you can also customize the banner style, sounds, and notification icons.
- Tap Grouping and choose how you want to group notifications.
- By application. All notifications from one application are grouped together.
- Automatically. Notifications from an app are grouped based on the app's sorting criteria (for example, topic or thread).
- Shutdown. Disable grouping.
To turn off notifications for individual apps, go to Settings > Notifications > Siri Suggestions and turn off notifications for the apps you want.
Changing alert styles
To add or change the alert style for notifications, follow these steps:
- Go to Settings > Notifications.
- Select an app from the Notification Style section.
- Select the alert type and banner style.
You can also turn sound and icons on or off.
Show recent notifications on the lock screen
You can also open Notification Center from the lock screen.
- Go to Settings > Face ID & Passcode (on an iPhone with Face ID) or Touch ID & Passcode (on other iPhone models).
- Enter the password code.
- Turn on Notification Center (under "Access with screen lock").
Alerts from government agencies
In some countries and regions, users can enable notifications from government agencies to alert the public. For example, in the US, you can receive government alerts on your iPhone, and you can turn AMBER alerts, public safety alerts, and emergency alerts (which include severe and extreme imminent threat alerts) on or off; they are enabled by default. In Japan, you can receive earthquake alerts from the Japan Meteorological Agency on your iPhone.
- Go to Settings > Notifications.
- Scroll down to the Government Alerts section and turn on the alerts you want.
Government alerts vary by carrier and iPhone model and may not apply in all conditions. See the Apple Support article Learn about emergency alerts and government alerts on iPhone and Apple Watch.
Disable notifications
In the “settings” menu (icon in the form of a light gray gear), select “notifications” - “show thumbnails” - “never”. While the device's screen is locked, notifications will not appear on the screen.
If you have critical applications, you can turn off notifications only from those applications that may interfere with your work. In the “settings” - “notification style” menu, under the icon of each application there is a list of permissions for notifications:
- banners;
- sounds;
- stickers.
Banners are messages on the lock screen. Sounds – beeps or vibrations. Stickers – notification counter in the upper left corner of the application icon.
Remove social media icons from the main screen into a folder
iPhone automatically creates a folder when a user drags one app icon onto another. All social networks can be collected in one folder and placed on an additional screen. This way, the chance of accidentally getting distracted will be minimal.
In the upper left corner of the folder you can see the number of unread notifications. It is shown as a number in a red circle. Notifications from all applications in the folder are summarized. So, if you received 2 messages from VKontakte, 1 from Facebook and 1 more from Instagram, the circle will contain the number 4.
Remove messenger icons from the main screen to a folder
A folder for instant messengers is created using a similar principle. Since many people use chats for work, it is better to leave work messengers on the main screen, putting the rest in a separate folder or on the second screen already inside the folder.
If the same messenger is used for both work and personal messages, you can leave it on the main screen, but mute notifications from personal chats while working.
Disable apps' ability to request ratings
Application developers can be understood - they need feedback, but not at the expense of the user experience. Intrusive requests to rate the application, if you like them, can be turned off once and for all:
“Settings” – “iTunes and App Store” – “Ratings and Reviews”.
You need to switch the slider to the inactive position.
Activate Do Not Disturb in Settings
Do not disturb mode isn't just for night time. By setting an interval corresponding to the length of the working day, you can ensure silence during these hours.
In order not to miss an important call, you need to set the slider of the “repeated calls” submenu to the active position. Thus, the first call from the subscriber will be muted, and the second one will be accompanied by a sound signal.
You can set your favorite contacts to always be cleared even when Do Not Disturb is turned on:
“Allow calls” – “From favorites”.
Install a productivity app
The App Store has a huge number of applications that help you not to be distracted from your work. All of them, having a common goal, differ only in the ways of achieving it. Some users may find it more suitable to set daily limits on the use of applications. RescueTime and its analogues do an excellent job of this.
For those who prefer gaming techniques to maintain concentration, apps like Forest are more suitable. If you need to work without a break, for example, for two hours, then a timer is set in the application for this time. If during this time the smartphone is left unattended, a tree grows on the digital lawn in Forest. If the user is nevertheless distracted and picks up the phone, the seedling virtually dies.
To find an application you like, you need to type the keyword “concentration” in the AppStore search.
Sooner or later, concentrating on the main tasks will become a habit, and most of the tricks will no longer be necessary, but at the initial stage you need to help yourself by choosing any of the methods listed above.
If you don't receive notifications from a specific application
To receive notifications, connect to a Wi-Fi or cellular network. If you're not receiving notifications from a specific app, follow these steps:
- Make sure the app supports notifications. Go to Settings > Notifications, select an app, and make sure Allow Notifications is turned on.
- If you've turned on notifications for an app but aren't receiving alerts, the Banners option might not be selected. Go to Settings > Notifications, select an app, and then select the Banners option.
- Make sure you're signed in to your Apple ID.
- Make sure Do Not Disturb is turned off.
- If you recently installed an app or restored your data from a backup, open it to start receiving notifications.
How to turn off flash on notifications
In version 13 of iOS, the location of the Accessibility settings has changed. The backlight function for notifications from applications and services is now placed in a separate subsection.
Now to turn it off you need to do this:
- Open the settings and find the Accessibility tab. Next to it, select the “Accessibility” option.
- Go to Audio/Visual option.
- In the “Visual” column, switch the slider located next to the “LED flash for notifications” line.
- Turn the toggle switch next to the “Flash without sound” option if the option for light notification in silent mode was previously activated.
Section names may vary depending on the age of the device. In any case, you will need to open the smartphone settings and look for the words “flash” or “LED” in the subsections. For example, in version 8 of iOS, a specially designated submenu was called “Alert Flash” and was located behind the “General” section, flipping the slider to the “Off” value.
So, you can deactivate the flash for incoming calls and notifications in the iPhone settings by toggling the appropriate slider. This can be done in 4 clicks, quickly removing and activating the function as needed. However, exceptions cannot be made for any programs.
What else can you do with the iPhone's flashlight?
There are no controls for the flashlight on the lock screen other than turning it on and off. However, if you use Control Center, you can tap and hold the icon to get more granular control.
Specifically, if you press and hold, you'll get the option to adjust the brightness of the light. There are five settings, from zero to highest, and you can set the one you want by swiping up and down.
Please note that whatever you set for the flashlight using this control, you will get it every time until you decide to change it again. This includes turning on the flashlight from Control Center or from the lock screen.
Why doesn't the flashlight turn on?
It’s a shame if the flashlight fails at a crucial moment: when entering a dark entrance or on a minibus, when change is scattered throughout the cabin. 3 reasons why the backlight does not turn on:
- Water has entered the smartphone case.
- The gadget fell and the internal elements were damaged.
- Software malfunctions, use of an unlicensed OS.
The last problem can be easily fixed by downloading the official version of iOS, or updating to newer software.