09/07/2019 windows | for beginners
This guide describes step-by-step ways to change the screen resolution in Windows 10, and also provides solutions to possible resolution-related problems: the desired resolution is not available, the image looks blurry or small, and others. There is also a video that shows the whole process clearly.
Before we talk directly about changing the resolution, I will write a few things that may be useful for novice users. You may also find it useful: Changing the resolution using hotkeys, How to change the refresh rate of your monitor screen, How to change the font size in Windows 10, How to fix blurry fonts in Windows 10.
The monitor screen resolution determines the number of horizontal and vertical pixels in the image. At higher resolutions, the image tends to appear smaller. For modern liquid crystal monitors, in order to avoid visible “defects” in the picture, the resolution should be set equal to the physical resolution of the screen (which can be found out from its technical characteristics).
- Changing Windows 10 screen resolution in Settings
- How to change resolution using video card programs
- In the control panel (method not available in new OS versions)
- Video instructions for changing the screen resolution of a Windows 10 monitor
- Problems when choosing the right resolution
Changing screen resolution in Windows 10 settings
The first and easiest way to change the resolution is to enter the new Windows 10 settings interface in the “Display” section (or “Screen” in earlier versions of the OS):
- The fastest way to open screen settings is by using the following method: right-click on the desktop and select the “Display Settings” menu item.
- Make sure Display is selected in the list on the left. At the bottom of the page, you will see an option to change the screen resolution (in earlier versions of Windows 10, you must first open Advanced Display Settings, where you will see the option to change the resolution). If you have multiple monitors, then by selecting the appropriate monitor you can set your own resolution for it.
- After selecting the screen resolution, the settings are applied immediately (in the latest version of the system, previously you had to click the “Apply” button). At the same time, if the image on the screen suddenly disappears, do not take any action: after 15 seconds, if you do not confirm the changes, the resolution will return to the original one.
- If on the same settings page you open the item “Advanced display settings” - “Video adapter properties for the display”, and then click on the item “List of all modes”, you will see a window with available resolutions, color depth and screen refresh rate, which can also be applied to change the resolution.
If choosing a resolution is not available, the following instructions should help: Windows 10 screen resolution does not change.
Let me remind you: if, when you set the screen resolution that is recommended by Windows 10, text and elements seem small to you, you should not increase them by setting a resolution that does not correspond to the physical resolution of the monitor matrix: this leads to distortion. It is better to use the built-in scaling and changing font and icon sizes available in the system.
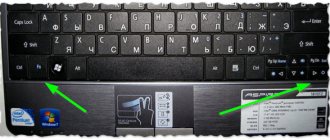
Ways to change image settings on a laptop
There are several ways to change the screen scale on a laptop computer:
- increase (decrease) display resolution;
- use the “Screen Magnifier” function;
- change information display parameters in the settings of the required application.
Which option to use depends on how and where you want to increase the screen size on your laptop.
Changing the display resolution
If you need to increase the screen resolution on your laptop, for example, to comfortably display a picture in a video game, or return to standard mode after a reset of monitor settings or a driver failure, perform the following steps:
- Place the cursor over a free part of the display and right-click or right-click on the TouchPad.
- In the list that appears, click “Screen Resolution” or “Properties”, and then the required item. It all depends on the version of Windows installed on the laptop.
- Using the slider, we set the resolution that suits you for comfortable use of your PC.
In the same settings section, you can stretch the desktop, increase the scale of the displayed text, change the screen orientation (widen or narrow it), etc.
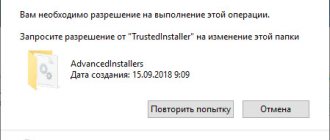
If, after a system crash or exposure to malware, images and applications do not open in full screen, the problem may lie in the incorrect operation of the drivers for the video card. To bring the monitor’s operating mode back to normal and stretch the picture, you need to do the following:
- Update drivers and download software to the video card installed on the laptop. You can find the required software on the disk that comes with your laptop, or download it from the official website of your PC manufacturer.
- Launch the downloaded application and set the required resolution in the display settings. Here you can select full-screen mode, adjust monitor brightness, frequency and some other parameters.
Using Magnifier
Windows has a built-in tool that allows you to zoom in on the entire screen or a specific part of it for a while. This is very convenient when reading any information written in small print. This feature is called Screen Magnifier. To call it you need:
Changing monitor screen resolution using video card utilities
When installing drivers for popular video cards from NVIDIA, AMD or Intel, a utility for setting up this video card is added to the control panel (as well as in the right-click menu on the desktop) - NVIDIA control panel, AMD Catalyst for managing Radeon graphics, Intel HD graphics control panel. To enter the control panel, you can use the search in the Windows 10 taskbar, and after entering it, to see the desired element, change the “View” field at the top right from “Categories” to “Icons”.
In these utilities, among other things, there is also the ability to change the monitor screen resolution, an example is in the screenshot above.
Browser window size changes
By default in any browser the scale is exactly 100%. But sometimes on some sites Webmasters use a font that is too small and unreadable. In this case, you can zoom in to read small letters and numbers. This can be done in several ways:
Method 1: Hotkeys
Hold down the Ctrl button and, without releasing it, start pressing the + and – keys. One button will zoom in and the other will zoom out. To return the screen with default settings, use the combination:
Ctrl + 0
Method 2: Through the browser quick menu
If you open the main menu of the browser, you can see the scaling setting. You should immediately see the number 100 with plus and minus signs. For clarity, I will leave screenshots for different browsers.
- Google Chrome
- Opera.
- Yandex.
- Mozilla Firefox
- Microsoft Edge.
Method 3: Button and mouse wheel
This method is somewhat reminiscent of the hot keys that we looked at in the first option, but instead of the + and – buttons, we will use the mouse wheel. So, again hold down the Ctrl button, and after that we start turning the mouse wheel up or down.
Method 4: In the browser settings
You can adjust the scale through the settings. To do this, open the browser menu.
Now go to “Appearance” and change the scaling. Here you can change the font settings, making them larger or smaller, while the scale will remain unchanged.
Using the control panel
Screen resolution can also be changed in Control Panel in the more familiar "old" Display Settings interface. Update : this option to change the resolution has been removed in the latest versions of Windows 10 - when you select the appropriate items, you will be taken to the new System Settings.
To do this, go to the control panel (view: icons) and select “Display” (or type “Display” in the search field - at the time of writing, it returns the control panel item, and not the Windows 10 settings).
In the list on the left, select “Setting screen resolution” and specify the desired resolution for one or more monitors. When you click “Apply”, as in the previous method, you can either confirm or cancel the changes (or wait, and they will be canceled themselves).
A Brief Look at Supersampling
Probably no. Nowadays, PC game developers have become experts at getting their games to run at 60 frames per second even on average hardware configurations (well, at least some of them), and even budget graphics cards are incredibly powerful and efficient. Among other things, the industry has introduced new technology that makes games look even better. It's called "Supersampling".
So what does this Supersampling do? Simply put, it renders game graphics at a resolution higher than the monitor can handle, and then compresses them to the size of the monitor's standard resolution. Various software with the same functionality have existed for a long time, but today's graphics cards have become powerful enough to give this technology full support.
The benefit of Supersampling is that you can see graphics in higher quality while avoiding some of the basic pitfalls, such as jagged polygon angles or lighting artifacts. Simply put, you use the power of your graphics card to produce images at a higher resolution, giving the picture some minor but pleasant improvements, such as reduced staircases and improved lighting effects. The same effect can be achieved using more complex anti-aliasing techniques, but current video cards are powerful enough to take full advantage of Supersampling. The downside of this technology, as you might have guessed, is that often the frame rate during supersampling can drop very significantly, but this is understandable, since your video card has to work several times more.
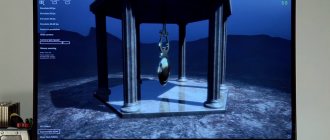
Above you can see the character Lucio from Overwatch in a standard render and in a render that was enlarged by 200% using Super Sampling technology. Both pictures are displayed in 1080p resolution, i.e. at the maximum resolution of most standard monitors. But the image on the left is rendered in the game engine at 1080p, while the image on the right is rendered at 4K (3840x2160). Notice how much better the picture looked when the specified technology was applied to it. However, such an improvement, as already mentioned, will cost you a reduced frame rate. For example, if you previously experienced a stable 60 FPS in the game, then with the use of Supersampling they can quite expectedly drop to 40 or 30 FPS.
The results of using Supersampling technology may vary depending on different system configurations, as well as the games themselves. Most PC enthusiasts have already reached a consensus among themselves that Supersampling is most wisely applied to older PC games or low-demand console ports that typically do not require the full performance of your computer. Such games can easily run at 60 FPS even with increased image rendering resolution. In addition, Supersampling will also be of interest to artists who need to take a screenshot or record high-quality video.
Here's a great example of using Supersampling. In this case, AMD’s technology was used, which is called “Virtual Ultra High Resolution”.
There are two ways to achieve such a picture: through the software of your video card or through the game itself. Note that only some video games have support for Supersampling. We recommend trying both methods.
Questions from users
Basic user questions regarding display parameters are collected in this block:
Where are the monitor settings on the computer?
Windows system utilities or video card manufacturers' programs are responsible for them. To get to the relevant Windows 10 settings, press Win + I and go to the “System” - “Display” section.
How to reduce the borders of the monitor?
Hold down the “Ctrl +” key if you want to increase the display size, and “Ctrl -” if you want to reduce it. With a single click, the image will change in one direction or another by 10 percent.
Interesting materials:
The purpose of the payment is not specified, what should I do? What intangible assets? How long is the irregular working day of the Labor Code of the Russian Federation? Unpaid leave for how many days? There are no masks on Instagram, what should I do? I can't open the gallery, what should I do? How to properly charge a new battery? Do I need to change my pension certificate? Do you need to wash seaweed? Do I need to put a stamp on an official letter?
A universal program for changing the resolution in games
On the Internet you can find a lot of amazing and useful programs that were developed by independent programmers. In your case, a utility called “Res-o-matic” will be useful. You can download it completely free of charge at https://www.bcheck.net/apps/reso.htm.
The program size is only 19 kilobytes. And this tiny tool will change any resolution in almost any monitor and game without having to go into the game. It's very easy to work with. After launch, you will see a line with a “Browse” button. By clicking it, you need to select your game from the list of installed applications. Then select a resolution for it below. Save the settings and launch the game for which you changed the settings.
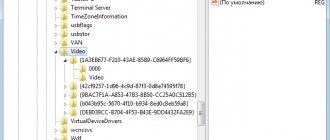
Registry editor for game settings
Using the Windows Registry Editor, we also have the opportunity to change the resolution settings in the game. But this method is not universal. Since not all games leave configuration data for editing in the registry.
To run it on Windows:
- Select two keys at the same time - WIN + R;
- Enter in the empty line: “regedit”;
- Press ENTER to run the command;
- Then select the "HKEY_CURRENT_USER" branch;
- And select the “Sofware” section;
- It displays the names of the companies that created the game. Therefore, if you do not know the publisher, you will need to search for it on the Internet by entering the name of the game in the search bar;
- Find the parameters on the right in the block that are responsible for resolution. It won't be difficult to do this. Since they have numerical values set next to them that correspond to the current image settings in the game;
- Select one of these RMB parameters and click “Change”;
- Set the desired settings and save the changes.
After that, close the Registry Editor window and launch the game. You may need to restart your computer for the settings to take effect.
Scale of an old application or game
All new programs support the zoom effect by default. But old programs and games running on Windows 10 or 8 may not display correctly. Because of this, text or some elements may be blurry. We go to the “Properties” of the exe file that launches the program or game.
Let's go through the parameters that can help us. If you have problems with scaling, then try disabling or, conversely, enabling the “Full screen optimizations” option. If the application is very old, then you can use a resolution of 640 x 480. After changing the settings, do not forget to click on the “Apply” button.
NOTE! If the program does not start at all, try changing the compatibility mode by installing XP, 7 or even 98. This way I was able to revive an old toy that I played on Windows 95.
How to change resolution using an icon without entering the game
You don't have to dig into the game folder to change the resolution in which it will run. You can use the icon and its settings to do what you want.
To do this, follow these steps:
- Click on the game icon RMB;
- Select the last item in the “Properties” menu;
- In the “Shortcut” tab, find the “Object” item. This line will help us change the parameters;
- Focus the mouse cursor on this line and press the END key. Or manually move the cursor to the end of the line;
You need to add the parameter after the existing characters
- In the line we will continue the existing entry. You need to put a space if there is none and write the following: “-w 800 -h 600”. Where “w” is the width of the screen, “h” is the height;
- Click “Apply” and “Ok” at the bottom of the window.
Now launch the game to check that the resolution settings have changed. And you managed to do this without entering the game. If nothing works, move on to the next methods. And in the line where we set the screen parameters manually, erase the added characters and save the changes again.