09/02/2019 for beginners | mobile devices
On many Android phones and tablets, the battery charge in the status bar is simply displayed as “fullness level,” which is not very informative. In this case, there is usually a built-in option to enable the display of battery percentage in the status bar, without third-party applications or widgets, but this function is hidden (except for the latest versions of the system).
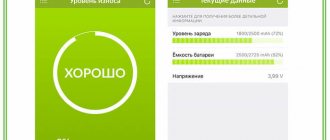
This instruction tells you how to enable display of battery charge percentage using the built-in tools of Android 4, 5, 6 and 7 (tested on Android 5.1 and 6.0.1 when writing), separately - on the latest Android 9 Pie and newer, on Samsung phones Galaxy and also about a simple third-party application that has one single function - it switches a hidden system setting of the phone or tablet that is responsible for displaying charging percentages. May be useful: Android battery drains quickly, How to find out the current Android battery capacity.
- Displaying charge percentage on Android 9 and later
- How to enable battery percentage on Android if there is no such function in the settings (hidden built-in system tools)
- Battery percentage on Samsung Galaxy
- Battery Percent Enabler app (battery with percentage for all Android versions)
- Video instruction
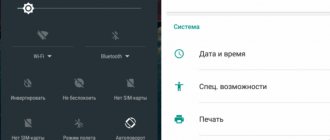
Note: usually, even without enabling special options, the remaining percentage of battery charge can be seen if you first pull out the notification shade from the top of the screen, and then the quick actions menu (charge numbers will appear next to the battery).
Battery percentage on Android using built-in system tools (System UI Tuner)
The first method usually works on almost any Android devices with current versions of the system, where the option to enable percentage charging is not available in the settings. Moreover, the method works even in cases where the manufacturer has installed its own launcher, different from the “pure” android.
The essence of the method is to enable the “Show battery level as a percentage” option in the hidden System UI Tuner settings, having previously enabled these same settings. To do this you will need to complete the following steps:
- Open the notification shade so that you can see the settings button (gear).
- Press and hold the gear until it starts to spin, then release it.
- The Settings menu will open with a notification that “System UI Tuner has been added to the Settings menu.” Keep in mind that steps 2-3 are not always successful the first time (you should not release immediately when the gear starts rotating, but after about a second or two).
- Now, at the very bottom of the settings menu, open the new “System UI Tuner” item.
- Turn on the "Show battery level as a percentage" option.
Done, now the status bar on your Android tablet or phone will show the charge as a percentage.
What is it and where is it located
The Status Bar is the notification area located at the top of the screen. Some users confuse it with the notification center, which is called up by swiping down, but these are two different interface elements.
The line shows various icons demonstrating the main information that the owner of a smartphone may need, regardless of the scenario for using the device. By default you can see here:
- current time;
- battery charge;
- network reception quality;
- connection type (for example, 3G or 4G).
Optionally, other icons appear here. For example, the user can configure the display of traffic consumption statistics. Icons also appear in the status bar depending on the connected interfaces. So, here you can find the icons:
- Wi-Fi;
- alarm clock;
- Bluetooth;
- silent mode;
- Airplane mode.
The presence of one or another icon indicates the activity of a certain mode. So, if you see an image in the form of a clock in the status bar, it means that you have an alarm clock set. Accordingly, the Bluetooth icon will indicate the activity of this sensor, and the image of an airplane symbolizes the inclusion of the communication mode of the same name.
Battery percentage on Samsung
Samsung Galaxy phones have a built-in function to enable display of battery charge percentage, but it is not located in the most obvious location for beginners:
- Go to Settings - Notifications. On the next screen, click on the “Status Bar” item.
- Turn on the “Show charging percentage” option.
After this, your Samsung Galaxy will show the charge percentage next to the battery icon in the top right corner of the screen as required.
Alternative option for Android 6 and higher
In addition to the method described above, another option is available for Android 6 and higher. The fact is that the battery charge percentage can be viewed after opening the top curtain.
The disadvantage of this method is that to view information about the battery charge percentage you need to open the top curtain each time. On the other hand, if you don't need this feature very often, it can be quite convenient.
Using the Battery Percent Enabler app
If for some reason you cannot enable System UI Tuner, then you can use the third-party application Battery Percent Enabler (or “Battery with Percent” in the Russian version), which does not require special permissions or root access, but reliably enables the display of charge percentages batteries (moreover, the same system setting that we changed in the first method is simply changed).
Procedure:
- Launch the application and oh.
- You immediately see that the battery percentage has begun to be displayed in the top line (at least that’s how it was for me), but the developer writes that you need to restart the device (completely turn it off and on).
Ready. At the same time, after you have changed the setting using the application, you can delete it; the charge percentage will not disappear anywhere (but you will have to reinstall it if you need to turn off the charging percentage display).
You can download the application from the Play Store: https://play.google.com/store/apps/details?id=de.kroegerama.android4batpercent&hl=ru
What is important to know about phone battery charge
If you have read this far, we suggest you familiarize yourself with some “tricks”, marketers’ tricks and other tricks related specifically to displaying the phone’s battery percentage.
- Do not constantly check the battery charge. If you regularly turn the screen on and off just to see how much charge you have left, this will eventually drain your phone even faster.
- Turn on “ Airplane mode ” and “ Battery saver ”. Do you see that there is very little charge left, but you still need your phone in working order? Then turn on the flight mode for a while (here you look at the circumstances), but be sure to use the energy saving mode, which will give you a large supply of time, even if there are some unfortunate couple of percent left.
- The system does not show the exact value. If your screen shows that the phone is 100% charged, it is not a fact that this is exactly the case. Also with a discharged battery. For example, if it says that there is 1-3 percent left, it is not a fact that the device will turn off immediately. He may be in a state of “downtime” for about half an hour, or even more.
In general, as you can see, making a charging percentage on Android phones, be it Samsung or any other manufacturer, is not difficult, and there are really many ways to do this. In general, for the future, we advise you to purchase another smartphone with a new version of the Android operating system and an already implemented option to display battery percentage.
Share link:
Adding a battery icon to the taskbar in Windows 10
To check the battery charge status, select the battery icon on the taskbar. To add a battery icon to the taskbar, follow these steps:
- Go to section Start
>
Settings
>
Personalization
>
Taskbar
, and then scroll down to the notification area.
Go to Select the icons that appear on the taskbar
and switch the
Power
to the On position.
( Note:
The Power switch does not appear on systems, such as a desktop computer, that are not running on battery power.) If the battery icon still does not appear, select the
Show hidden icons
in the taskbar check box, and then select the battery icon. - If on a battery-powered device, when you go to the section Start
>
Settings
>
Personalization
>
Taskbar
device manager
in the search box on the taskbar , and then select
Device Manager
from the list of results.
Under Batteries
, right-click your device's battery, select
Disable
, and then click
Yes
.
Wait a few seconds, right-click on Battery and select Enable
. Then restart your device. - If in the section Start
>
Settings
>
Personalization
>
Control Panel
you have turned on the Power switch but the battery icon does not appear on the taskbar, in the search box on the taskbar, type task
manager
and select
Task Manager
from the list of results.
On the Processes
, in the
Name
, right-click
File Explorer
and select
Restart
.
Enable the battery icon in Settings
Let's start by simply checking the Windows 10 settings to enable or disable the battery icon.
- Right-click anywhere on the taskbar and select “Taskbar Settings.”
- Pay attention to the "Notification Area" section and two items - "Choose the icons that appear in the taskbar" and "Turn system icons on or off."
- Turn on the “Power” icon in both of these points (for some reason it is duplicated and turning on only one of them may not work). In the first point, I recommend turning on the “Always display all icons in the notification area” option so that the battery indicator is not hidden behind the arrow icon.
If everything went well, and the reason for the missing icon was in the settings, the battery indicator will appear in the notification area.
However, this does not always help; in some cases, the settings are already set properly, but there are no signs of the required icon. In this situation, you can try the following methods.
Reinstalling the battery driver
The battery driver in the Windows 10 operating system is usually installed automatically. Sometimes malfunctions in its operation provoke the occurrence of various problems, including problems with displaying the “Power” icon. You won’t be able to check if the drivers are functioning correctly, so you’ll have to reinstall them, but you can do this like this:
- Log in to the OS under an administrator account to perform further manipulations.
You will find detailed instructions for using this profile in a separate material at the following link. Read more: Using the Administrator account in Windows Managing account rights in Windows 10 - Right-click on “Start” and select “Device Manager”.
- Expand the "Batteries" line.
- Select "AC adapter (Microsoft)", right-click on the line and select "Uninstall device".
- Now update the configuration via the Action menu.
- Select the second line in the "Batteries" section and follow the same steps described above with it. (Don't forget to update the configuration after uninstallation).
- All that remains is to restart the computer to make sure that the updated drivers work correctly.
Updating the motherboard BIOS
Like drivers, the motherboard BIOS has its own versions. Sometimes they do not work entirely correctly, which leads to various failures with the detection of connected equipment, including batteries. If you can find a newer BIOS version on the official website of the laptop developers, we recommend updating it. Read on to learn how this is done on different laptop models.
We have ranked the methods from the most effective and simple to those that help only in the rarest cases. Therefore, it is better to start with the first one, gradually moving on to the next ones in order to save your time and effort.
Updating motherboard chipset drivers
The motherboard chipset driver is responsible for the operation of the battery and receiving information from it. Periodically, developers release updates that correct possible errors and glitches. If you haven’t checked for updates for your motherboard for a long time, we recommend that you make this one of the appropriate options. In our other article you will find a guide to installing the necessary software.
Separately, I would like to mention the DriverPack Solution program. Its functionality is focused on finding and installing driver updates, including those for the motherboard chipset. Of course, such software has its drawbacks associated with intrusive advertising and disabling offers to install additional software, but DRP copes well with its main task.
Scanning a laptop for viruses
Often, infection with viruses leads to malfunctions of certain functions of the operating system. It is quite possible that a malicious file has damaged the part of the OS responsible for displaying the icon, or is blocking the launch of the tool. Therefore, we strongly recommend that you run a scan of your laptop for viruses and clean them using any convenient method.
Cleaning the registry
There is a setting in the Registry Editor that is responsible for displaying taskbar icons. Over time, some parameters change, garbage accumulates, or various types of errors occur. This process may cause problems with showing not only the battery icon, but also other elements. Therefore, we recommend cleaning the registry using one of the available methods. For a detailed guide on this topic, read the article below.
In addition, we advise you to familiarize yourself with our other material. While in the articles at the previous links you could find a list of software or many additional methods, this guide is dedicated exclusively to interacting with CCleaner.
Restarting Explorer
Try restarting Windows 10 Explorer - this will force your laptop to reboot the entire system interface and, if the battery icon disappeared due to Explorer crashing (which is not uncommon), it will reappear. Procedure:
- Open the task manager: to do this, you can right-click on the Start button and select the desired context menu item.
- In Task Manager, find File Explorer, select it, and click Restart.
Check if this fixed the problem. If this time there is no result, move on to the last method.
Reinstalling the battery in Device Manager
And the last way to get back the missing battery icon. Before using it, connect your laptop to the mains:
- Open the device manager (this can be done in the menu by right-clicking on the Start button).
- In Device Manager, open the Batteries section.
- In this section, select the device corresponding to your battery, usually “ACPI-Compliant Control Battery”, right-click on it and select “Remove Device” and confirm the removal.
- In the Device Manager menu, select “Action” - “Update hardware configuration” and wait until the battery installation process completes.
If the battery is working and Windows 10 was able to reinstall it, you will immediately see a battery indicator in the notification area of Windows 10. Also, in the context of the topic under consideration, the material What to do if your laptop does not charge may be useful.
Sources
- https://lavnik.net/kak-vklyuchit-otobrazhenie-zaryada-batarei-v-protsentah-na-android-i-ios
- https://IT-here.ru/instruktsii/kak-uznat-zaryad-batarei-v-protsentah-na-iphone-12-i-iphone-12-pro-vse-sposoby/
- https://remontka.pro/battery-percent-android/
- https://tarifkin.ru/mobilnye-sovety/kak-sdelat-na-ajfone-zaryad-v-protsentah
- https://SmartPhonus.com/%D0%BF%D1%80%D0%BE%D1%86%D0%B5%D0%BD%D1%82%D1%8B-%D0%B7%D0%B0% D1%80%D1%8F%D0%B4%D0%BA%D0%B8-%D0%B1%D0%B0%D1%82%D0%B0%D1%80%D0%B5%D0%B8-% D0%BD%D0%B0-android/
- https://upgrade-android.ru/stati/stati/4312-kak-vklyuchit-protsenty-zaryadki-na-android.html
- https://sdelaicomp.ru/mobile/kak-vklyuchit-procenty-zaryadki-na-samsung.html
- https://www.orgtech.info/procent-zaryadki-samsung/
- https://androproblem.ru/polomki/android-nepravilno-pokazyvaet-zaryad-batarei.html
- https://a-apple.ru/android-ios/oshibki/nepravilno-pokazyivaet-zaryad-batarei-na-android-osnovnyie-prichinyi
- https://askproblem.ru/phone/android/remont/nepravilno-pokazyvaet-zaryad-batarei.html
- https://support.microsoft.com/ru-ru/windows/%D0%B4%D0%BE%D0%B1%D0%B0%D0%B2%D0%BB%D0%B5%D0%BD%D0 %B8%D0%B5-%D0%B7%D0%BD%D0%B0%D1%87%D0%BA%D0%B0-%D0%B0%D0%BA%D0%BA%D1%83%D0 %BC%D1%83%D0%BB%D1%8F%D1%82%D0%BE%D1%80%D0%B0-%D0%BD%D0%B0-%D0%BF%D0%B0%D0 %BD%D0%B5%D0%BB%D1%8C-%D0%B7%D0%B0%D0%B4%D0%B0%D1%87-%D0%B2-windows-10-df5599da-5f1f-c1f8 -d9df-a5c8dd991cdf
- https://remontka.pro/battery-icon-missing-windows-10/
- https://lumpics.ru/missing-battery-icon-on-laptop-with-windows-10/
Google Now Launcher app
Google has its own launcher, the advantage of which is its integration with the Google Now service (the user just needs to swipe left on the main screen of the phone). This option lacks a wide variety of personalization options, but all large icons are shown by default. Such icons are more readable.
The downside of this method is its availability - you can install the software only from the Play Market on a limited number of gadgets.
How to display the status bar in Excel 2016?
If you want to show the status bar in Microsoft Excel, check the Status Bar option; If you want to hide the status bar in Microsoft Excel, uncheck the Status Bar option.
Interesting materials:
Who won the voice kids 2022? Who won the Figure Skating Grand Prix 2022? Who won KHL 2022? Who won an apartment in the lottery? Who won the Emelianenko fight? Who wins the auction? Who bought channel 1? Who bought Philips? Who hatches from an egg? Who pays maternity benefits - the employer or the state?
What percentage of charge is on my phone?
Open your phone settings. In the Battery section, you will see the remaining charge percentage and the time to fully charge.
Interesting materials:
How to remove a neodymium magnet from metal? How to remove New Year's stickers from windows? How to remove a lampshade from a stretch ceiling? How to remove QR code on Samsung? How to skin a pike for cutlets? How to remove a switch from a mechanical keyboard? How to remove the base from a light bulb at home? How to remove the ban on incoming calls on Tele2? How does iPhone 4 shoot? How are sutures removed from the cornea?
Genesis of the problem
Mostly percentage jumps occur due to incorrect battery calibration. For the battery to work correctly, it must be discharged to zero and fully charged several times in a row. This will allow the device to remember the correct parameters and preserve the “health” of the battery for a long time. However, not all users can be patient and carry out such a procedure.
Many turn to specialists who use special programs for lightning-fast setup. In fact, this is just a myth. Since specialists reset the battery data in the files intended for this. In practice, this file contains only statistical data about the battery and does not affect its settings at all.
The use of programs disrupts the operation of sensors and drivers, which are designed to translate strange numbers into percentages of battery charge. Other reasons for problems with the correct operation of the battery include the following:
- failure to comply with the firmware update conditions;
- installing an update when the phone is almost empty;
- battery wear - you should purchase a new battery, there is an option to repair the old one, but, as a rule, this is a long and expensive procedure in which there is no point.
Using adb
You can also leave the Google USB Driver item, which is responsible for drivers. After this, you need to click on the install button. Now you need to wait a while. To run the tool, enter the following statement on the command line: cd C:\sdk-tools-windows-3859397\tools\bin, only the directory should be specified as the one into which the user unpacked the files.
Now you should go to your smartphone, go to settings, then go to device information, then click on the build number until the developer menu appears. Next, you should enter it and activate USB debugging.
After this, all that remains is to connect the smartphone to the computer, wait for the device to connect and install the drivers, or install them yourself. Next, all you have to do is enter a couple of operators on the same command line:
adb shell content insert —uri content://settings/system —bind name:s:status_bar_show_battery_percent —bind value:i:1
adb reboot
The device will reboot, the required indicator will appear and everything will work as it should.
First way
- First, we need to go to the settings of the smartphone. To do this, click on the gear in the notification shade or launch the settings shortcut through the launcher.
- Next, in the settings, open the “Screen” item.
In this case, only 4 modes are available:
- very large;
- average;
- small;
- very small.
Alas, in this method you cannot adjust the scale of the interface more widely; everything is limited to only four beams. But everything is very fast and convenient. Also, when you change the scale, there is a picture showing how the interface will look in different applications.
What does scale affect?
As we can see from the above screenshot, first of all it affects the amount of information on the screen in one frame. That is, the larger the scale, the more useful information from applications fits on the screen. Accordingly, it becomes more convenient to use a smartphone due to the fact that you do not always have to scroll through the screen to obtain hidden information. With a larger scale, there is more text and more pictures on the screen, because the interface itself takes up less space.
The example screenshot clearly shows that with a large scale there are four settings lines at once, while on a small scale there are only two. Thus, we increase the amount of information on the screen and make working with the gadget more convenient, faster and more comfortable.
It is also worth noting that such settings only affect the size of interface particles, without affecting the font size, inserted images, videos, photos, and so on.
When resizing the interface, only those parameters that are specified as a program change, and not as a graphic element. That is, if the picture is the same size, then it will not become smaller or larger with a change in scale, since the picture does not belong to the interface, it is already considered as content. Consequently, the size of the interface will not affect the display in any way in games, when watching movies in the player, in the gallery, and so on. This method makes the interface size only for system polygons, which are created in the form of code, not graphics.
The scale will be applied to the following parts of the system:
- System settings menu;
- Applications that do not have a special design (some messengers, customizers, etc.);
- Status bar and notification curtain;
- Application for calls and SMS;
- Calendar, mail, translator and other services from Google and other companies;
- Play Market (or Google Play);
- Unlock screen;
- Size of dialog boxes and icons in the launcher.
But these elements will not change:
- Remoteness of the screensaver;
- Distance between background images and live wallpapers;
- Browser pages and other web elements;
- Games;
- Video and music players;
- Pictures in galleries;
- Interface for incoming and outgoing calls;
- Font, that is, any text;
- Keyboard;
- And so on…
Why change the scale?
First of all, it can be changed to fit more information on the phone screen. This is especially useful if you often spend time on instant messengers, social networks, and so on.
Also, if the user constantly does not get to the right place on the screen, then for comfortable work it is necessary to adjust the interface so that the control buttons are larger. Accordingly, it will be easier to hit them.
As an example, look at these two screenshots. On one the scale is small, and on the other large:
Android interface scale
The screen scale changes to accommodate the maximum amount of information on it. At the same time, the size of windows and icons in the device interface changes.
First method
Don’t know how to solve a problem with your gadget and need expert advice? Alexey, a smartphone and tablet repairman at the service center, answers your questions. Write to me »
The following modes are available here:
By choosing this method, you will not have wide options for adjusting the interface scale. Here you are asked to choose one of 4 points.
This setup is done conveniently and quickly. While changing settings, a special picture is shown. It shows exactly what the interface will look like in different programs.
Second method
The method is more flexible, but also more complex. Here you can change the size at your own discretion to the smallest value or to the maximum possible, when the icons will occupy the entire screen.
To make icons larger or smaller, you need to activate the “For Developers” mode. Instructions:
Battery indicator on Android can be changed without Root
The battery charge indicator on Android in the status bar of the operating system interface is in most cases neutral, informative and compact.
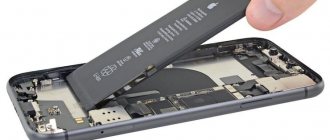
But there are devices (we encountered them from Lenovo and Motorola) where the icon:
In pursuit of beauty, developers could overdo the design, blur the font too much, or make a glitchy background. The owner of a rooted Android device can increase the battery charge icon, change it, even remove it completely or change it to suit his wishes. Can someone who does not use Root do the same? Maybe!
Minimal ADB and Fastboot for Windows
The size of icons on an Android phone screen depends on the pixel density per inch (DPI). To change this parameter using the Minimal ADB and Fastboot utility, follow these steps:
If your phone is rooted, then the DPI can be changed using a suitable file manager with root access, for example, ES file explorer.
The user will need to open the build.prop file in the /system directory. In this file you should find the line “ro.sf.lcd_density=” and enter the desired DPI value. Then we save the changes made and restart the phone.
Line setting
Not only can you remove notifications, but you can also customize other status bar components through your phone settings. For example, on Xiaomi devices the following parameters are available for change:
- notification icons;
- network speed;
- operator name;
- battery indicator type;
- hiding the cutout.
That is, you can change the icon symbolizing the charge level, and also turn on or off the display of data consumption speed when connected to the Internet. On some models it is also possible to enlarge or reduce icons. But no smartphone will allow you to completely abandon the top line, no matter how much you might want to.