Most smartphones based on the Google Android operating system are equipped with high-definition cameras that allow you to capture high-quality videos almost anywhere. However, limited internal storage is still a problem, which cannot store many videos, especially high-quality ones. An alternative solution is to get the video from your Android phone and free up space for your mobile phone.
There are many Android phone manufacturers. And although they all run on the Android operating system, the methods for transferring multimedia files are different. Therefore, we will tell you how to transfer videos from Android to computer in different situations.
- Part 1: Transfer Videos from Android to PC Using USB Cable
- Part 2: Transfer video from Android to computer via cloud service
- Part 3: Transfer Videos from Android to Computer Using Messaging Services
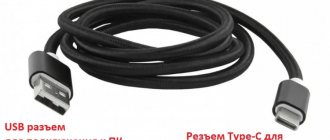
How to transfer video from your phone to your computer using a USB cable
The presented method of transferring video from a phone to a personal computer is the simplest and requires a USB cable to use it. In addition, this method is also the most popular, which is due to the fact that any personal computer has a USB connector, and each mobile device comes with a corresponding cable.
If this cable is lost, the user can purchase a new one at any hardware store. You can transfer video using the described method as follows:
- First you need to insert one wire into the phone, and the other into the corresponding connector on the personal computer;
- Next, you will need to open the “My Computer” tab on your personal computer and open the folder with the necessary multimedia. You can find this folder by clicking on the gadget you are using in the “Devices and drives” section;
- In this folder you will need to find the files that need to be moved to your mobile device;
- You need to copy the necessary files and click on the right mouse button, a drop-down menu will open in which you need to click on the “Copy” or “Move” button;
- Then you need to open on your personal computer the folder into which the user wants to move the video and click on the “Insert” button.
Important! It is worth noting that after the mobile device is connected to the personal computer, you must enable the “Connect as media device” option on the gadget.
Once all the steps described above are completed, the desired video will be in the storage of your personal computer. After this, the user can disconnect the smartphone from the PC.
What methods are there on Android?
There are several basic ways to transfer files from Android to PC. As a rule, they differ only in the required means. But additional programs can also be used to make the process easier. Nothing else is needed to carry out the operation. All basic information is presented in the table below:
| Method | Need additional tools (programs) | Algorithm execution complexity |
| Using a USB cable | No | Easily |
| Using Wi-Fi connection | No, but may be required in some cases | Average |
| With Bluetooth | No | Easily |
| Transfer via microSD and USB | No | Average |
| Using ShareIt | Yes | Average |
| Using a mail client | No, but it is possible to apply | Easily |
| Downloading files from instant messengers | No, but it is acceptable to upload for VK, Facebook and others | Easily |
| Using cloud storage | No | Easily |
Using a USB cable
The USB cable is the easiest way to transfer from Android gadgets. This means that there will be no special difficulties during the operation. The algorithm is simple, and is presented in just a few points:
- First you need to connect Android to Windows;
- Next, you need to check on your smartphone what mode the connection is in. By swiping the notification shade down, you need to find an item where you can find a non-deletable menu in which the USB setting is located. In it you need to click on “Data transfer” (or the item may be called differently);
- After this, a reconnection will occur and the gadget will appear as an additional disk in “My Computer” / “This Computer”. All you have to do is double-click on this device and the system will open. You can also open the memory card directory if it is installed in your smartphone;
- All that remains is to transfer all the necessary documents to your computer by selecting them, right-clicking on them and selecting “Copy” from the context menu. On the desktop, you also need to open the selection of actions and now select “Paste”.
You may be interested in: How to log out of your Google account on Android
Using Wi-Fi connection
You can also resort to wireless transfer methods to a PC. To do this, you will already need a common access point for both devices. Here is the algorithm that needs to be carried out in this case:
- First you need to turn on the Wi-Fi access point and connect from both devices to it;
- Next, go to the document manager from your smartphone and find the “Remote control” item. Also, the name “FTP” or “File Transfer” is possible;
- Once inside, all that remains is to copy the address from the gadget, enter it into the computer browser and go;
- At the end, access to all files on the device from the PC will be granted. You can download them and do whatever you want with them.
However, there may be an error during the operation. To correct this situation, you need to click on “Configuration”. After that, turn on the “Access for everyone” item and change the “Transmission encoding”. When carrying out all such operations, the means of moving files via Wi-Fi should work.
With Bluetooth
Bluetooth has long been a popular way to transfer files. This way it was possible to share various information with other mobile devices. However, this can also be done with desktop PCs that have the corresponding module. To use this feature you need to do the following algorithm:
- First you need to go through different points. First “Start”, then “Settings”, then “Devices”. There you need to turn Bluetooth to the “ON” position;
- On your smartphone you need to go to the file manager, select the files in the desired directory that you need to transfer to your PC;
- All that remains is to call up the context menu, highlight the “Transfer via Bluetooth” item and select the recipient.
If an error occurs, it is recommended to check whether the visibility of the gadget is enabled or not. If not, you need to activate it and repeat the procedure again. Typically, the procedure for transmitting via Bluetooth should work. Otherwise, you need to turn to other methods.
You may be interested in: Setting up Wi-Fi on an Android device in 1 minute
Transfer via microSD and USB
MicroSD and USB are things that users use often. They may also be needed if previous methods of transferring data from a smartphone to a PC do not help. To carry out such an operation, you need to perform the following simple procedure:
- First, install microSD or connect a USB drive to the phone;
- Copy all the necessary files to external media and disable the latter;
- All that remains is to connect an SD memory card or install a USB flash drive via USB to eventually transfer data from Android to a PC.
Using ShareIt
ShareIt, according to the developers, is the #1 tool for transferring files across devices. This is true. Everything happens easily and quickly. All you need is a shared Wi-Fi point, as well as the necessary files. The algorithm for using such a tool is small and does not take much time:
- First you need to download ShareIt on your smartphone and PC;
- A window opens on your computer with a QR code that you need to scan from your smartphone;
- By opening ShareIt on your phone, a user icon for pairing may appear on your PC. By clicking on it, you can open a file transfer window;
- All that remains is to select the necessary data and send it from your smartphone to your computer.
Using a mail client
Mail can also be a way to transfer files from Android to PC. However, one point is taken into account here. You need to either log into the same account from both gadgets or have 2 different ones. It is more profitable to choose the second option. The execution algorithm is as follows:
- You need to log into your email account from your smartphone. Next, select the destination for sending the letter;
- All that remains is to write a message, attach the necessary files (preferably in an archive), wait for the process to complete and indicate the recipient’s address - this will be an account on the PC;
- Next, when the letter is sent, you need to go to your email client or website on your PC, log into your account if authentication has not been carried out and open the letter with attached files;
- On your computer you need to click on the download button, the desired file (or group of files) will become available in the downloads folder.
You may be interested in: Root rights to Android via PC
It is also possible to use an email client. It differs from the site only in that it uses only a separate application. And no additional funds are needed. Although the differences are minimal, it is much more convenient to have a separate program for easily launching mail.
Downloading files from instant messengers
Messengers have a similar execution algorithm as in the case of mail. The main thing in this case is to have an account at hand. Login is required on both gadgets. For example, the algorithm from VKontakte:
- You need to create a conversation in the messages tab. The person who needs to be warned about such actions is added there;
- Then, the added user leaves the conversation and a dialogue between the person and himself is obtained;
- In the resulting single conversation, you need to add all the files that you want to transfer to your PC. They can be in almost any format. The main thing is to comply with the system requirements so that no problems arise during loading;
- Having moved to the PC, you need to log into your account on the website or in the messenger (at the discretion of the person), then select the dialog where all the files for downloading were sent and then carry out the operation (click on the document).
Using cloud storage
The last method you can try to transfer files from an Android gadget to a computer is the use of cloud storage. As a rule, they do not provide any difficulties in transferring files. And that means it’s easy to deal with this. It is enough to follow this procedure:
- An upload is performed, where all the necessary files end up on the disk, in the case of Android it will be Google Drive;
- On the computer, the user goes to the Google cloud storage site;
- Next, the “My Disk” tab will open. It requires you to find the desired file, run it, load it and manipulate it however you want.
How to download video from phone to laptop via cloud storage
Cloud storage is another great way to transfer necessary information via the Internet. Among all cloud services, the following are considered the most reliable:
- DropBox.
- Google Drive.
- Yandex. Disk.
- Mega.
The presented services have fairly minor differences, therefore, the video sending algorithm will be approximately the same:
- First, you need to download the cloud storage application on your mobile device;
- Next, you need to open the installed application and select the files that the user wants to download to the personal computer;
- Then you will need to open the cloud storage site through your personal computer, open the folder with the files and install them on your laptop.
It is worth noting that most cloud storage is provided for a fee. You can use only a small amount of storage for free (5-10GB). However, for copying a small number of videos this should be enough.
Thanks to the use of cloud storage, the user can completely abandon various external media, such as memory cards.
How to Record Screen on MacOS
How to Record Screen on MacOS
Are you part of the Apple army? You have several ways to record screen video without much hassle. There's actually a dedicated toolbar for taking screenshots, but you can also use Quicktime Player.
Toolbar Screenshot
- Turn on your MacOS computer and unlock the screen.
- Press Shift + Command + 5 .
- Now you can choose whether you want to record the entire screen or part of it. Make a choice.
- You can go to Settings to change some settings.
- Click Record .
- A Stop button will appear in the menu bar. Use it when you're done. You can also use Command + Control + Esc .
Transferring video via instant messengers
The most common messengers that we use every day can also be suitable for sending videos and other files. To send, you will also need to download one of the messengers both on your mobile device and on your personal computer:
- Viber.
- Telegram.
- WhatsApp.
After this, you will need to perform the steps described below:
- On your mobile device, you need to open the installed messenger application and log in to it;
- Next, you need to go into dialogue with yourself and click on the button to send multimedia data and attach the necessary videos;
- At the end, you will need to launch the same messenger on your personal computer, log in to your account and download the files.
Important! The quality of photos and videos is greatly compressed when sent via instant messengers and social networks. In this regard, it is recommended to add files to the archive in advance in order not to lose their quality.
How to Record Screen on Chrome OS
How to Record Screen on Chrome OS
Until recently, this feature was not available, but now Chrome OS makes it very easy to record screen videos. This is a built-in feature and is very easy to use.
- Turn on your Chromebook and unlock the screen.
- Press Shift + Ctrl + Show Windows .
- A menu will appear. Select the video camera icon.
- Choose whether you want to capture a full screen, partial screen, or window.
- Start recording:
- Full Screen Mode: Click anywhere on the screen to start recording.
- Partial Screen: Select the area of the screen you want to record. Then click the record button in the middle of your selection.
- Window: Select the window you want to record.
- A stop button will appear in the dock. Click on it to stop recording.
Those who have a Chromebook that can run Android apps can also use third-party Android apps. Some Chrome OS computers also support Linux apps, meaning even something like OBS can work if the device supports it.
How to transfer video from phone to computer via social network
On all social networks, users can send messages to themselves. This function can be used to transfer video from your phone to your computer if you don’t want to deal with third-party software.
An example of sending a video to a computer via a smartphone using the VKontakte social network:
- First you need to open the mobile application of the presented social network on your gadget;
- Next, the user must go to the “Messenger” tab and enter “Favorites” in the search bar;
- You need to open this dialogue and send videos to it;
- Then you will need to open the official VKontakte page on your personal computer and log in to the system;
- The user also needs to use the messenger and go to the “Favorites” dialog, from which he can download the sent video to his personal computer.
If the user was unable to find the “Favorites” section in the VK messenger, he will need to perform the following steps:
- In the “Messenger” section, you need to click on the “New message” button, which is located in the upper right corner;
- Next, you need to click on the “Search” button;
- A search bar will open in which you need to enter the user’s first and last name;
- After this, the system will automatically open a dialogue with “Favorites”.
How to Record Android Screen
Note. These steps were performed using Xiaomi ME 9 running Android 11. The steps may vary depending on your device and software version.
Function built into the phone
Android Q has built-in screen recording. When it first launched in public beta, it worked clumsily, but now the feature has been polished and anyone with Android 10 or higher can use it.
- Turn on your phone and unlock it.
- Swipe down to show quick settings. Swipe down again to expand the notification area.
- the Screen Recording quick setting .
- If you can't find it, click the pencil button and add screen recording to quick settings.
- When you're ready, tap the Screen Recording .
- You will have several options for recording audio and displaying touches on the screen . Make your choice.
- Click Start .
- Simply pull down the notification area and tap the big red section that says Tap to Stop to stop recording.
The entries will be saved in the gallery. You can find them there!
Send video to your email
If the user needs to send a small number of files, then email can be used to send video from one device to another. To do this, you will need to create a mailbox address in Google, Mail or Yandex, if it has not yet been created, and follow the steps described below:
- First, you need to open the mail application installed in advance on your mobile device and log in to the system;
- Next, you need to click on the “Write a letter” button and enter any message subject;
- After this, you need to click on the button to attach a multimedia file, attach it and click on the “Send” button;
- At the end, you need to open the same mailbox on your personal computer and download the files from the sent letter. The user can also send this letter to himself by entering his personal email address in the recipient field.
How to Record Screen in Windows 10
How to Record Screen in Windows 10
Xbox Game Bar
Windows 10 has a built-in Xbox Game Bar. This tool can be used as a screen recorder, among other things. It doesn't work for desktop recording or file explorer, but you can use it for anything as long as it's in full screen mode.
- Find the Xbox Game Bar app and launch it. Alternatively, you can use the Windows + G .
- Click on the widgets menu and select Capture if the Capture window is not already enabled.
- You can click on the Record button or use the keyboard shortcut Windows + Alt + R.
- A capture status window will appear somewhere on the screen. You can use it to stop recording and mute/unmute your microphone.
Unfortunately, not all Windows 10 computers support screen recording via Game DVR. If your computer does not meet the hardware requirements, you will have to install a third-party application.
Third Party Applications
You can also download a third-party application to record Windows screen. Some of them can be downloaded directly from the Microsoft Store. One of the most worthy OBS Studio. It's a free and open source product that allows you to record and stream what's on your computer screen.
- Download OBS Studio from this link. OBS Studio supports Windows starting from Windows 7, MacOS 10.13+ and Linux.
- Click the plus icon at the bottom of the Sources field to add a video or audio source. To record what you do on the screen, click on Screen Capture .
- Click Start Recording in the menu on the right side. To stop recording, click Stop Recording.
- Video files will be saved in the Video folder on the C: drive by default. You can change the save folder by clicking File - Settings - Output and making changes in the Recording section.
The steps given above are for recording your computer screen easily. However, this is a professional-grade application that gives you detailed control over almost every aspect of the screen and audio recording. If you're looking for a professional screen recording program, OBS Studio is a great option.
We use special applications
If you cannot send a video using one of the methods presented above, you can use one of the specialized applications for smartphones. These include:
- SHAREit
- Xender
- Zapya
The applications presented above work on approximately the same principle. Using the SHAREit utility as an example, the process of transferring files from one device to another will look like this:
- First you need to download this software on both devices;
- The mobile device and personal computer must be connected to the same Wi-Fi network;
- Then you will need to open the installed utility on your smartphone;
- The user must select the files that need to be sent to the PC and click on the “Send” button, indicating the name of the personal computer;
- You will only need to confirm the receipt of the sent files on your computer.
By default, sent files are stored on a personal computer in the application folder.
Conclusion:
According to a recent survey, people are more likely to record or watch video on their smartphone than they were three years ago, in part because the screen is now larger. However, people have complained that the limited storage forces them to frequently transfer videos from Android to computer. We've shared a few ways to help you do this quickly and easily. You can choose your favorite path and follow our instructions to get what you want. Click here to learn how to transfer other files from Android to computer easily.
Via Bluetooth
This method of transferring files is not the most convenient because various failures may occur during the sending process. In addition, the personal computer must have the Bluetooth module turned on.
This is done in the manner described below:
- On the mobile device, you need to switch the Bluetooth module to the active state;
- In the list of available devices, you need to find the personal computer you are using and connect to it;
- Then you need to connect two devices, entering a confirmation code if the system requests it;
- On your smartphone you need to find the necessary files with videos, select them and click on the “Share” button;
- A list of how the user can share the selected files will open, in which you need to click on the “Bluetooth” button;
- After this, the files will be sent to your personal computer.
Via memory card
This method is suitable if your mobile device has a memory card slot. In addition, to send the video you will need a card reader or a special slot in your personal computer.
This is done as follows:
- First, you need to upload the video on your mobile device to the memory card storage;
- Next, you need to turn off the device and remove the memory card from it, which then needs to be inserted into the card reader;
- The card reader connects to a personal computer;
- The user must open the “My Computer” folder on the PC and go to the section with the device connected to it;
- In the folder that opens, you need to copy the necessary videos and transfer them to your desktop;
- After this, you will need to safely remove the memory card from your personal computer and insert it back into your mobile device.
How to Record Screen on iPhone
How to Record Screen on iPhone
iPhone users can also record screens! This is also very easy to do. Follow the instructions below.
- Turn on your iPhone or iPad and unlock the device.
- Open the Settings .
- Go to Control Center .
- Tap the record .
- There will be a three second countdown on the display before recording begins.
- When you're done, go back to Control Center and click the Stop . You can also do this from the red status bar.
Transferring video over Wi-Fi
Simply transmitting video over a wireless network will not work. To do this, you will need to install additional software, such as MyPhoneExplorer. After installing the program, you will need to complete the following steps:
- First you need to connect both devices to the same Wi-Fi network;
- In the programs on both devices, you need to enable detection and enter the connection code on the smartphone;
- The created password is indicated on the personal computer to confirm synchronization;
- The desired folder opens and the files to be sent are selected; to do this, click on the “Copy” button;
- Then you need to paste the files onto your PC desktop.
4.2/5 — (5 votes)