Let's talk about how to hide sheets, as well as how to show hidden sheets in Excel , including how you can display very hidden sheets using Visual Basic.
Greetings to all, dear readers of the TutorExcel.Ru blog.
From time to time, the need arises to hide sheets in Excel either from the prying eyes of other users, or from ourselves, so that these same sheets do not distract or interfere with work.
The opposite need also arises - for partial or complete display of hidden sheets. In general, let's look at different ways to implement both hiding and showing sheets.
Hiding using program tools
A less popular method, but still, knowledge about it will not be superfluous.
- First, select the sheet that you want to hide.
- Go to the “Home” tab, click on the “Cells” tool, and select “Format” from the options that appear.
- In the list that opens, select “Hide or show” and then “Hide sheet”.
- The selected sheet will be hidden.
Note: if the size of the Excel window allows, the “Format” button will immediately appear in the “Home” tab, bypassing the “Cells” tool block.
Method 4: Turn off the filter
Filtering table data is an effective method of searching and organizing large amounts of data. However, using this tool makes some rows in the table hidden. Let's see how to remove the filter when it is no longer needed.
- We find a column that is filtered by a certain criterion. An active filter is indicated by a funnel icon next to an inverted arrow.
- Click on the filter icon and go to the window with filtering settings. To display the data, check the box for each value, or select the top item “Select all”. Then click OK.
- After canceling the filter, all hidden elements will be displayed in the table.
If the filter in the table is no longer needed , go to the “Data” tab, where we click the “Filter” button in the “Sorting and Filter” tool section.
How to return shortcuts
Let's see what a book should look like so that you can easily move from one sheet to another. Here they are. This is the bottom left corner of the default Excel workbook.
But someone in the lower left corner may have a completely different picture.
What should you do in this case, when when you open a book, it does not show a panel with bookmarks? Excel needs to be configured. If you have the 2007 version of the program, the path to the necessary settings is in OFFICE (located at the top left, in the very corner of the book) – EXCEL SETTINGS – ADDITIONAL – SHOW PARAMETERS FOR THE NEXT BOOK. Here we find the line SHOW LABELS and check the box. Click OK.
After this, the sheets will appear in the lower left corner of the book. If you have Excel 2003, then the path is as follows: SERVICE – PARAMETERS – VIEW. For versions 2010-2013: FILE – PARAMETERS – ADDITIONAL.
Content:
Microsoft Excel is one of the components of the Microsoft Office suite of office programs. This package is very popular among users because its functionality allows you to perform many actions, such as creating electronic documents, tables, presentations, databases, etc. Microsoft Office is often used to work or create important files that store valuable information.
Unfortunately, Microsoft Office, like the operating system itself, can experience glitches and errors. When such circumstances arise, the current files that were being worked on disappear without a trace, forcing the user to do all the work again. Below we will look at the main ways to recover lost files , and also give an example of how to properly configure a program that can ensure data security in the event of unexpected errors.
Restoring sheets
Navigation between sheets of the book is possible using shortcuts that are located on the left side of the window above the status bar. We will consider the issue of their restoration in case of loss.
Before we start studying the recovery algorithm, let's figure out why they might disappear in the first place. There are four main reasons why this can happen:
- Disable the shortcut bar;
- Objects were hidden behind a horizontal scroll bar;
- Selected shortcuts have been set to hidden or super hidden;
- Delete.
Naturally, each of these reasons causes a problem that has its own solution algorithm.
Enable the shortcut bar
If there are no shortcuts above the status bar in their proper place, including the active element shortcut, this means that their display was simply disabled by someone in the settings. This can only be done for the current workbook. That is, if you open another Excel file with the same program, and the default settings are not changed in it, the shortcut bar will be displayed in it. Let's find out how you can re-enable visibility if you disable the panel in the settings.
- Go to the “File” tab.
- Next, move to the “Parameters” section.
- In the Excel options window that opens, go to the “Advanced” tab.
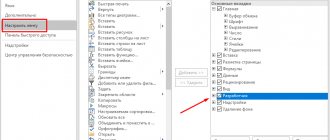
- On the right side of the window that opens are various Excel settings. We need to find the “Show options for the next book” settings block. This block contains the “Show Sheet Labels” option. If there is no checkmark next to it, you should check it. Next, click on the “OK” button at the bottom of the window.
- As we can see, after performing the above action, the shortcut bar is displayed again in the current Excel workbook.
Move the scroll bar
Sometimes there are cases where the user accidentally drags the horizontal scroll bar over the shortcut bar. Thus, he actually hid them, after which, when this fact is discovered, a feverish search begins for the reason for the absence of labels.
- Solving this problem is very simple. Place the cursor to the left of the horizontal scroll bar. It should transform into a double-headed arrow. Hold down the left mouse button and drag the cursor to the right until all objects on the panel are displayed. Here, too, it is important not to overdo it and not make the scroll bar too small, because it is also needed for navigating through the document. Therefore, you should stop dragging the bar as soon as the entire panel is open.
- As you can see, the panel is displayed on the screen again.
Enable showing hidden shortcuts
You can also hide individual sheets. In this case, the panel itself and other shortcuts on it will be displayed. The difference between hidden objects and deleted objects is that they can always be displayed if desired. In addition, if on one sheet there are values that are pulled up through formulas located on another, then if an object is deleted, these formulas will begin to display an error. If you simply hide the element, then no changes will occur in the functioning of the formulas; there will simply be no shortcuts for transition. In simple terms, the object will essentially remain as it was, but the navigation tools to navigate to it will disappear.
The hiding procedure is quite simple. You need to right-click on the corresponding shortcut and select “Hide” in the menu that appears.
As you can see, after this action the selected element will be hidden.
Now let's figure out how to show hidden shortcuts again. This is not much more difficult than hiding them and is also intuitive.
- Right-click on any shortcut. The context menu opens. If the current book contains hidden elements, then the “Show...” item in this menu becomes active. Click on it with the left mouse button.
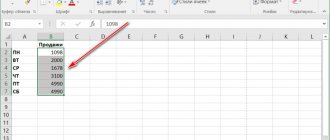
- After clicking, a small window opens, in which there is a list of hidden sheets in this book. We select the object that we again want to display on the panel. After that, click on the “OK” button at the bottom of the window.
- As you can see, the shortcut of the selected object is again displayed on the panel.
Microsoft Word Keyboard Shortcuts
In the Word program you can work not only with the mouse, but also using key combinations. This is convenient, especially if you have to perform the same actions often.
Work with documents:
- Ctrl + N: Create a new document.
- Ctrl + O: Open a document from a computer.
- Ctrl + S or Shift + F12: save (similar to the “Save” button).
- F12: save under a name (similar to “Save As”).
- Ctrl + W or Alt + F4: Close the document.
- Ctrl + F2: Preview before printing.
- Ctrl + P: Open the print window.
- Ctrl + F: search by text.
- F7: spell check.
Move through text:
- Arrows: Move the blinking cursor through the text. They are located on the numeric part of the keyboard (usually at the bottom). The right and left arrows move the cursor one letter, and the up and down arrows move the cursor one line.
- Ctrl + right/left arrow: Moves the blinking cursor one word.
- End: Move to the end of the line.
- Ctrl + End: Move to the end of the document.
- Home: Go to the beginning of the line.
- Ctrl + Home: Go to the beginning of the document.
- Page Up and Page Down: Moves the document up and down relative to the blinking cursor.
Highlight:
- Shift + right/left arrow: symbol (letter).
- Ctrl + Shift + right/left arrow: word.
- Shift + up/down arrow: line.
- Ctrl + Shift + up/down arrow: paragraph.
- Shift + End: From the blinking cursor to the end of the line.
- Shift + Home: From the blinking cursor to the beginning of the line.
- Ctrl + Shift + End: to the end of the document.
- Ctrl + Shift + Home: To the beginning of the document.
- Shift + Page Up or Page Down: Up and down one screen.
- Ctrl + A: Selects the entire document.
Editing text:
- Ctrl + B: Bold style.
- Ctrl + I: Italic style.
- Ctrl + U: underlined style.
- Ctrl + D: font settings.
- Ctrl + L: Left align.
- Ctrl + E: Center Align.
- Ctrl + R: Align Right.
- Ctrl + J: fit to width.
- Ctrl + M: Moves paragraph to the right.
- Tab: red line.
- Ctrl + Shift + L: Bulleted list.
- Ctrl + Shift + *: non-printing characters.
- Ctrl + 1: Single line spacing.
- Ctrl + 2: double spacing.
- Ctrl + 5: one and a half spacing.
- Ctrl + spacebar: clears the format of the selected text (resets to default font).
- Ctrl + Z: Undo last action.
- Ctrl + Y or F4: repeat the last action.
Removal:
- Backspace: Deletes one character (letter) before the blinking cursor.
- Ctrl + Backspace: Deletes one word before the blinking cursor.
- Delete: Deletes one character (letter) after the blinking cursor.
- Ctrl + Delete: Deletes one word after the blinking cursor.
Control Microsoft Word from the keyboard
In addition to hotkeys, there is another way to work in Word from the keyboard:
- Press Alt.
- Letter icons will appear at the top of the program.
- Press the key with the desired letter and use the suggested combinations.
For example, you need to change the size of the letters. So, first press Alt to activate the keyboard selection mode. Then, the key with the letter I to work with the “Home” tab.
Now press the combination FR (two keys at once).
The size selection field is activated.
Type the desired value and press Enter.
Sheets deleted
The most obvious option is that you accidentally deleted the sheets, so they are not displayed in the bottom panel. In this case, it will be extremely difficult to restore them. The only salvation is if you haven’t saved yet.
In this case, you just need to exit the program without agreeing to save it. This way, the original version of the document will be restored, where the sheets are still intact.
However, remember that in this case the latest changes in the document will not be saved. It’s good if you realized about the deleted sheets about five minutes after they were deleted. If you realized the mistake an hour later and have been editing the document all this time, this situation is more complicated. You will have to choose whether to save the changes or return the deleted sheets.
The second option to restore sheets is to try to find previous versions of the file, which are saved automatically.
Go to the “File” menu on the top panel. In the first tab “Information” we find “Versions” and look at what versions the program offers us. By default, autosave runs every 10 minutes. Select the one that was made before you removed the sheets.
Please note that this recovery option is possible when autosave mode is enabled in the settings.
Shortcuts panel
The shortcut bar may have been turned off. In this case, there will be no sheet labels on the bottom panel.
Go to the “File” menu again and select “Options” there.
In the “Advanced” section, scroll down the settings, reaching the “Book display options” item. Here we need to set the marker opposite “Show sheet labels”.
How to make a sheet very hidden?
Workbook sheets can be made very hidden. Such sheets cannot be displayed using standard Excel tools; when calling the context menu, the “Display...” item (in some versions it is called “Show...”) is not active. To make a sheet very hidden, you need to go to the VB (Visual Basic) editor, this can be done in different ways, but the easiest way is by using the Alt+F11 key combination, select the desired sheet in the VBA workbook project, and then in the “Visible” property of this sheet select the “xlSheetVeryHidden” parameter.
To return the sheet to visibility, you need to change the “Visible” property back to xlSheetVisible.
What is it about
Excel has three levels of sheet visibility: visible, hidden, and very hidden. The visible sheet appears in the sheet list of sheets in the workbook. hidden sheet is not displayed in the list, but it can be displayed using standard methods. The so-called Very Hidden Mode, which can only be installed and removed using macros.
Very hidden sheets are not displayed in the list of sheets, moreover, they are not displayed in the “Display Hidden Sheet” dialog box. Since most Excel users do not know about this method, it is convenient to use if you need to hide part of the information.
Useful Lifehack in Excel
To prevent inserting new rows and columns in Excel without using sheet protection, you need to do this:
- Go to the last cell relative to rows and columns XFD1048576. To do this, you can enter the cell address XFD1048576 in the name field and press Enter. And if the sheet is empty, you can press the hotkey combination CTRL+ → (left arrow) to move the cursor to the last column of XFD1, and then CTRL+ ↓ (down arrow) will move the cursor to the last cell of XFD1048576.
- Enter any value in the last cell XFD1048576, you can even use a space " ".
That's all, now you can't insert a row or column into the sheet. If you need to prohibit inserting only rows, then enter any value in the very last row (for example, A1048576). And if you prohibit inserting only columns, then enter any value in the last column (for example, XFD1).
Securely hide sheets that cannot be displayed using standard means (the Show option). Useful lifehacks for working with sheets and cells.
Using the sheets property in the code editor
To hide a sheet you need to:
- Open the code editor using the keyboard shortcut Alt+F11 .
- In the left menu, expand the project with the same name as your book.
- Find the sheet you want to hide in the list of objects.
- In the list of properties, find the property Visible and select from the list of values 2 – xlSheetVeryHidden.
To display a hidden sheet, you can set the value to -1 – xlSheetVisible .
general information
To begin with, we would like to draw your attention to one important detail. These are the symbols used in the list of button combinations below.
If one symbol “+” is specified, this should be interpreted as the preposition “AND”, and not pressing the plus sign on the keyboard. Those. the combination Ctrl+C means that you need to press the “Ctrl” and “C” keys.
If a double plus sign “++” is specified, this should be interpreted as “And press the plus sign on the keyboard along with the specified key.” Those. the combination Shift+C means that you need to press the “Shift” and “+” keys.
The designations F1, F2, F3... F10 mean pressing the corresponding keys at the top of the keyboard, and not a combination of the F key and a number.
Another important detail is the order of key presses. The service buttons always have priority – these are the three keys Alt, Ctrl and Shift. They should be pressed first. And only after them are the remaining buttons on the keyboard.
And finally, in macOS operating systems, and accordingly, keyboards for these systems, instead of the Control (Ctrl) , command (cmd) is usually used .
However, not all combinations below apply to macOS, and not all combinations necessarily change the Control key to command.
Let's sum it up
You can restore sheets in Excel using 5 methods:
- if they were deleted, do not save the changes or try to restore the previous version of autosave;
- move the scroll bar to the right so that it does not cover the sheet labels;
- enable the display of shortcuts in the program parameters;
- restore hidden sheets with two clicks;
- use the macro editor to restore super hidden pages.
Sources
- https://MicroExcel.ru/skrytye-listy/
- https://exceltable.com/nastroyki/skryt-pokazat-yarlyki-listov
- https://lumpics.ru/what-do-if-missing-sheets-excel/
- https://public-pc.com/propali-listy-v-excel-ishhem-poteryannye-stranitsy/
- https://macros-vba.ru/nadstrojki/excel/78-kak-otobrazit-vse-skrytye-listy-excel
- https://exceltable.com/vozmojnosti-excel/pokazat-i-skryt-list
- https://micro-solution.ru/projects/addin_vba-excel/sheets-visible
- https://tutorexcel.ru/knigi-i-listy/kak-skryt-i-pokazat-skrytye-listy-v-excel/
Cell selection
You may have noticed from the previous section that you use the arrow keys to move between cells, and the Ctrl key to change that movement. Using the Shift key to change the arrow keys allows you to expand selected cells. There are also several other combos to speed up your selection.
- Shift + Left/Right Arrow: Expand the selection cell left or right
- Shift + Space: select entire line
- Ctrl+Space: Select entire column
- Ctrl + Shift + Space: select entire worksheet