Formatting is a procedure during which all data is completely deleted from the media. In the case of conventional hard drives, such an operation can be performed virtually without restrictions, but what to do with solid-state SSDs? Since such drives have a limited number of data rewrite cycles, the question arises: is it necessary to format this type of disk? In our article we will describe in detail in which cases it is advisable to do this and how formatting can affect the performance of the device.
Software
The advantage of using third-party software to format an SSD is that it is (for the most part) impossible to waste the drive's resource due to incorrect process settings. Extra-system programs most often cannot use full formatting, since this is the prerogative of the operating system. Therefore, quick formatting is enabled, which, together with the TRIM command, allows you to delete files and reconfigure the disk without harming its durability and performance.
Method 1: EASEUS Partition Master
EaseUS Partition Master is a functional and intuitive (despite the recent discontinuation of Russian language support) program for performing many operations with disks and partitions. To format it, follow these steps:
- In the main application panel, select the disk that you want to format and click the “Format” button.
Decide on the “Partition label”, “File system” and “Cluster size” parameters, that is, “Partition label”, “File system” and “Cluster size”, respectively. After filling in the lines according to your preferences, click “OK” and the formatting process will begin.
How does an SSD work?
Traditionally, storage drives have been mechanical spinning drives (HDDs). They have magnetic disks called platters and drive arms that move across the platters to access the information written on them.
Since they are mechanical, it is a slow process. The drive arms must be manually moved across the platters to access the storage, causing a slight delay in retrieving data.
This worked for a long time and still works for certain types of files, but now we have flash-based hard drives: solid state drives (SSDs). So named because it has no moving mechanical parts.
SSD is a big step forward in storage technology as it has allowed for significantly faster read/write speeds.
But how does it work and why is it so much faster?
SSD storage consists of small transistors and wires that are constantly receiving signals. These signals will turn into ones and zeros on your SSD. Eventually, they accumulate and make up data that is written to disk.
Transistors make up cells, and cells make up pages. This is where the data is stored. The more pages on the disk, the more space there is to write data.
Chances are you've been using a flash drive for years: a USB flash drive. USB flash drives use similar technology to store information.
Instructions for installing Windows on SSD media
Currently, an ever-growing number of Windows and other OS users choose SSDs as the main storage devices in personal computers and laptops. This is due to the large number of advantages of this technology:
- high speed of functioning of the Windows operating system and applications in comparison with conventional HDDs;
- low power consumption and noise even at maximum load;
- high fault tolerance under overloads and adverse external conditions;
- optimization of the latest versions of Windows and non-Windows-like systems for working with SSDs.
Preparing installation media
If you already have a ready-made installation disk, you can skip this step and immediately begin installing the OS. If you don’t have one, then you will need a USB flash drive with at least 4 GB of memory. Creating an installation program on it will look like this:
- We insert the USB flash drive into the port and wait until the computer recognizes it. Open the explorer.
Let's start formatting the flash drive
Select NTFS mode and start formatting
Download the installation tool
We accept the license agreement
Select the option “Create installation media for another computer”
Select version, bit depth and language
We note that we want to create a USB drive
Selecting flash drives to create installation media
We are waiting for the media creation to complete
Press the Del key to enter the BIOS
We put the flash drive first in the system boot order
Complicated version
This method to format a new SSD (or old) suggests using the administration. The procedure is performed as follows:
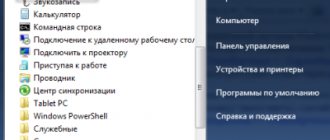
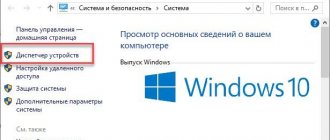
- Having activated the “Start” menu, launch “Control Panel”;
- here you need to find a section called “System and Security”;
- in it go to “Administration”;
- now double-click on the computer control point;
- on the left side of the window, find and activate the “Disk Management” section;
- after opening the list, select the one you need for formatting. Right-click on it and launch the corresponding process in the context menu;
- The settings window will appear in front of you again. Parameter values can be changed. But if you are not sure, then just leave it as is;
- press the button to start the procedure and just wait for it to finish.
Now let's figure out how to format an SSD via BIOS.
The Ultimate DIY Method
An SSD only really deletes data when it overwrites it. With this in mind, you can manually erase sensitive information on your hard drive by deleting all data on the drive in Windows Explorer. Fill with media files such as movies or music.
Once completed, all old data will be destroyed, making it unrecoverable. Then delete the media files and you will have a clean SSD. The SSD will be empty. And only random media files will be recovered.
This method only works for SSDs that do not have Windows 10 OS files on them.
An SSD solid-state drive differs in its properties and method of operation from a hard HDD drive, but the process of installing Windows 10 on it will not be much different; there is a noticeable difference only in preparing the computer.
Convenient third-party utilities
The third method involves using a third-party utility other than Erase HDD. These programs often create user-friendly environments reminiscent of Windows 10 for ease of use. Examples include the popular Parted Magic and Blancco Drive Eraser.
These utilities function almost identically to the manufacturer's tools. But, unfortunately, most often they have a price tag attached to them. They do, however, make the process much easier for the inexperienced user.
How to format a drive in Windows 10
In today's article, we'll look at various ways to format a disk in Windows 10.
Formatting is the process of preparing a storage device for initial use. When formatting, you can select the file system NTFS, REFS, exFAT, FAT32 or FAT. You also choose quick or full formatting. During a full format, files are removed from the volume and the disk itself is checked for bad sectors. During a quick format, files are deleted from the volume, but the disk is not checked for bad sectors.
Format disk in Explorer
1. Open Explorer => right-click on the drive you want to format and select “Format” (or select the drive you want to format, click on “Manage” in the top ribbon and select “Format”).
2. Select the file system and unit allocation size (it is better to use the default one), next to “Volume Label” write the name for the selected disk => for quick formatting - check the box next to “Quick”, for full formatting - uncheck the box next to “Quick” and click "Begin".
3. A warning message “Attention! Formatting will destroy ALL data on that drive. Click “OK” to start formatting, “Cancel” to continue.
When formatting is complete, you will see the “Format Complete” window, click “OK”.
Format disk in Disk Management
1. Open “Disk Management”: one way is to write diskmgmt.msc and press Enter (you can also right-click on the “Start” menu and select “Disk Management”).
2. Right-click on the drive you want to format and select “Format” from the context menu.
3. Next to “Volume label” write a name for the selected disk => select the file system => it is recommended to leave the cluster size at default => uncheck “Quick format” if you want to perform a full format => click “OK”.
4. “Formatting a volume will destroy all data on that volume. Before formatting, archive any data you want to keep. Do you want to continue?”, click “OK”.
Format disk on command line
1. Open Command Prompt as an administrator: one way is to right-click on the Start menu and select “Command Prompt (Administrator).”
2. Type the command Diskpart and press the Enter key => enter the command list volume and press the Enter key. Note the volume number you want to format. For example, we need to format drive F, after entering the list volume command we saw that it is “Volume 4”.
3. Enter the command select volume No. and press the Enter key (No. must be replaced with the number of the volume that you want to format). In our example, the volume number is 4 , which means the command will look like select volume 4
4. For quick formatting you need to use the command format fs= label="" quick For complete formatting you need to use the command format fs= label=""
For example, we want to run a quick format of the selected volume, select the “ntfs” file system and the name “Test Disk”, the command will look like this format fs=ntfs label=”Test Disk” quick
After entering the command, click OK.
During the formatting process, the percentage of completion is shown and when the process is complete, you will see the message “DiskPart successfully formatted the volume.”
Format a drive in PowerShell
1.Open PowerShell as an administrator: one way is to write PowerShell in the search bar, right-click on the result found and select “Run as administrator.”
2. Type Get-Partition and press Enter. A list of volumes will open, remember the letter of the volume you want to format.
3. For quick formatting, you need to use the command Format-Volume -DriveLetter “Volume Letter” -FileSystem -NewFileSystemLabel “Volume Label ” For complete formatting, you need to use the command Format-Volume -DriveLetter “Volume Letter” -FileSystem -NewFileSystemLabel “Volume Label” -Full
For example, I need to format drive F so that the file system type after formatting is “Ntfs” and its name is “Test Disk”, the command will look like this: Format-Volume -DriveLetter “F” -FileSystem NTFS -NewFileSystemLabel “test disk” -Full After entering the command, you must press the Enter key.
Source: https://vynesimozg.com/kak-formatirovat-disk-v-windows-10/
Paragon Hard Disk Manager
Paragon's once free Partition Manager is now included in the comprehensive Hard Disk Manager , where it has its own tab. To fully work with it, you will need to activate the corresponding functionality in your account. After this, you can perform various operations with the hard drives installed in the system.
The program supports the creation of partitions of various types, and you can select an arbitrary number from the space available on the drive. At the same time, you can specify the type of file system, as well as the preferred letter designation for it (the program works with Windows 7 SP1 and higher). For convenience, you can use system components that are directly responsible for formatting.
The program is convenient because it allows you to flexibly distribute free space between partitions. If you perform potentially dangerous actions, such as deleting a partition, the application will display a warning. Similarly, when formatting an existing partition, to avoid accidental erasure of data, you must check the box. Paragon Hard Disk Manager also supports converting HFS to NTFS and vice versa without reformatting the disk.
- Pros : a full range of actions with partitions, including creation/deletion/compression/expansion and formatting.
- Cons : all functionality is available after purchase, registration is required to operate with sections.
Disk Management
Next, let's talk about a more complex way to format an SSD. Now you will need to work with the previously mentioned administration:
- via the search bar, launch the “Control Panel” application. Among all the elements, find the administration section;
- after the transition, find the computer management section;
- On the left, find the paragraph called “Disk Management”. Here, find the required device and, after selecting it, launch the formatting window. Configure the parameters and activate the procedure.
Now let's talk about how to format an SSD if it is an external drive.
This computer
This is the shortest and easiest way. In fact, it can be called formatting directly. This is done as follows:
- Launch This PC. Use a shortcut or “Explorer”;
- From the list of connected media, select the one that needs to be formatted. Click on it with the right mouse button;
- in the context menu that opens, select the formatting function;
- After this, the already familiar settings window will open. Everything is the same here, if you are not sure, leave all the items as default;
- press the button to start the procedure and just wait for it to finish.
Secure Erase utility from the SSD manufacturer
Most, if not all, SSD manufacturers provide what is called a toolkit. Or a utility with various SSD-specific tools. Including secure erase feature. Secure erase is considered the most effective way to erase an SSD drive.
Secure erase completely clears the SSD of any data. Returns it to factory settings or as "out of the box". Data recovery programs will not be able to retrieve the data later.
Each toolkit works differently. And therefore, we recommend searching on the website of your hard drive manufacturer not only for the utility itself, but also for how to perform the removal. In many cases, the toolkit is loaded onto the SSD itself.
Examples of secure erase utilities include Samsung Magician, Intel Solid State Drive Toolbox, and Kingston SSD Toolbox.
For reference, let's take the Samsung Magician:
- Download the utility here from the Samsung website.
- Double-click the executable file and follow the installation wizard instructions.
- Open Samsung Magician and click "Secure Erase" in the menu. It is located at the bottom of the program window.
- Follow the instructions to run the secure removal utility. In most cases, you will need to create a bootable USB drive for the utility to work. As always, remember that the process completely erases the drive, including Windows 10.
Securely erase your data
To securely erase data from your SSD, you will need some software. In most cases, the manufacturer offers software specifically for its brand of drive.
The SSD I'm going to wipe today is my Western Digital Blue M.2, so I'll be using the WD SSD Dashboard software. After this, I will also show you how to use the BIOS to wipe your SSD (Note: Each BIOS is different and you will need to read the manual to find the settings on your motherboard).
Western Digital SSD Control Panel
The first thing that will greet you after installing the WD SSD Dashboard is, in fact, the Dashboard itself, which will look like this:
You'll use this control panel to navigate the software and use the various tools and monitors that come with it. The secure erase option is located in the Tools tab. This will give you a new look with more options.
Select Erase Disk from the menu on the left and follow the onscreen instructions. After this, your disk will be securely deleted, and you can recycle it without worrying about your information being recovered.
However, if you see a message that your SSD is in a security frozen state - like I have in the picture above - you'll need to follow a few extra steps to erase it. Essentially, freezing means it is locked to prevent accidental rubbing. In this case, you have several options.
Formatting with third-party applications and recovering files
To completely delete data on a solid-state drive (reset the SSD, so to speak), you can use the special Secure Erase function. This is a set of commands that completely clear the disk. This procedure is performed by the software of the device itself and is not associated with the operating system. Once information is deleted in this way, it will be impossible to recover it in the future.
To run Secure Erase, we recommend using the SSD manufacturer's dedicated program, such as Crucial Storage Executive or Samsung Magician. In addition to permanent formatting, Secure Erase can restore device performance if the SSD speed begins to degrade.
Secure Erase in Samsung SSD Magician program
You should use this formatting option only if you need to delete information without the possibility of its recovery or if there is a noticeable decrease in the speed of the solid-state drive.
It is also worth noting that to permanently delete files, it is not necessary to use Secure Erase, since with the TRIM function enabled, regular quick formatting can also delete data without the possibility of subsequent recovery.
However, as noted earlier, this function does not work under the following conditions:
- when using an external solid-state drive connected to a computer via a USB cable;
- with partitions on which there are varieties of the FAT and ex2 file systems;
- on most NAS drives, with the exception of a few models;
- if there is damage to the file system and the device itself;
- on most RAID arrays;
- when using operating systems from Microsoft released before Windows 7;
- on non-original SSDs in Apple computers.
Starting with the seventh version of Windows, as well as in MacOS, the TRIM function is automatically triggered after the user deletes a file. It is also activated by default if the SSD drive is connected to the computer in AHCI mode, which can be enabled in the motherboard BIOS. If a file is deleted using the TRIM function, it cannot be restored.
If this function is not activated, then after formatting the partition, files from the drive are restored using special applications.