What is cache in an Android phone?
What is application cache on Android? The cache is a specially allocated area of RAM, which is designed to save files necessary for the correct operation of installed applications. The main task is to optimize and speed up the operation of the mobile device.
The Android operating system needs to be periodically cleaned of cached garbage.
Cached data - what is it on Android? These are, for example, thumbnails in graphics viewing programs. Thanks to the cache, the system processor will not need to be reloaded to recalculate the image.
For your information! Browser cache stores the page layouts that the user visits most often to reduce wait time and wasted traffic.
What is cached data
The word Cache from English means “cache”. When a person first visits a website or opens an application or program, the phone automatically begins recording the page that appears - caching. The downloaded data remains on the device in the form of temporary or permanent files. When viewed again, the saved information allows you to quickly reproduce the original page.
There are 3 types of android hidden memory.
Dalvik-Cache
Temporary code files of installed applications are stored in an intermediate buffer and can be requested by the Dalvik virtual machine for quick access. All Android phones operate on this software.
It is recommended to delete such information only if serious problems arise with your phone. Cleaning actions are carried out when the device is turned on in a special mode, where all settings are reset.
Subsequently, the system can restore the lost files again.
System cache
The mobile device contains pre-installed programs. Their data is called system data. They are necessary for programs to function correctly. When deleting temporary files, their operation may fail.
It is considered inappropriate to clean the necessary programs.
Cache in applications on the phone
In programs that the user downloads from the Internet independently, cached data contains all the information about the application’s operation and settings. They take up a certain amount of memory.
Persistent files are created for quick entry into games and large programs.
A temporary cache is saved on the device when viewing videos, music and graphic files in installed programs. For example, when entering a page on social networks, old images appear in the feed immediately and can be displayed even without the Internet.
A local copy is created using a browser.
- How to knit a scarf-collar with knitting needles: patterns for beginners
- How to take folic acid when planning pregnancy for women and men
- Providing first aid for arterial bleeding
Why is clearing cache on Android important?
Many users, especially when their device is slow, wonder what it means to clear the cache on an Android phone. This procedure allows you to free up RAM and internal memory space, which will have a positive effect on the performance of the operating system. A significant disadvantage of using a cache is its constant growth.
What is Android TV - detailed information about the device
If you do not clean it regularly, this will inevitably lead to a lack of memory for the correct operation of the main applications. The result is that the data does not optimize the phone’s performance as it should, but, on the contrary, slows it down.
Note! Deleting cached data is completely safe if you follow certain rules.
Erasing data from running applications may cause a system crash. That is why it is recommended to first close, rather than minimize, all running applications.
Specialized software
Don't want to clear the cache manually? Install third party software. In addition to memory cleaning, applications are equipped with functions that allow you to speed up the device. Let's look at the best apps.
CCleaner
Download from the Play Store at: https://play.google.com/store/apps/details?id=com.piriform.ccleaner&gl=UA. The latest version introduces the “Application Statistics” feature. Shows how individual programs affect the performance of the device.
Power Clean
Download the utility from: https://play.google.com/store/apps/details?id=com.powerful.power.clean&hl=ru. Peculiarities:
- Deleting files unused for a long time;
- Battery performance analysis;
- Monitoring CPU load.
What types of cache are there on Android devices?
What are widgets for Android - detailed information
Cache memory in the Android operating system is divided into three types. You should familiarize yourself with the features of each in more detail:
- The system cache is designed for the correct operation of programs and applications that ensure the functioning of the smartphone operating system. An ordinary user will not be able to enter this section, since incorrect actions can lead to unpredictable consequences;
- Dalvik is an internal system area that is allocated for the memory of a virtual machine called “Dalvik”. Users are also denied access to this section, since deleting important system files will damage the mobile device;
- cached user application data is a section of internal memory that not only can, but also needs to be freed periodically. All recommendations on how to clear the cache relate specifically to this type of data.
It is necessary to clear the memory on your phone periodically
Having familiarized yourself with the main types of cache, you need to study the traditional methods of deleting it.
Why do you need to clear the cache?
After we have decided what cache is and what cached data on the phone means. It is necessary to clarify the question of why it is necessary to regularly clear the cache and delete data from it.
You also definitely need to know why the Thumbnails folder is needed, which takes up more than GB of your device’s memory, and how to delete it to free up a significant part of the Android device’s memory.
As your device operates, its Cache begins to fill up with a variety of different data. Photos you once looked at, sites you visited, applications you launched - all this leaves a trace in the memory of your device. Moreover, in most cases, such cached data is a useless burden, because there are many sites that we visited only once, applications that we launched only once, photos that we will never look at again, and so on.
Therefore, to prevent cached data from filling your device’s memory to capacity and contributing to the appearance of the DF-DLA 15 error, it is recommended to regularly clear the cache. I will tell you how to do this below.
What happens if you delete the cache on Android
Clear cache on Android - what does it mean? Many users worry that deleting this data will cause the gadget to malfunction or that user information will be lost, but this is not the case. Optimizing cache memory does not mean completely deleting the program, but only some files. This operation does not cause any harm at all; on the contrary, it improves the performance of the smartphone.
What are Google Play services - detailed information
The only thing to remember is that cached data contains information necessary for programs to launch and operate correctly. To prevent system crashes in some utilities due to clearing the cache, you must adhere to the following rules:
- Before clearing the RAM on your phone, you must close all active applications;
- Pre-save all important information that may be directly in the application itself.
Note! In most cases, after clearing the memory, re-authorization in the system is necessary. That is why you first need to make sure that the user remembers the login and password.
Clear cache (all browsers)
A cache is a temporary storage that contains certain information (pictures, videos, audio, etc.) that browsers use to speed up the loading of pages of websites that you have already visited.
The cache memory has limitations, upon reaching which the user may experience discomfort when using the browser. This is why the cache needs to be cleared from time to time. We’ll talk about how to clear the cache memory in the most popular browsers now.
Delete cache in Google Chrome
Go to the “Customize and manage Google Chrome” menu (at the very top, on the right, under the close browser button) → “Show additional settings” → “Clear history...” → “Images and other files.”
By default, cleaning is selected for the entire time the browser is used, but it is possible to change this value to cleaning per hour of use, per day, per week and month.
I would also like to note that by completing all the steps described above, you will lose:
- visited web addresses listed on the History page;
- cached text of visited pages;
- snapshots of the most frequently visited pages on the quick access page;
- all IP addresses extracted from pages visited.
Clear cache in Mozilla
Open the menu, the button of which is located at the very top, in the browser control panel, go to the settings on the “Privacy” tab, find “delete your recent history”, select the period for which you want to delete it, click “Details” and leave a checkmark on the “ Cache" and click on the "Delete Now" button.
In the “History” section you can set whether the browser will remember the history of site visits or not. If you do not want to clear the cache memory anymore, set “Will not remember history”.
Delete cache in Opera
The cache in the Opera browser is stored on the hard disk drive (HDD). You will be asked to choose to clear memory, increase memory, or disable caching.
For latest versions:
Click on the “Opera” icon at the top, select Settings (or Alt+P) → Security → in the “Privacy” section, click “Clear browsing history...” → check the “Clear cache” checkbox → select “from the very beginning” in the drop-down menu and confirm.
For version 12.17 and below:
Go to Menu → Settings → General settings (or Ctrl+F12) → Advanced → History. Opposite “Disk cache” click “Clear”. You can check the “Clear on exit” checkbox - cleaning will be done every time you close the browser and the memory will not become clogged.
Next, click “OK” or simply close the window.
Ways to delete cache
There are several ways to optimize device operation. All of them are equally effective and easy to implement.
Classic way
The safest way to free up RAM space is to use Android's internal tools. The operating system of the device is able to independently get rid of all unnecessary information and user data.
The instructions look like this:
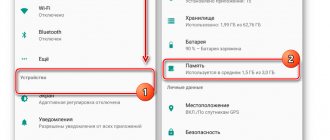
- Go through the path: “Settings” - “Storage” or “Memory” (the names of the sections may change depending on the phone brand and operating system version).
- Among the available options, select the “Cache Data” section. A pop-up window will appear on the display that says “All application cached data will be deleted.” To confirm the action, click on “Ok”.
The classic method of deleting cache using standard tools
That's all. It may take 2-7 seconds to remove unnecessary system files.
Third-party utilities for deleting cached data
You can get rid of unnecessary information using special applications, the main task of which is to optimize the operation of the gadget. You can find and download them from the Play Market.
Note! Recently, the most popular program is Clean Master. Using the utility is free.
To clear data, just open the program and go to the “Files in the Trash” tab. Next, you need to select the applications in which you want to delete the cache. Finally, tap on the “Clean JUNK” button.
What the program can do:
- frees up the amount of random access memory (RAM);
- the utility is able to control the operation of the microprocessor at all stages of algorithm processing;
- allows you to delete files without the possibility of recovery that have not been used for a long time;
- regularly displays notifications about the status of the mobile phone;
- analyzes the operation and condition of the battery;
- Performs quick uninstallation of programs and their components;
- cools the phone if necessary;
- automatically deletes identical files, leaving a single copy.
Other programs that are also popular:
- Power Clean is a multifunctional utility that can be used not only to remove garbage, but also to cool the processor, erase outdated and unused files;
- CCleaner is a functional program that is similar in interface design and set of tools to Clean Master;
- App Cache Cleaner is an add-on whose installation allows you to clean files automatically. It is also possible to transfer information to an external storage device - an SD card.
Interface of the Clean Master cleaning program
Note! On the Play Market platform you can see the entire list of programs, most of them are downloaded for free.
Clearing junk using Recovery
You can get rid of unnecessary cached data on all brands of smartphones, and the version of the operating system does not matter. The main condition is to enter Recovery mode. To do this, you need to simultaneously hold down a certain key combination. The volume up and on keys are mainly used.
How to get rid of junk using Recovery mode
As soon as the Recovery menu is displayed on the screen, the user needs to select the “Wipe Cache Partition” mode. Navigation is carried out using the volume keys, confirm the actions with the power button. That's all, in a few clicks all junk will be removed on your Android smartphone.
Removing the cache of one application
If you need to remove junk from one specific application without using third-party programs, you need to use the following instructions:
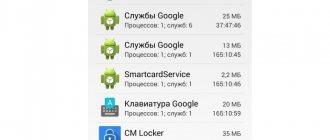
- On your mobile device, go to: “Settings” - “Applications” or “All”.
- From the list of installed programs, select the one you need and tap on it.
- Go to the “Storage” section and click on the active “Erase data” or “Clear cache” button.
Deleting the cache in a specific application
Important! The names of the sections may vary depending on the phone brand and firmware version.
Having figured out what a cache is, it’s easy to guess why this data needs to be cleared periodically. Proper “care” of the device allows you to optimize its operation, and the problem of bugs and glitches will be unfamiliar to the user. For beginners, the best option would be to install a cleaning program that effectively copes with the task and is easy to use.
Why do you need data caching?
Having determined that the cache is created by a variety of applications on an Android phone, you should understand why an intermediate buffer is needed at all. Its main role is to provide quick access to files. That is, the cache reduces the time it takes to launch programs and load data.
To make the role of cache even clearer, we should consider the principle of its operation using a specific example. Let's say a user opens websites through a browser. Moreover, he visits some resources with enviable regularity. If the data were not cached, each launch of site “A” would require a conditional 5 seconds of time. With cache, the period is reduced to one second.
Despite the obvious benefits of a cache, the intermediate buffer has a disadvantage. It takes up free space in the smartphone's memory, which could be occupied by full-fledged files.
The cache of other applications works similarly to the browser. The intermediate buffer reduces startup time, making interaction with your smartphone smoother.
Is it possible to delete the cache folder?
It depends on what exactly is inside. If there is only a cache, you can delete it, but only the contents; the folder itself does not need to be deleted.
If we mean /data/dalvik-cache, then you shouldn’t delete the folder itself, but you can delete the contents. An empty one still doesn’t load the system in any way, because it’s empty. It is important to understand that the cache will be restored in the future.
To answer the question whether to delete or not, you just need to find out what exactly is in the cache folder; if there is only a cache and no other data, then you can delete, but only the contents.
And of course, the best thing to do before making any changes/deletions in the system is to make a backup copy of Android, that is, a backup.
Russian Blogs
Preface
In the previous article, I suggested that everyone familiarize themselves with the process of executing a Volley network request.
This is a clearer picture of Volley. Starting with this article, we began to conduct an in-depth analysis of a certain Volley feature. Fully master the various functions of Volley. Let's start with the cache contents, but today's cache analysis is based on the previous source code analysis. Friends who have not read the previous article are recommended to read it first. Android Volley (1) Source Code Analysis, Network Request Process。
General design of the Volley cache
Before going into a detailed analysis, let's take a look at the design of the Volley cache. Understanding this process helps us understand the details of the cache. Volley provides a cache as a caching interface, encapsulates a cached Entry object and some regular add, delete and validate operations.
public interface Cache { Entry get(String key); void put(String key, Entry entry); void initialize(); /** * Invalid cache entry */ void invalidate(String key, boolean fullExpire); void remove(String key); void clear(); /** * Custom cached objects */ class Entry { public byte[] data; public String etag; public long serverDate; public long lastModified; public long ttl; public long softTtl; public Map responseHeaders = Collections.emptyMap(); public List allResponseHeaders; / ** Determine whether the entry period has expired. * / public boolean isExpired() { return this.ttl < System.currentTimeMillis(); } /** Determines whether a record should be updated. * / public boolean refreshNeeded() { return this.softTtl < System.currentTimeMillis(); } } } Copy code
The entry basically contains the original network response data, cache-related attributes, and the corresponding response header as a cache entity. The concrete implementation class of Cache is DiskBaseCache, which implements the Cache interface and implements the response method. Next, let's look at the DiskBaseCache structure. Let's first look at the static inner class CacheHeader in DiskBaseCache.
static class CacheHeader { long size; final String key; final String etag; final long serverDate; final long lastModified; final long ttl; final long softTtl; final List allResponseHeaders; private CacheHeader(String key, String etag, long serverDate, long lastModified, long ttl, long softTtl, List allResponseHeaders) { this.key = key; this.etag = ("".equals(etag)) ? NULL : etag; this.serverDate = serverDate; this.lastModified = lastModified; this.ttl = ttl; this.softTtl = softTtl; this.allResponseHeaders = allResponseHeaders; } CacheHeader(String key, Entry entry) { this(key, entry.etag, entry.serverDate, entry.lastModified, entry.ttl, entry.softTtl, getAllResponseHeaders(entry)); size = entry.data.length; } } Copy code
DiskBaseCache is very thoughtful. It puts a static inner class CacheHeader inside. We can find that this class is very similar to Entry of Cache. Does it seem a little redundant? The reason Volley designed it this way is mainly for caching purposes. rationality. We know that every application has a certain memory limit. The program takes up too much memory and is prone to OOM (Out of Memory). If each request is intact, all information is cached in memory, so it is very memory intensive.
We can find that the biggest difference between CacheHeader and Entry is whether there is a byte[] data attribute. The data is the metadata of the network response, which is the element that takes up the most space in the returned content, so DiskBaseCache re-abstracts the non-data element. CacheHeader and cache it in memory, and some of the data is stored in disk cache, so that the limited memory space can be used to the maximum extent. the code is shown below:
BufferedOutputStream fos = new BufferedOutputStream(createOutputStream(file)); CacheHeader e = new CacheHeader(key, entry); boolean success = e.writeHeader(fos); // write entry.data to disk fos.write(entry.data); fos.close(); // Cache cache in memory putEntry(key, e); Copy code
Secondly, the specific implementation of DiskBaseCache
Having read the Volley cache project, let's look at a specific implementation of DiskBaseCache.
2.1 Initialize cache
// Cache directory private final File mRootDirectory;
public DiskBasedCache(File rootDirectory, int maxCacheSizeInBytes) { mRootDirectory = rootDirectory; mMaxCacheSizeInBytes = maxCacheSizeInBytes; } @Override public synchronized void initialize() { // If mRootDirectroy does not exist, create it if (!mRootDirectory.exists()) { if (!mRootDirectory.mkdirs()) { VolleyLog.e(“Unable to create cache dir % s", mRootDirectory.getAbsolutePath()); } return; } File[] files = mRootDirectory.listFiles(); if (files == NULL) { return; } // Loop through all files in mRootDirectory for (File file : files) { try { long entrySize = file.length(); CountingInputStream cis = new CountingInputStream( new BufferedInputStream(createInputStream(file)), entrySize); // Cache the corresponding file in memory CacheHeader entry = CacheHeader.readHeader(cis); entry.size = entrySize; putEntry(entry.key, entry); } catch (IOException e) { file.delete(); } } } Copy code Create a DiskBaseCache instance using the rootDirectory and maxCacheSizeInBytes passed from outside. MRootDirectory represents our memory cache directory, and maxCacheSizeInBytes represents the disk cache size. The default value is 5 MB. If mRootDirectory is NULL, create it and then cache all files in mRootDirectory in memory.
2.2 Implementation of put() method
@Override public synchronized void put(String key, Entry entry) { pruneIfNeeded(entry.data.length);
File file = getFileForKey(key); try { BufferedOutputStream fos = new BufferedOutputStream(createOutputStream(file)); CacheHeader e = new CacheHeader(key, entry); boolean success = e.writeHeader(fos); fos.write(entry.data); fos.close(); putEntry(key, e); return; } catch (IOException e) { } } private void pruneIfNeeded(int neededSpace) { // If there is enough memory, just return directly. if ((mTotalSize + neededSpace) < mMaxCacheSizeInBytes) { return; } long before = mTotalSize; int prunedFiles = 0; Iterator> iterator = mEntries.entrySet().iterator(); // We go through all the files and start deleting files while (iterator.hasNext()) { Map.Entry entry = iterator.next(); CacheHeader e = entry.getValue(); boolean deleted = getFileForKey(e.key).delete(); if (deleted) { mTotalSize -= e.size; } iterator.remove(); prunedFiles++; // If there is enough storage space after deleting the file, stop the loop if ((mTotalSize + neededSpace) < mMaxCacheSizeInBytes * HYSTERESIS_FACTOR) { break; } } } Copy code You can see that the implementation of the Volley code is complete. Before adding cache, call the pruneIfNeed() method to estimate and process the memory space. If there is no limit, memory usage will increase indefinitely and finally reach the SD card. When the capacity changes, an exception is raised that cannot be written (because the storage space is full).
Here's one more point to add. When it comes to caching, Volley mainly uses the LRU (Least Recently Used) algorithm. The LRU algorithm is the least used algorithm. Its basic idea is to give priority to eliminating these least recently used caches when the cache is full. An object. The basic principle of the algorithm is to store recently used objects in the LinkedHashMap as a strong link (that is, the object reference method we usually use), and when the cache is full, remove the least recently used objects from memory. You can read about the LRU algorithm in this article: A thorough analysis of the Android caching mechanism - LruCache。
After estimating the memory footprint, save entry.data to disk and cache the CacheHeader in memory to complete the DiskBaseCache put() method.
2.3 Implementation of the get() method
Since this is a caching function, there must be a key for caching. Let's see how the Volley caching key is generated.
private String getFilenameForKey(String key) { int firstHalfLength = key.length() / 2; String localFilename = String.valueOf(key.substring(0, firstHalfLength).hashCode()); localFilename += String.valueOf(key.substring(firstHalfLength).hashCode()); return localFilename; } Copy code
Volley's cache key generation method is still very confusing: it splits the network request URL into two halves, and then concatenates the hash code of those two halves into a cache key. The main reason Volley wants to do this is to avoid duplicate filenames caused by duplicate hashCode. The chance of the hashCode matching another URL is twice that of one. However, a small probability doesn't mean it doesn't exist, and Java hashCode calculation is very fast. This should be Volley's decision after weighing safety and effectiveness. This idea is worth exploring.
@Override public synchronized Entry get(String key) { CacheHeader entry = mEntries.get(key); if (entry == NULL) { return NULL; } File file = getFileForKey(key); try { CountingInputStream cis = new CountingInputStream( new BufferedInputStream(createInputStream(file)), file.length()); try { CacheHeader entryOnDisk = CacheHeader.readHeader(cis); if (!TextUtils.equals(key, entryOnDisk.key)) { // The file can be mapped to two different keys and stored in different entries removeEntry(key); return NULL; } byte[] data = streamToBytes(cis, cis.bytesRemaining()); return entry.toCacheEntry(data); } finally { cis.close(); } } catch (IOException e) { remove(key); return NULL; } } Copy code
As we said above, Volley places the response data on disk and caches the CacheHeader in memory. The get() method is actually the reverse of this process. First, the CacheHeader is retrieved from mEntries via a key. If it is null, it will directly return NULL, otherwise get the data on disk by key and combine the CacheHeader and data into a complete entry by entry.toCacheEntry(data) and then return.
Third, using DiskBaseCache in Volley
After reading the concrete implementation of DiskBaseCache, let's finally look at how DiskBaseCache is used in Volley so that all of Volley's caching mechanisms can be connected in series.
3.1 Building DiskBaseCache
private static RequestQueue newRequestQueue(Context context, Network network) { File cacheDir = new File(context.getCacheDir(), DEFAULT_CACHE_DIR);
RequestQueue queue = new RequestQueue(new DiskBasedCache(cacheDir), network); queue.start(); return queue; } Copy Code You must remember the basic principles of using Volley. At that time, our first step was to use Volley.newRequestQueue() to create a RequestQueue, which was the starting point of everything. It can be seen that we first get the cache path via context.getCacheDir() and then create the cacheDir directory that we need for caching. This is actually mRootDirectory to DiskBaseCache, and then passing it to the DiskBaseCache constructor with only one parameter, creating a DiskBaseCache Instance, the default cache size is 5 MB.
private static final int DEFAULT_DISK_USAGE_BYTES = 5 * 1024 * 1024; public DiskBasedCache(File rootDirectory) { this(rootDirectory, DEFAULT_DISK_USAGE_BYTES); } Copy code
3.2 Calling the initialize() method
public class CacheDispatcher extends Thread { @Override public void run() { Process.setThreadPriority(Process.THREAD_PRIORITY_BACKGROUND);
mCache.initialize(); while (true) { try { processRequest(); } catch (InterruptedException e) { } } } } Copy Code initialize() is called in the execution method of the CacheDispatcher, which is the thread that processes requests in the cache queue. After instantiating the DiskBaseCache in a wireless while (true) loop, we wait for the request to arrive and then execute it.
3.3 call to put() method
public class NetworkDispatcher extends Thread { private void processRequest() throws InterruptedException { Request request = mQueue.take();
try { NetworkResponse networkResponse = mNetwork.performRequest(request); Response response = request.parseNetworkResponse(networkResponse); if (request.shouldCache() && response.cacheEntry != NULL) { mCache.put(request.getCacheKey(), response.cacheEntry); request.addMarker("network-cache-written"); } } } Copy Code You can see that the put() method is called in NetworkDispatcher, NetworkDispatcher is a thread that makes network requests, takes the request from the request queue and then executes the request. If the request needs to be cached (it should be cached by default) and the response's cacheEntry is not null, call the put() method of DiskBaseCache to cache the Entry.
3.4 call to get() method
public class CacheDispatcher extends Thread { @Override public void run() { mCache.initialize();
while (true) { try { processRequest(); } catch (InterruptedException e) { } } } private void processRequest() throws InterruptedException { final Request request = mCacheQueue.take(); // call the get() method to get the Entry Cache.Entry entry = mCache.get(request.getCacheKey()); if (entry.isExpired()) { request.setCacheEntry(entry); mNetworkQueue.put(request); return; } Response response = request.parseNetworkResponse( new NetworkResponse(entry.data, entry.responseHeaders)); if (!entry.refreshNeeded()) { mDelivery.postResponse(request, response); } } Copy Code We mentioned above that the initialize() method of DiskBaseCache is called in the run() method of CacheDispatcher. In fact, the get() method is the same. It loops endlessly on while (true). When a request arrives, it first retrieves the corresponding entry cached in memory from the requested URL, then performs some evaluation and processing of the entry, and finally converts it into a response callback.
summary
When calling Volley.newRequestQueue() method to get a RequestQueue, instantiate DiskBaseCache, call initialize() method of DiskBaseCache in run() method of CacheDispatcher to initialize DiskBaseCache and in run() method of NetworkDispatcher when the request is running, call put() method of DiskBaseCache. to cache it in memory and then call DiskBaseCache's get() method to create the appropriate response when the request is executed in CaheDispatcher's run() method and finally distribute it.
When to delete cache
Cache data on the phone can and should be deleted, preferably 1-2 times a month.
Many people do not clean their own phone at all, because cached data is created in order to speed up the loading of programs and websites. But, if there is not much memory on your smartphone, over time the drawbacks of the cache will be noticeable - it will overflow with unnecessary data, taking up the lion's share of free space.
When using a new phone that does not yet have a bunch of programs installed, system slowdowns do not bother you. But, after a couple of months of active use, the Android smartphone begins to slow down significantly. The fact is that photos, videos, music are saved in the cache, and when the memory is full, along with a lack of free space, brakes appear.
Cache data on your phone can and should be deleted, preferably 1-2 times a month. This will free up device memory and reduce the likelihood of system errors.
The signal for cleaning will be the fact that some programs have stopped functioning normally, for example, they are experiencing crashes or crashes.